Marketing Lists: To Create a Static Marketing List
The following activity demonstrates how to create static marketing lists and add members to it.
Story
Suppose that you are Bill Owen, a marketing manager of the SweetLife Fruits & Jams company. You need to create a new marketing list that includes leads from bakeries and restaurants with confirmed contact information, contacts and leads from a previously prepared marketing list, and members of one of the company's existing marketing campaigns. These members will receive a special offer from the company with 30 percent off the price of citrus juicers.
Configuration Overview
In the U100 dataset, for the purposes of this activity, the following tasks have been performed:
- On the Enable/Disable Features (CS100000) form, the Customer Management feature has been enabled. This feature provides the customer relationship management (CRM) functionality, including lead and customer tracking, as well as the handling of sales opportunities, contacts, marketing lists, and campaigns.
- On the Leads (CR301000) form, two leads
(which will be added to a marketing list manually) of the CAFE and
BAKERY classes with the following lead IDs have been added to the
system:
- Leslie Walker
- Leonard Hemmings
- On the Marketing Lists (CR204000) form, the Cooks marketing list with five members has been defined.
- On the Marketing Campaigns (CR202000) form, the Juice for Bakeries marketing campaign with four members has been added.
Process Overview
In this activity, on the Marketing Lists (CR204000) form, you will do the following:
- Create a static marketing list
- Add members to the static marketing list manually
- Add members to the marketing list by using an inquiry
- Add members to the marketing list by using another marketing list
- Add members to the marketing list by using another marketing campaign
- For some members of the created marketing list, cancel the subscription
System Preparation
Before you start creating marketing lists, you should do the following:
- Launch the MYOB Acumatica website with the U100 dataset preloaded.
- Sign in to the system as marketing manager Bill Owen by using the following
credentials:
- Username: owen
- Password: 123
- Make sure that on the Company and Branch Selection menu, in the top pane of the MYOB Acumatica screen, the SweetLife Head Office and Wholesale Center branch is selected.
Step 1: Creating a Static Marketing List
To create a static marketing list, do the following:
- On the Marketing Lists (CR204000) form, add a new record.
- In the Summary area, specify the following settings:
- Marketing List ID: JCR30OFF
- List Name: Citrus Juicers at a 30% Discount
- Status: Active
- On the form toolbar, click Save.
You have created a static marketing list. You can now add and remove list members, or unsubscribe them from the marketing emails according to your needs or preferences, as described in the following steps.
Step 2: Adding Individual Members to a Static Marketing List
Now you will manually add two members, Leslie Walker and Leonard Hemmings, to the static marketing list you created. While you are still viewing the Citrus Juicers at a 30% Discount marketing list on the Marketing Lists (CR204000) form, do the following:
- Go to the List Members tab.
- Add the members to the static marketing list as follows:
- On the table toolbar, click Add Row.
- In the Member Name column, select Leslie Walker. The system adds a row with the lead's data to the table.
- On the table toolbar, click Add Row.
- In the Member Name column, select Leonard Hemmings. The system adds a row with the lead's data to the table.
- On the form toolbar, click Save.
You have added two members to the marketing list manually.
Step 3: Adding Multiple Members to a Static Marketing List by Using a Generic Inquiry
To add multiple members to the marketing list by using a generic inquiry, while you are still viewing the Citrus Juicers at a 30% Discount list on the Marketing Lists (CR204000) form, do the following:
- On the table toolbar of the List Members tab, click , as shown in the following screenshot.
Figure 1. Addition of the members by using the generic inquiry 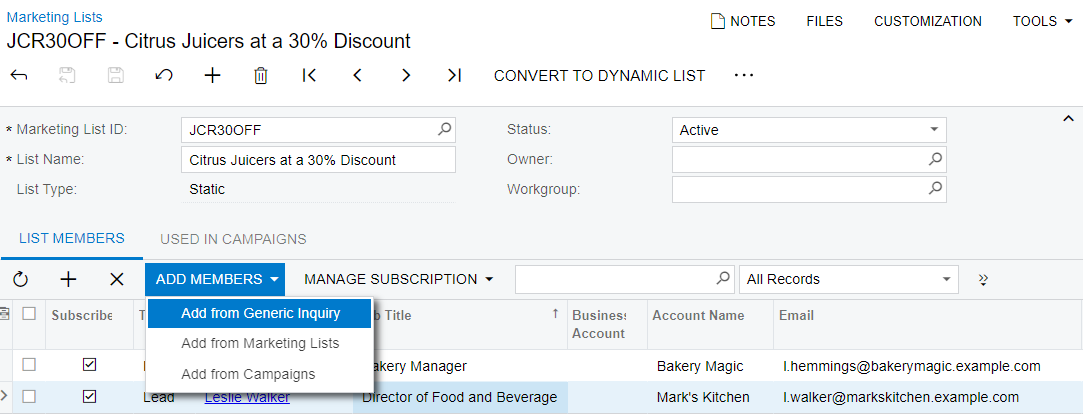
- In the Add Members dialog box, which opens, do the
following:
- In the Generic Inquiry box, select the BI-Leads generic inquiry, which is predefined (available in an out-of-the-box system).
- In the Shared Filter box, select the Leads
Ready for Sales shared filter, which has been defined for the
selected generic inquiry. This filter contains only leads that have the
Open status.Tip:
- MYOB Acumatica also provides the following predefined generic inquiries,
which can be specified in marketing lists:
- CR-Contacts2018R1 to add contacts
- CR-Opportunities2018R1 to add contacts related to opportunities
- In this dialog box, you can select any shared filter that is available for the specified inquiry form. This gives you the ability to select members from only the relevant records. For details on shared filters, see Managing Advanced Filters.
- MYOB Acumatica also provides the following predefined generic inquiries,
which can be specified in marketing lists:
- Click Add. The system closes the dialog box and adds the leads to the marketing list.
You have added multiple members to the marketing list by using a generic inquiry.
Step 4: Adding Multiple Members to a Static Marketing List by Using a Marketing List
To add multiple members to the marketing list by using another marketing list, while you are still viewing the Citrus Juicers at a 30% Discount list on the Marketing Lists (CR204000) form,do the following:
- On the table toolbar of the List Members tab, click .
- In the Add Members from Marketing Lists dialog box, which
opens, do the following:
- Select the Selected check box in the row with the Cooks marketing
list, as shown in the following screenshot.
Figure 2. Addition of the members through a marketing list 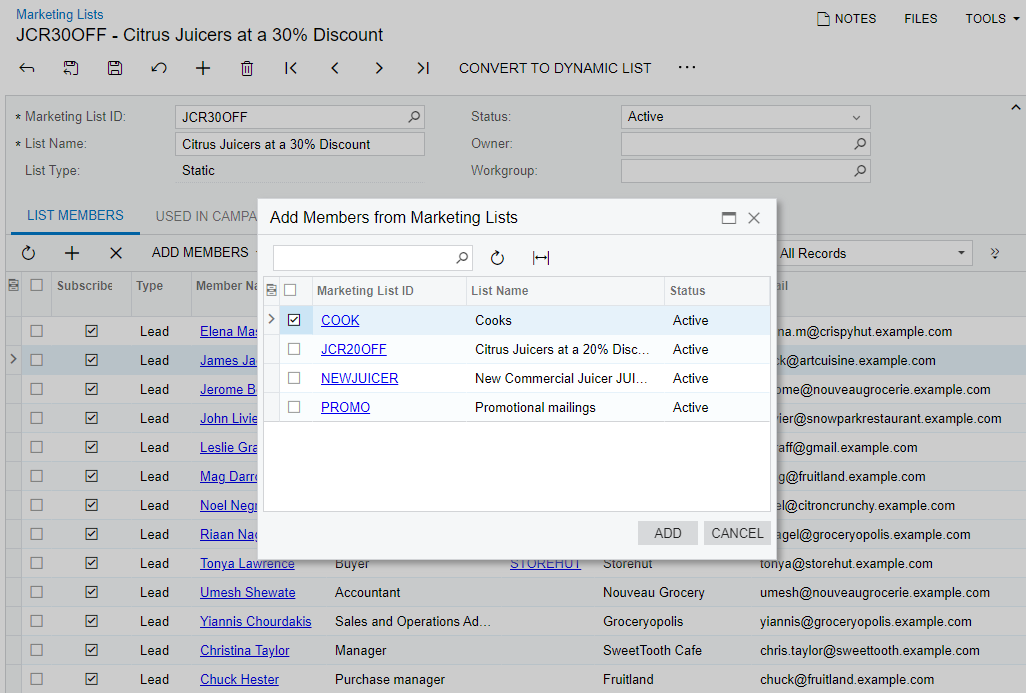
Tip:- You can select as many marketing lists as you need to add their members to the current marketing list.
- If the table contains a large number of marketing lists, you can use the Search box at the top of the dialog box to find a specific list.
- You can expand this dialog box to a full screen by clicking
the
 icon in the top right corner of
the dialog box. This may make it easier to see all the
settings of the marketing lists.
icon in the top right corner of
the dialog box. This may make it easier to see all the
settings of the marketing lists.
- Click Add. The system closes the dialog box and adds the members to the marketing list.
- Select the Selected check box in the row with the Cooks marketing
list, as shown in the following screenshot.
You have added multiple members to the marketing list by using another marketing list.
Step 5: Adding Multiple Members to a Static Marketing List By Using a Marketing Campaign
To add multiple members to the marketing list by using a marketing campaign, while you are still viewing the Citrus Juicers at a 30% Discount list on the Marketing Lists (CR204000) form, do the following:
- On the table toolbar of the List Members tab, click .
- In the Add Members from Campaigns dialog box, which
opens, do the following:
- Select the Selected check box in the row of the Juice for
Bakeries marketing campaign.Tip:
- You can select any number of marketing campaigns to add their members to the current marketing list.
- If the table contains a large number of marketing campaigns, you can use the Search box at the top of the dialog box to find a specific campaign.
- You can expand this dialog box to a full screen by clicking
the icon in the top right corner of
the dialog box. This may make it easier to see all the
settings of the marketing campaigns.
- Click Add. The system closes the dialog box and adds the members from the marketing campaign to the marketing list.
- Select the Selected check box in the row of the Juice for
Bakeries marketing campaign.
You have added multiple members to the marketing list by using a marketing campaign.
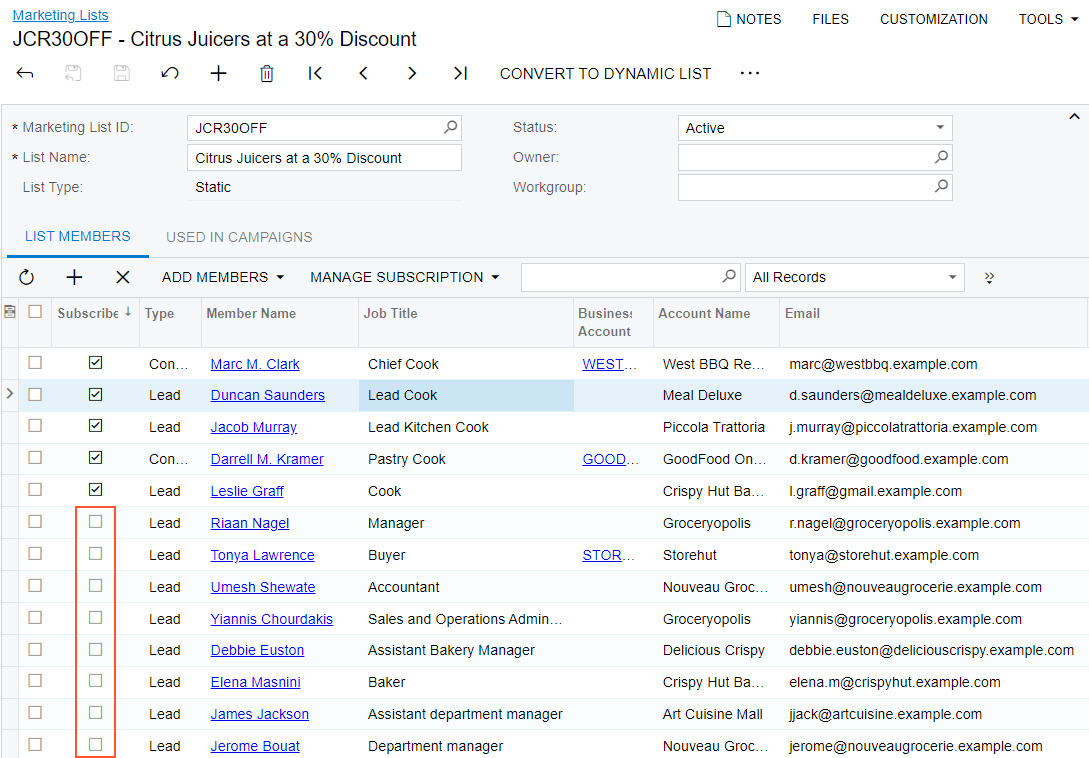
Step 6: Unsubscribing Multiple Members From the Marketing List
Suppose that you need to temporarily cancel the subscription (that is, cancel marketing mailings for some or all members of the marketing list, but do not remove them from the marketing list) for all the members of the marketing list except those who work as cooks, because you want to initially use this marketing list only for cooks.
To cancel the subscription for most of members of the marketing list, while you are still viewing the Citrus Juicers at a 30% Discount list on the Marketing Lists (CR204000) form, do the following:
- On the table toolbar of the List Members tab, click .
- Click the header of the Job Title table column.
- In the Sorting and Filtering Settings dialog box, which opens, apply the filter with the Contains condition, type Cook in the Search box, and click OK. As a result, the table contains five records with the following cooks: Marc M. Clark, Jacob Murray, Duncan Saunders, Darrell M. Kramer, and Leslie Graff.
- On the table toolbar, click to subscribe all of the rows that are currently listed (because of the filter).
- Remove the filter for the header of the Job Title column to make sure that the other members of the marketing list remain unsubscribed.
You have temporarily canceled the subscription for part of the members of the marketing list without removing them from the marketing list, as shown in the following screenshot.