
Marketing Campaigns: Process Activity
The following activity demonstrates how to create a marketing campaign in the system and change the stages of the marketing campaign.
Story
Suppose that you are Bill Owen, a marketing manager of the SweetLife Fruits & Jams company. SweetLife management has decided to launch a marketing campaign that will promote online master classes focused on teaching the audience how to use juicers that the company sells. You need to create the marketing campaign, add members, and after the campaign has finished, change the stage of the campaign to Completed in preparation for analyzing the campaign results.
Configuration Overview
In the U100 dataset, for the purposes of this activity, the following tasks have been performed:
- On the Enable/Disable Features (CS100000) form, the Customer Management feature has been enabled: This feature provides the customer relationship management (CRM) functionality, including lead and customer tracking, as well as the handling of sales opportunities, contacts, marketing lists, and campaigns.
- On the Campaign Classes (CR202500) form, the MSTRCLASS campaign class has been created.
- On the Leads (CR301000) form, a number of leads have been created, including Jonas Clayton and Douglas Keatinge.
- On the Marketing Lists (CR204000) form, the JCR20OFF marketing list, which includes a number of leads (Leslie Walker, Leonard Hemmings, Paul Mitchell, Nicholas Langdon, and Jacob Murray), has been added to the system, as described in Marketing Lists: To Create a Static Marketing List.
Process Overview
In this activity, you will do the following on the Marketing Campaigns (CR202000) form:
- Create a marketing campaign.
- Add members to the marketing campaign.
- Change the stage of the marketing campaign.
System Preparation
Before you start creating a marketing campaign, you should do the following:
- Launch the MYOB Acumatica website with the U100 dataset preloaded.
- Sign in to the system as marketing manager Bill Owen by using the following
credentials:
- Username: owen
- Password: 123
- Make sure that on the Company and Branch Selection menu, in the top pane of the MYOB Acumatica screen, the SweetLife Head Office and Wholesale Center branch is selected.
- Download the CRMContactImport.xlsx file, which has new contacts, to your computer.
Step 1: Creating a Marketing Campaign
To create a marketing campaign, do the following:
- On the Marketing Campaigns (CR202000) form, add a new record.
- In the Summary area, do the following:
- In the Campaign Class box, select MSTRCLASS.
- In the Campaign Name box, type the name of the campaign: Juice Master Class.
- In the Stage box, select Planning.
- On the Campaign Details tab, specify the campaign
settings as follows:
- In the Start Date box, specify 1/30/2025.
- In the Workgroup box, specify Marketing.
- In the Expected Response box, specify 5 (the number of responses to the campaign that you expect).
- In the Planned Budget box, specify 700.
- In the Expected Return box, specify 3500.
- In the text area, add the following description of the marketing campaign: A marketing campaign that promotes online master classes focused on teaching the audience how to use juicers.
- On the form toolbar, click Save.
You have created a marketing campaign. Now you can add members to this campaign.
Step 2: Adding Individual Members to the Marketing Campaign
To add members to the marketing campaign one by one, do the following:
- While you are still viewing the Juice Master Class campaign on the Marketing Campaigns (CR202000) form, open the Members tab.
- On the table toolbar, click Add Row to add a member to the marketing campaign.
- In the Member Name box, select Jonas Clayton. The system adds a row with the lead's data to the table.
- On the table toolbar, click Add Row to add another member to the marketing campaign.
- In the Member Name box, select Douglas Keatinge. The system adds a row with the lead's data to the table.
- On the form toolbar, click Save.
You have added two individual members to the marketing campaign one by one.
Step 3: Adding Multiple Members to the Marketing Campaign by Using a Marketing List
Suppose that one more marketing campaign has already been launched: SweetLife offers citrus juicers at a special price to the leads with confirmed contact information to increase sales. These leads have been added to the Citrus Juicers at a 20% Discount (JCR20OFF) marketing list, and you need to add these members to the marketing campaign.
To add multiple members to the marketing campaign from the marketing list, do the following:
- While you are still viewing the Juice Master Class campaign on the Marketing Campaigns (CR202000) form, open the Marketing Lists tab.
- In the Selected column, select the check box in the row with the JCR20OFF marketing list.
- On the form toolbar, click Save.
- In the Confirmation dialog box, which opens, click Update to update the campaign members.
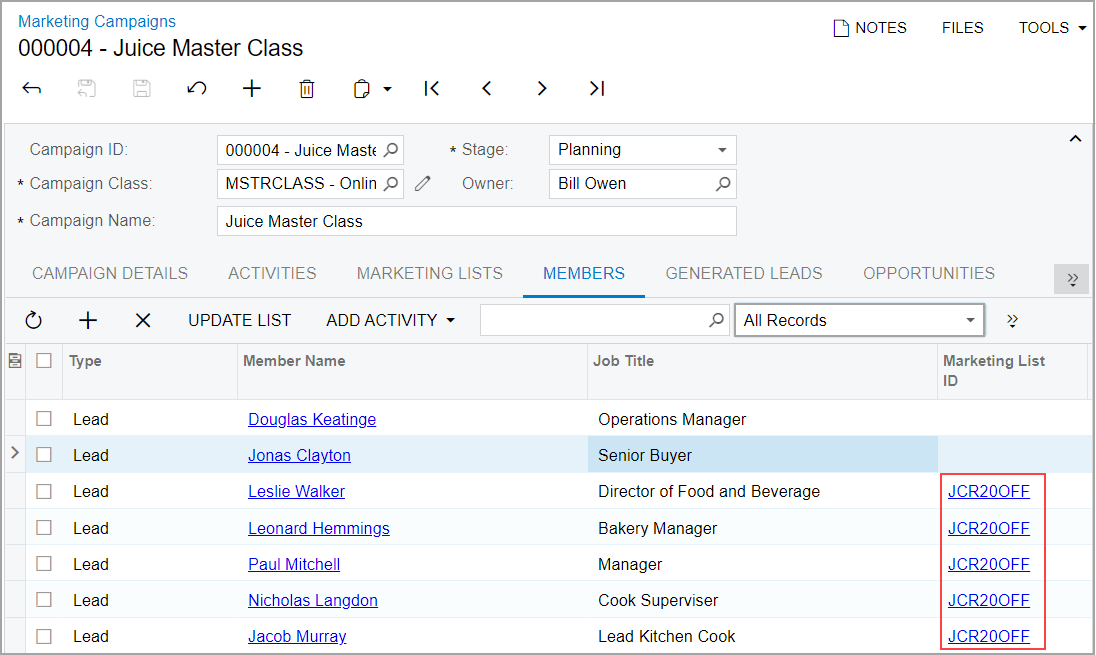
You have added members from the marketing list to the marketing campaign.
Step 4: Uploading with the Creation of New Contacts
Suppose that your colleague has given you a list of new contacts who might be interested in participating in the online master class. You have created an Excel file with these contacts, and now you are ready to add them to the marketing campaign. You want the system to create a new contact for each listed contact that is not already defined in the system.
To upload the new contacts from the file, you will use the Load Records from File button. While you are still viewing the Juice Master Class campaign on the Marketing Campaigns (CR202000) form, do the following:
- On the table toolbar of the Members tab, click Load Record from File.
- In the File Upload dialog box, which opens, click Choose File, and select the CRMContactImport.xlsx file, which you previously downloaded to your computer.
- Click Upload to upload the file to the system.
- In the Common Settings dialog box, which opens, leave the default settings, and click OK.
- In the Columns dialog box, which opens, notice that the system automatically matches most values in the Column Name and Property Name columns. Leave the default values in the columns, and click OK.
- After the system has finished uploading the members to the form, click
Close in the Processing dialog
box.
The system closes the dialog box.
- On the Members tab, make sure that the new contacts have been added to the campaign.
- Optional: Click the link in the Member Name column of one of the uploaded contacts to make sure that a new contact has been created in the system. The system opens the contact on the Contacts (CR302000) form in a pop-up window.
Step 5: Changing the Stage of the Marketing Campaign
Suppose that the Juice Master Class campaign has been launched and then completed.
To change the stage of the marketing campaign, do the following:
- While you are still viewing the Juice Master Class campaign on the Marketing Campaigns (CR202000) form, in the
Stage box of the Summary area, select
Execution.Tip:On the Activities tab, you can add activities that are related to the launch, execution, and completion of the marketing campaign, as described in Managing Emails and Activities.
- On the form toolbar, click Save.
- In the Stage box of the Summary area, select Completed to record in the system that the marketing campaign has been completed.
- On the form toolbar, click Save.
- On the Members tab, review the list of the members of the
Juice Master Class marketing campaign (see the following screenshot).
Notice that the list of the members includes all members that had been added to
the campaign both manually and automatically.
Figure 2. List of members of the marketing campaign 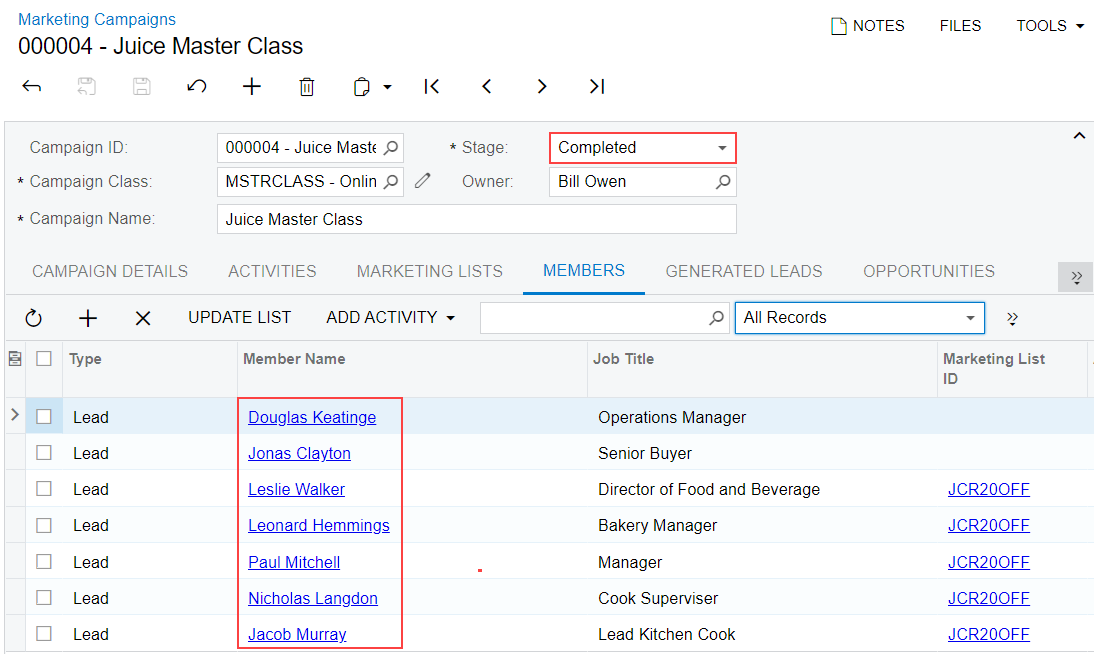
You have completed the processes of creating the marketing campaign and changing the stages of the marketing campaign.