Emails and Activities: To Create an Event
The following activity will demonstrate how to create an event.
Story
Suppose that you are David Chubb, a sales manager of the SweetLife Fruits & Jams company. You have sent the company's price list to Donna Coleman, a buyer at Yummy Supplies supermarket. Donna has studied the price list and would like to discuss the company's offer on juicers. You want to invite your colleague Jeffrey Vega, who maintains juicers at SweetLife, to the call. Also, Donna wants to invite her colleague, Jim Berry, who maintains juicers at Yummy Supplies. Jim's email address is jim.berry@yummysupplies.example.com, and his contact information has not been added to MYOB Acumatica yet. You need to schedule a conference call and invite Donna, Jeffrey, and Jim to the call.
Because you work in New York, your time zone is Eastern Time, which is Greenwich Mean Time (GMT) minus five hours.
A day before the call, Donna informs you that she will be on a business trip in Phoenix, and you need to adjust the time zone and choose the time that fits Donna's time zone, which is Arizona, Greenwich Mean Time minus seven hours.
Configuration Overview
In the U100 dataset, for the purposes of this activity, the following tasks have been performed:
- On the Enable/Disable Features (CS100000) form, the Customer Management feature has been enabled: This feature provides the customer relationship management (CRM) functionality, including lead and customer tracking, as well as the handling of sales opportunities, contacts, marketing lists, and campaigns.
- On the Event Setup (EP204070) form, the system-wide settings have been specified to prepare the system to send automatic notifications by using the built-in notification capabilities.
- On the Employees (EP203000) form, the following employees
have been created:
- David Chubb
- Jeffrey Vega
- On the Leads (CR301000) form, the Donna Coleman lead has been created.
Process Overview
In this activity, you will create, reschedule, and then cancel an event on the Activities tab of the Leads (CR301000) form.
System Preparation
Before you start creating an event, you should do the following:
- Launch the MYOB Acumatica website with the U100 dataset preloaded.
- Sign in to the system as sales manager David Chubb by using the following
credentials:
- Username: chubb
- Password: 123
- Make sure that on the Company and Branch Selection menu, in the top pane of the MYOB Acumatica screen, the SweetLife Head Office and Wholesale Center branch is selected.
- In the info area, in the upper-right corner of the top pane of the MYOB Acumatica screen, make sure that the business date in your system is set to 11/28/2025. If a different date is displayed, click the Business Date menu button and select 11/28/2025. For simplicity, in this process activity, you will create and process all documents in the system on this business date.
Step 1: Creating an Event
To create an event, do the following:
- Open the Donna Coleman lead record on the Leads (CR301000) form.Tip:To search for a record in a list of records, you can enter a keyword or phrase in the Search box of the table toolbar. The system will find all the records that match your search criteria and display these records in the table. For details, see Searching in MYOB Acumatica.
- Open the Activities tab.
- On the table toolbar, click Create Event. The Event (CR306030) form opens in a pop-up window so that you can create an event that is related to the lead you were viewing.
- On the Details tab, specify the following settings:
- Summary: Juicers for Yummy Supplies
- Start Time: 12:00 PM on the next business day (that is, 12/01/2025)
- End Time: 1:00 PM on the next business day (that is, 12/01/2025)
- Category: Green
Notice that in the Owner box, David Chubb is inserted, and in the Related Entity box, Donna Coleman is inserted.
- In the text area, type the message to be associated with the event, such as the following: Let's discuss your questions about the juicers that SweetLife can offer for sale.
- On the form toolbar, click Save.
You have created the event. On the Attendees tab, notice that a row with your contact information has been added. (A row is always added for the event's owner.) In the Invitation column, the status of the invitation is Accepted because the owner is assumed to be attending the event. In the next step, you will invite potential attendees to the event.
Step 2: Adding Potential Attendees to the Event
To add potential attendees and invite them to the event, do the following:
- While you are still viewing the Juicers for Yummy Supplies event on the
Event (CR306030) form, add Donna Coleman on the
Attendees tab as follows:
- On the table toolbar, click Add Row. The system adds a new row to the table.
- In the Contact column, select Donna Coleman. Notice that the system has inserted Donna's email address in the Email column. Also notice that in the Invitation column, the status of the invitation is Not Invited because you have not yet sent the invitation to the event.
- Add Jeffrey Vega, who is an employee, as follows:
- On the table toolbar, click Add Row.
- In the Contact box, select Jeffrey Vega. The system inserts Jeffrey's email address in the Email column. Notice that in the Invitation column, the status of the invitation is Not Invited.
- Add Jim Berry, whose data has not been added to the system yet, as follows:
- On the table toolbar, click Add Row.
- In the Email column, type jim.berry@yummysupplies.example.com.
- In the Comment column, type Donna's colleague, a technician from Yummy Supplies.
- On the table toolbar, click Invite All.
- In the Confirmation dialog box, which opens, click
OK. The system closes the dialog box, saves your
changes, and sends emails to notify the potential attendees about the event.
Notice that for the three rows that have email addressees of the potential attendees, the status of the invitation has changed to Invited.
- On the Activities tab, notice that rows have been added
with the summary information about the notification emails that have been sent
to the potential attendees.
You have invited the potential attendees to the event.
- Close the Event form.
- Sign out of the system.
Step 3: Accepting the Event
To accept the invitation to the event as a SweetLife's technician Jeffrey Vega, do the following:
- Sign in to the system by using the vega username and the 123 password.
- Open the All Records tab of the Events (EP4041PL) form.
- In the row with the Juicers for Yummy Supplies event, notice that in the
Owner column, David Chubb has been inserted,
meaning that he is the event's organizer. In the Category
column, notice that Green has been inserted.Tip:Organizations can use these informational categories as they deem appropriate to help users prioritize events. For SweetLife, the Green category and highlighting in green means that the event is a usual planned work activity. The categories that can be used for events are defined on the Event and Task Categories (EP204040) form. The Green is one of the predefined categories, but others can be added to the form and selected for events.
- In the Summary column, click the Juicers for Yummy Supplies link to open the event on the Event (CR306030) form. Notice that when you are viewing an event as a potential attendee, you cannot edit the settings on the Details tab.
- On the Attendees tab, view the potential attendees of the event. In the Invitation column, the status of the invitation is Invited because an invitation has been sent, but Jeffrey Vega has not yet accepted the invitation.
- On the form toolbar, click Accept. Notice that the status of the invitation has changed to Accepted.
- Sign out of the system.
Step 4: Rescheduling the Event
Suppose that Donna Coleman informed you that she will be on a business trip to Phoenix, Arizona, at the time of the event. Her time zone is now Greenwich Mean Time minus seven hours. You want to select Donna's time zone for the event.
To select a new time zone for the Juicers for Yummy Supplies event and change the event's time, do the following:
- Sign in to the system by using the chubb username and the 123 password.
- Open the All Records tab of the Events (EP4041PL) form.
- Select the row that has Juicers for Yummy Supplies in the Summary column.
- In the side panel, click Event. The event opens in the side panel on the Event (CR306030) form.
- On the Details tab, in the Time Zone box, select (GMT-07:00) Arizona. Notice that in the Start Time box, 12:00 PM remains, and in the End Time box, 1:00 PM remains. However, the actual start and end times of the event have been changed, because they are the same times in a different time zone.
- On the form toolbar, click Save.
- In the Confirmation dialog box, which opens, click OK. The system closes the dialog box and sends the potential attendees rescheduling emails, which notify them about the new time of the event.
- On the Activities tab, notice that rows have been added
(as shown in the following screenshot) with the summary information about the
emails that notify the potential attendees about the new time of the event.
Figure 1. Notifications to the potential attendees about the rescheduled event 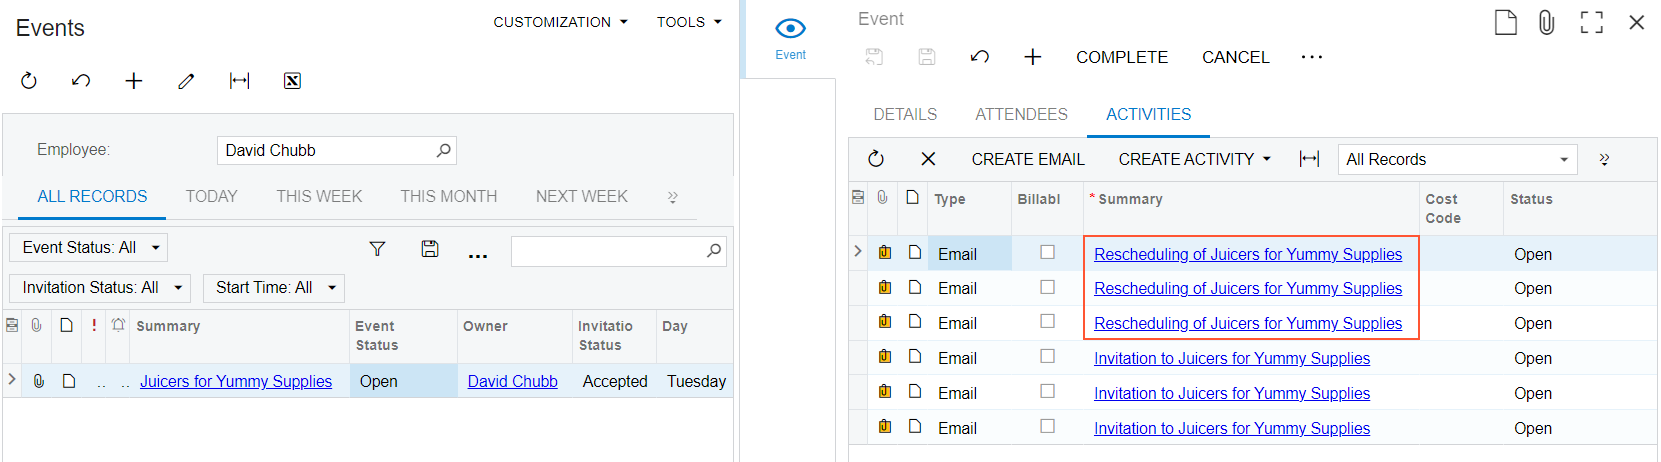
- Close the side panel with the Event form opened.
- On the form toolbar of the Events (EP4041PL) form, click Refresh. Notice that in the Start Time column for the event, the time has changed to 2:00 PM and in the End Time column, the time has changed to 3:00 PM. The times on this form are shown in the default time zone for the user as specified on the User Profile (SM203010) form or, if no time zone is specified for the user, the default time zone of the system as specified on the Site Preferences (SM200505) form. Because no default time zone is specified for David Chubb, the time is shown in the system time zone, which is Greenwich Mean Time minus five hours.
You have rescheduled the event and notified the potential attendees about the new time of the event.
Step 5: Canceling the Event
Suppose that Donna Coleman cannot participate in the conference call because of a change in her travel plans and would like you to cancel the event. Donna will come to SweetLife's office early next week, but the exact date is not defined yet.
To cancel the Juicers for Yummy Supplies event, do the following:
- On the All Records tab of the Events (EP4041PL) form, click the Juicers for Yummy Supplies link in the Summary column to open the event on the Event (CR306030) form.
- On the form toolbar, click Cancel.
- In the Confirmation dialog box, which opens, click OK. The system closes the dialog box and sends emails to notify the potential attendees about the cancellation of the event.
- On the Activities tab, notice that rows have been added with the summary information about the emails that notify the potential attendees about the cancellation of the event.
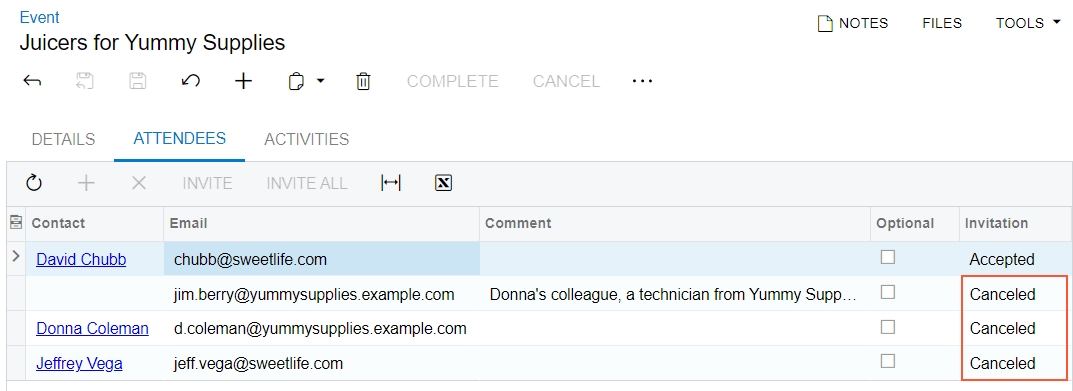
- On the Attendees tab, in the
Invitation column, notice that the status of the
invitations to potential attendees has changed to Canceled because you
have canceled the event (see the following screenshot).
Figure 2. The cancellation of the event