
InsightXL: Installing the Excel Add-In
To use the Excel add-in, you perform a one-time setup that includes the following steps:
- Set up HTTPS for the MYOB Acumatica instance
- Configure an OpenID provider
- Make adjustments to the
web.configfile - Download the add-in manifest from Acumatica and place it in a shared location
- Grant access rights to the users who will run the add-in
- Install the add-in in Excel
For instructions on setting up HTTPS for an instance and configuring an OpenID provider, see the links above. Read on to learn about Steps 3 to 6.
Making Adjustments to Web.config
Modify the settings in the web.config file, which is located in the application instance folder, as follows:
- Add the text in bold to the
<formsAuth>tag of the<px.core>section.<formsAuth loginUrl="Frames/Login.aspx" timeout="60" requireSSL="true" /> - Add the text in bold to the
<sessionState>tag of the<system.web>section.<sessionState cookieSameSite="None" cookieless="UseCookies" mode="Custom" customProvider="PXSessionStateStore" timeout="60" sessionIDManagerType="PX.Owin.SessionIdManager, PX.Owin"> - In the
<system.web>section, add the following line before the<compilation>tag.<httpCookies sameSite="None" requireSSL="true" />Attention:When you insert the line, note that:- The first two occurrences of the
<system.web>section within the<location>tag are not the sections you need. - Insert the line only once; otherwise, a compilation error may occur when the site is restarted.
- The first two occurrences of the
Downloading the Add-In Manifest
Once you have configured an OpenID provider, download the add-in manifest on the Site Preferences (SM200505) form. To do so, click the Get Excel Add-In Manifest link in the Export to Excel section.
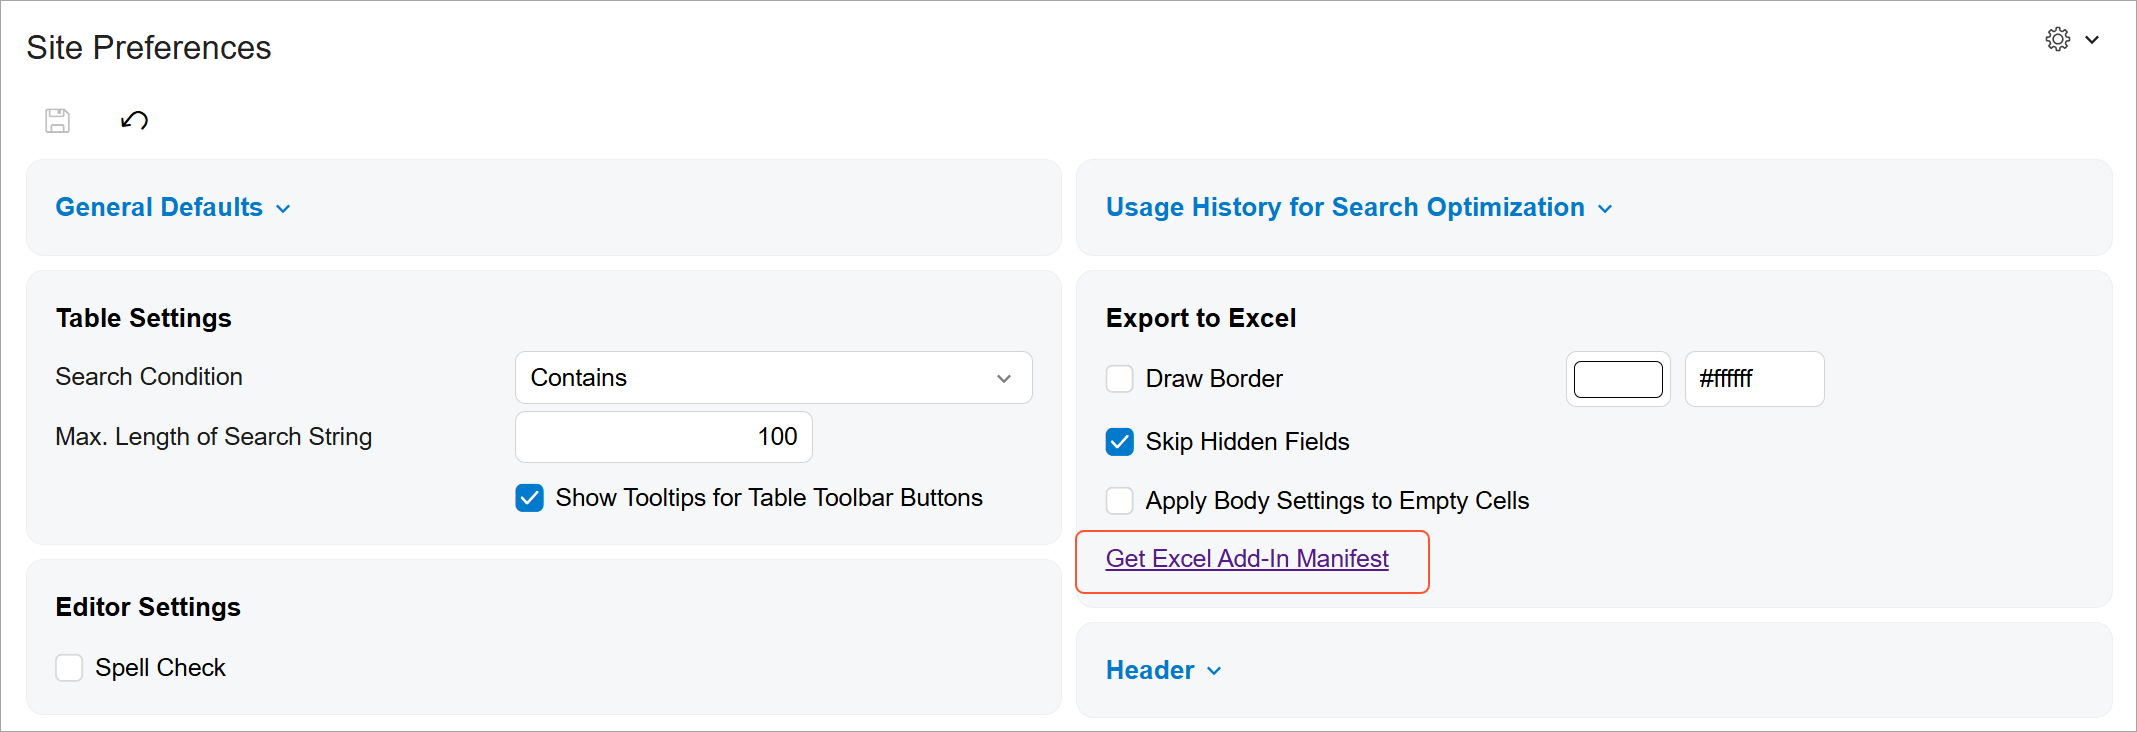
Place the downloaded manifest file in a shared folder on a network server (such as \\MyServer\Share\AddIns) where add-in users will be able to access it.
Granting Access to the Add-In Panel
Make sure that users of the Excel add-in have access rights to the Excel Add-In (EX000000) form. This form displays information in the add-in's right panel in Excel, including details about the add-in's connection, status, and settings.
You can modify access rights by using any of the following forms:
- Access Rights by Role (SM201025)
- Access Rights by User (SM201055)
- Access Rights by Screen (SM201020)
Configuring the Add-In in the Excel Desktop App
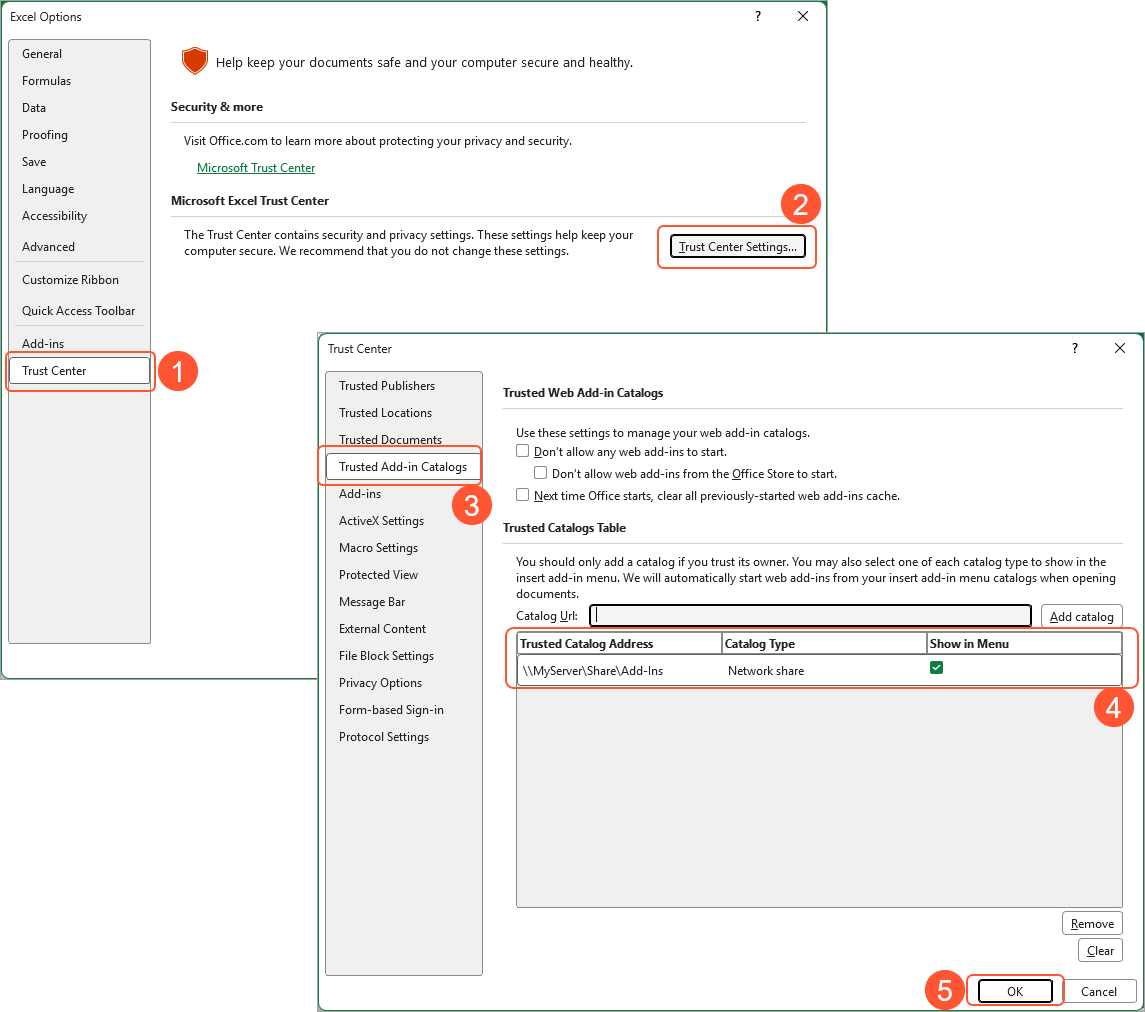
To install the add-in in the Excel desktop app, add the shared folder to the list of trusted add-in catalogs as follows:
- Open the Excel Options dialog box by clicking .
- Open the Trust Center by opening the Trust Center tab (Item 1 below) and clicking Trust Center Settings (Item 2).
- In the Trust Center dialog box, open the Trusted Add-in Catalogs tab (Item 3), and add the shared folder to the Trusted Catalogs table (Item 4).
- Click OK (Item 5).
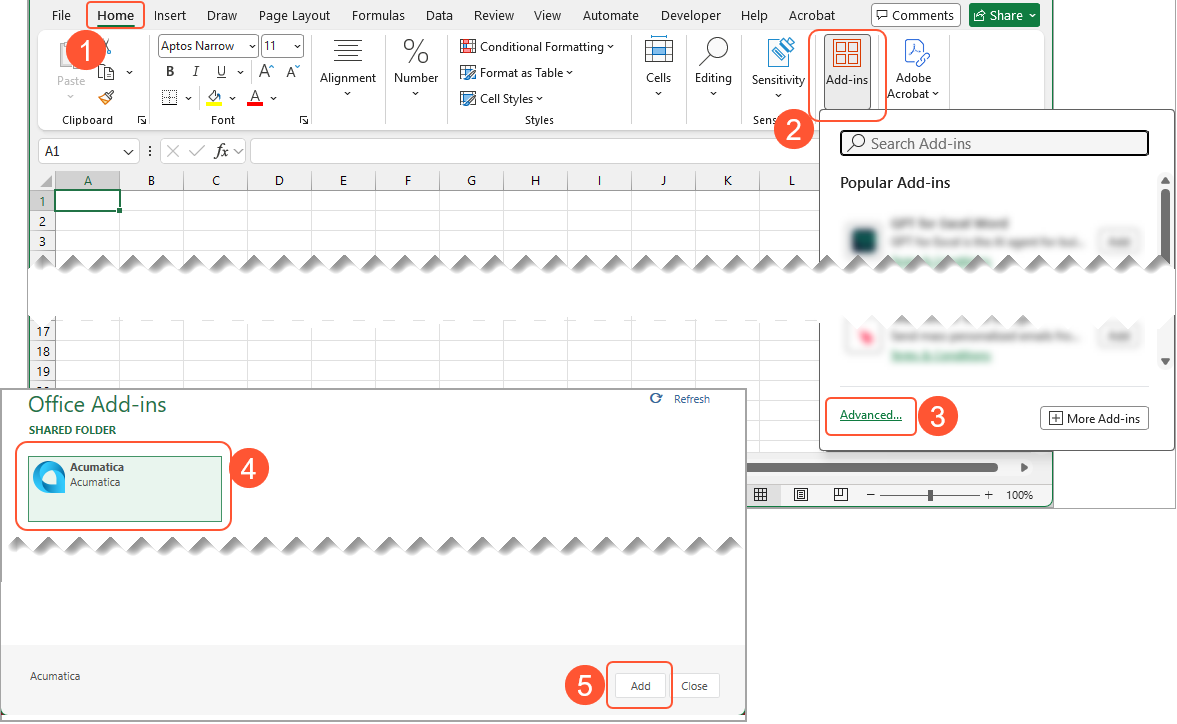
After you reopen Excel, you can add the add-in to the Home tab by clicking (Items 1–3 below) and selecting the add-in from the list of available add-ins (Item 4). Click Add (Item 5).
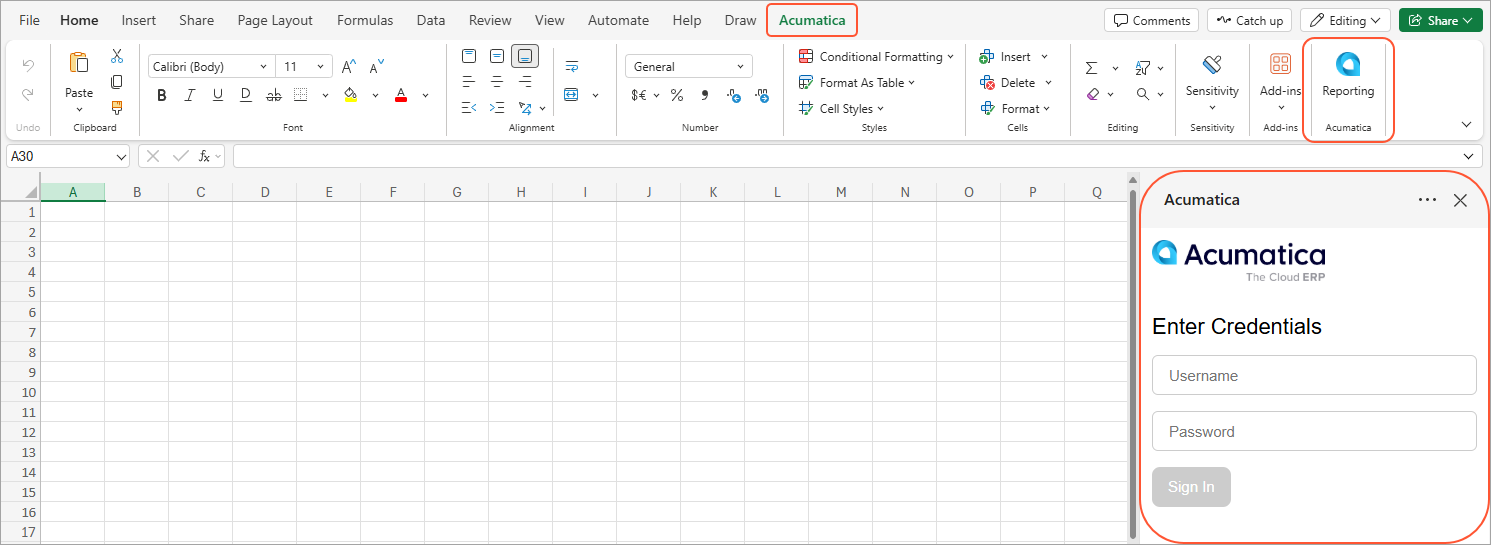
Once the add-in has been installed, you'll see the Acumatica tab, the Reporting button on the Home tab, and the Acumatica panel.
Configuring the Add-In in the Excel Browser App
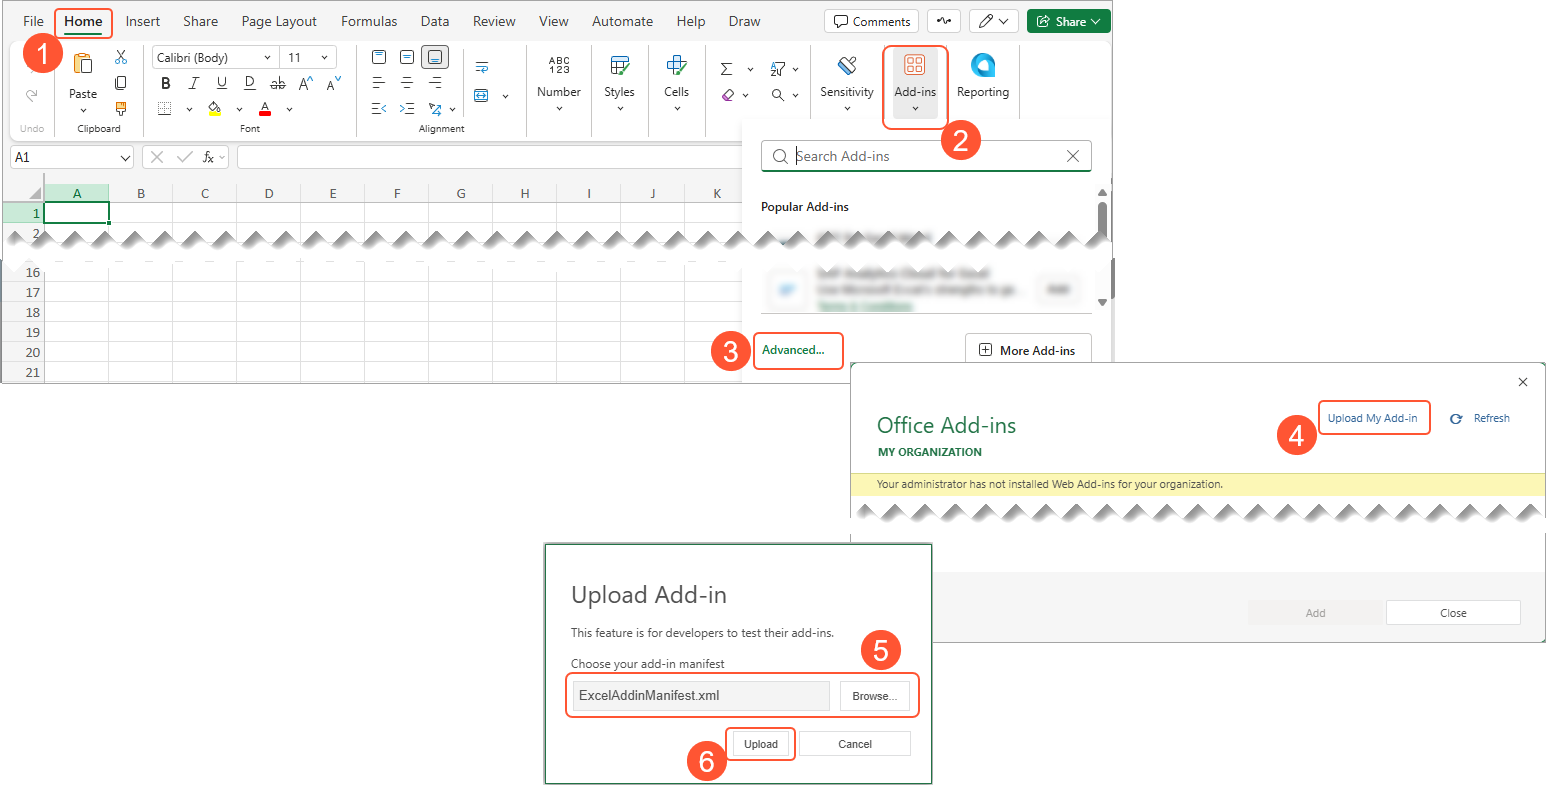
To install the add-in in the Excel browser app, do the following:
- Open the Office Add-ins dialog box by clicking and then clicking Advanced (Items 1–3 below).
- Click Upload My Add-in (Item 4) and then select and upload the add-in manifest that you previously downloaded (Items 5–6).
Once the add-in has been installed, you'll see the Acumatica tab, the Reporting button on the Home tab, and the Acumatica panel.