
Report Form
Before you run a report, you specify the needed parameters on the report form. You can select a template and manually make selections that affect the information collected. Also, you can specify appropriate settings to print or email the finished report.
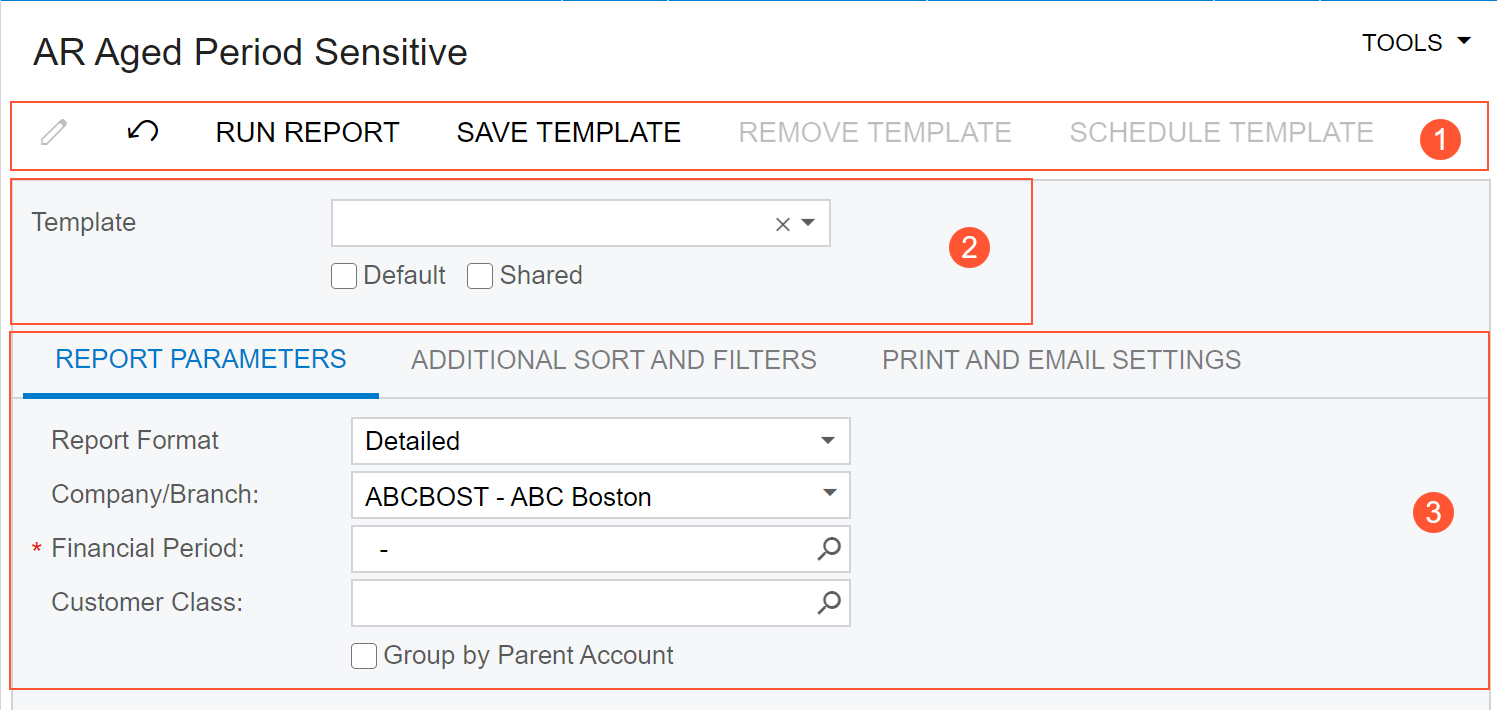
The following screenshot shows a typical report form, which has the following elements:
- Report form toolbar and More menu (see Item 1)
- Details area (Item 2)
Report Form Toolbar and More Menu
The following table lists the elements of the report form toolbar and the commands of the More menu.
| Element | Description |
|---|---|
| Cancel |
Clears any changes you have made on the report form and restores the default settings. |
| Delete Template |
Removes the selected template. This command is available only if a template is selected in the Template box. |
| Edit Report |
Downloads the RPS file with the report, which you can edit in the MYOB Acumatica Report Designer. |
| Edit Template |
Opens the Edit Template dialog box, in which you can change the template name and settings. This command is available if a template is selected in the Template box. |
| Run Report |
Initiates data collection for the report and displays the generated report. |
| Save Template |
Opens the Save Template dialog box, which you use to save the currently selected report as a template with all the selected settings. |
| Save Template As |
Opens the Save Template dialog box, in which you can specify the new name for the template and change its settings. |
| Template |
The template to be used for the report. If any templates have been created and saved, you can select a template to use its settings for the report. To quickly find a template, start typing its name in the Search box. If no template is selected, the lookup box remains empty. After you select a template, its name appears in this box, which becomes highlighted in blue. To run a report without using a template, you select None in this box. You can mark frequently used templates as favorites. The system lists these templates at the top of the list. |
| Element | Description |
|---|---|
| Template |
The name of the template. |
| Default |
A check box that you select to mark the template as the default one for you. |
| Shared |
A check box that you select to indicate that the template is shared with other users. Shared templates are marked with the Group icon to help you identify them quickly. |
|
The dialog box has the following buttons. |
|
| Save |
Saves the changes and closes the dialog box. |
| Cancel |
Closes the dialog box without saving the changes. |
Report Toolbar
The following table lists the buttons of the report toolbar, which is shown on the generated report that you have run.
| Buttons | Icon | Description |
|---|---|---|
| Parameters | Navigates back to the report form to let you change the report parameters. | |
| Refresh | Refreshes the information displayed in the report (if any data changes were made). | |
| Groups | Adds to the report a left pane where the report structure is shown. Click a report node to highlight the pertinent data in the right pane. | |
| View PDF / View HTML | Displays the report as a PDF, or displays the report in HTML format. The available button depends on the current report view; if you're viewing a PDF, for instance, you will see the View HTML button. | |
| First | Displays the first page of the report. | |
| Previous | Displays the previous page. | |
| Next | Displays the next page. | |
| Last | Displays the last page of the report. | |
| Opens the browser dialog box so you can print the report. | ||
| Send | Opens the Email Activity dialog box, which you use to send the report file (in the selected format) to the specified email address. | |
| Export | Enables you to export the data in the selected format (Excel or PDF). |
Parameters Tab
This tab has sections where you can specify the contents of the report depending on the current report and vary in the following regards:
- Which elements are available on a particular report
- Whether elements contain default values
- Whether specific elements require values to be selected
- Whether elements may be left blank to let you display a broader range of data
Sorting & Filtering Tab
This tab contains the following sections with additional sorting and filtering conditions:
- Sorting: Defines the sorting order. You can add a line, select one of the report-specific properties, and select the Descending or Ascending sort order for the column.
- Filtering: Defines the report filter. You click Add, select one of the report-specific fields, and define a condition and its value. The list of conditions include one-operand and two-operand conditions. For more information on creating filters, see Managing Advanced Filters. For detailed procedures on using ad hoc filters, see Modern UI: Filters and Reports: Process Activity.
Mailing & Printing Tab
If you plan to print the report or save the report as a PDF, select the appropriate settings in the Printing section.
| Element | Description |
|---|---|
| Archived Records |
The indication of how the system should treat archived records when printing the report. The following options are available: Hide, Print, Only. |
| Deleted Records |
The visibility of the data deleted from the database. The following options are available: Hide, Print, Only. |
| Print All Pages |
A check box that you select to causes the system to print all pages of the report. |
| Print in PDF Format |
A check box that you select to display the report in PDF format. |
| Compress PDF File |
A check box that you select to indicate that the system should generate a compressed PDF. |
| Embed Fonts in PDF File |
A check box that you select to indicate that the system should generate the PDF with fonts embedded. |
If you plan to send the report as an email, in the Mailing section, specify the format in which the report will be sent, as well as the email subject, the recipients of copies of the report, and the email account of the recipient.
When you add recipients, the system checks the format of the email addresses entered in the To, Cc, and Bcc boxes. If an address’s format is incorrect, its box is highlighted in red so that you can quickly identify and correct the issue.
| Element | Description |
|---|---|
| Format |
The format (HTML, PDF, or Excel) in which the report will be emailed. Attention:
Merge function for reports in
Excel format is not supported. If you want to merge a report with other reports and send
an aggregated report by email, you should select either the HTML or PDF format for the
report. |
| To |
The email address of the recipient. |
| CC |
An additional addressee to receive a carbon copy (CC) of the email. |
| BCC |
The email address of a person to receive a blind carbon copy (BCC) of the email; an address entered in this box will be hidden from other recipients. |
| Subject |
The subject of the email. |
| Element | Description |
|---|---|
| Locale |
A locale that you select to indicate to the system that the report should be prepared with the data translated to the language associated with this locale. This box is displayed if there are multiple active locales in the system. For details, see Locales and Languages. |
| Localization |
The localization that is used for the report. This box appears on the form if the following conditions are met:
One of the following options can be selected in the box:
Tip:
To determine if a localized
version of a report exists, the system checks the
Site\ReportsDefault directory, the
database, the ReportsCustomized folder, and
the ReportsDefault folder. |
Versions Tab
If the report has multiple versions, you can select one of them.
This tab displays the data only to users assigned with report designer user role.
Report versions are designed in the Report Designer. To activate editing report versions, give the user report designer role.
The table toolbar includes standard buttons and buttons that are specific to this table. For the list of standard buttons, see Table Toolbar. The table-specific buttons are listed below.
| Button | Description |
|---|---|
| Edit Version |
Downloads the RPS file with the report version. |
| Deactivate |
Deactivates the report version. This button appears if a report version is active. If the version is inactive, the button changes to Activate. |
| Column | Description |
|---|---|
| Version |
The version number. |
| Description |
Th description of the version. |
| Created |
The date when the version was created. |
| Active |
A check box that you select to indicate that the version is active. If you select this check box, the Deactivate button appears on the table toolbar. If you clear the check box, the button changes to Activate |
Email Notifications Tab
This tab lists the email templates that can be used to send email notifications that include the report.
| Button | Description |
|---|---|
| Schedule Report |
Opens the Email Templates (SM204003) form, where you can select or create a new email template that can be used to send the report and specify a schedule for notifications. The button appears only if the user account to which you are signed in has at least the Insert level of access rights to the Email Templates (SM204003) form. |
| Column | Description |
|---|---|
| Email Template |
The email template to be used to generate the body of the email notification. |
| Screen ID |
The identifier of the form whose elements are used as the source of specific placeholders for this template. |
| Recipients |
The email addresses of the people to receive the email. Use semicolons as separators between addresses. |
| Report Template |
The template configured for the report. |
| Report Template Owner |
The name of the user who created the template. |