
Basic Service Management Configuration: Implementation Activity
In this implementation activity, you will learn how to enable the Service Management feature and review the basic service management settings.
Story
Suppose that you are an administrative user of the SweetLife Service and Equipment Sales Center. You are configuring the minimum required functionality to prepare the system for the processing of service orders and the scheduling and processing of appointments.
Configuration Overview
In the U100 dataset, the following tasks have been performed for the purposes of this activity:
- The minimum system configuration, which is described in Company with Branches that Do Not Require Balancing: General Information, has been performed.
- The SWEETLIFE company has been created on the Companies (CS101500) form. This company has multiple branches created on the Branches (CS102000) form, including SWEETEQUIP (Service and Equipment Sales Center).
- On the Numbering Sequences (CS201010) form, the FSPOST - SM Posting Batches, FSSO - Service Orders, and FSSCHEDULE - Staff Members' Schedules numbering sequences have been created.
- On the Work Calendar (CS209000) form, the MAIN work calendar has been created to reflect the work days and times, and the unpaid break time of staff members.
- On the Service Management Preferences (FS100100) form, the needed numbering sequences and work calendar have been specified.
Process Overview
To set up the basic service management settings, you will do the following:
- On the Enable/Disable Features (CS100000) form, you will enable the Service Management feature.
- On the Numbering Sequences (CS201010) form, you will review the following numbering sequences for service management entities: the numbering sequence to be used to assign identifiers to batches of billing documents, and the numbering sequence to be used for the reference numbers of the service orders of the service order types to be created in other activities of this part of the guide.
- On the Work Calendar (CS209000) form, you will review the calendar with the staff members' work days and work times for each day.
- On the Service Management Preferences (FS100100) form, you will ensure that the numbering sequences and the work calendar are specified.
System Preparation
Before you start performing the initial configuration of the service management functionality, launch the MYOB Acumatica website, and sign in to a company with the U100 dataset preloaded. You should sign in as a system administrator by using the gibbs username and the 123 password.
Step 1: Enabling the Service Management Feature
To enable the Service Management feature, do the following:
- Open the Enable/Disable Features (CS100000) form.
- On the form toolbar, click Modify, which gives you the ability to change the set of selected features.
- Select the Service Management check box.
- On the form toolbar, click Enable. This saves your changes and enables the currently selected features.
Step 2: Reviewing Numbering Sequences
To review the numbering sequences that have been created for service management batches, do the following:
- Open the Numbering Sequences (CS201010) form.
- In the Numbering ID box, select the FSPOST numbering
sequence ID. The system uses this numbering sequence to automatically generate an ID for
each GL batch created for a service document.
Notice that this numbering sequence has the following settings:
- Start Number: SM000001
- End Number: SM999999
- In the Numbering ID box, select the FSSO numbering
sequence ID. The system uses this numbering sequence to automatically generate a reference
number for each new service order.Notice that this numbering sequence has the following settings:
- Start Number: 000001
- End Number: 999999
- In the Numbering ID box, select the FSSCHEDULE numbering sequence and review its settings. The system uses this numbering sequence to automatically generate an ID for each new staff members' schedule.
In Step 4 of this activity, you will make sure that the FSPOST - SM Posting Batches and FSSCHEDULE - Staff Members' Schedules sequences are specified on the Service Management Preferences (FS100100) form. You will specify the FSSO - Service Orders sequence on the Service Order Types (FS202300) form when you create the service order types.
Step 3: Reviewing the Work Calendar
To review the work calendar, do the following:
- On the Work Calendar (CS209000) form, select MAIN in the Calendar ID box.
- Make sure that the following settings are specified for the calendar:
- Calendar ID: MAIN
- Description: Main Calendar
- Time Zone: (GMT-05:00) Eastern Time (US & Canada)
- On the Calendar tab, ensure that the Monday, Tuesday, Wednesday, Thursday, and Friday check boxes are selected, and the Sunday and Saturday check boxes are cleared.
- In the boxes of the Start Time column, ensure that 10:00 AM is specified for all the selected days of the week.
- In the boxes of the End Time column, ensure that 6:00 PM is specified for all the selected days of the week.
Step 4: Reviewing the Service Management Preferences
To make it possible for the service management functionality to be used, the numbering sequences and work calendar need to be specified in the service management preferences. Do the following:
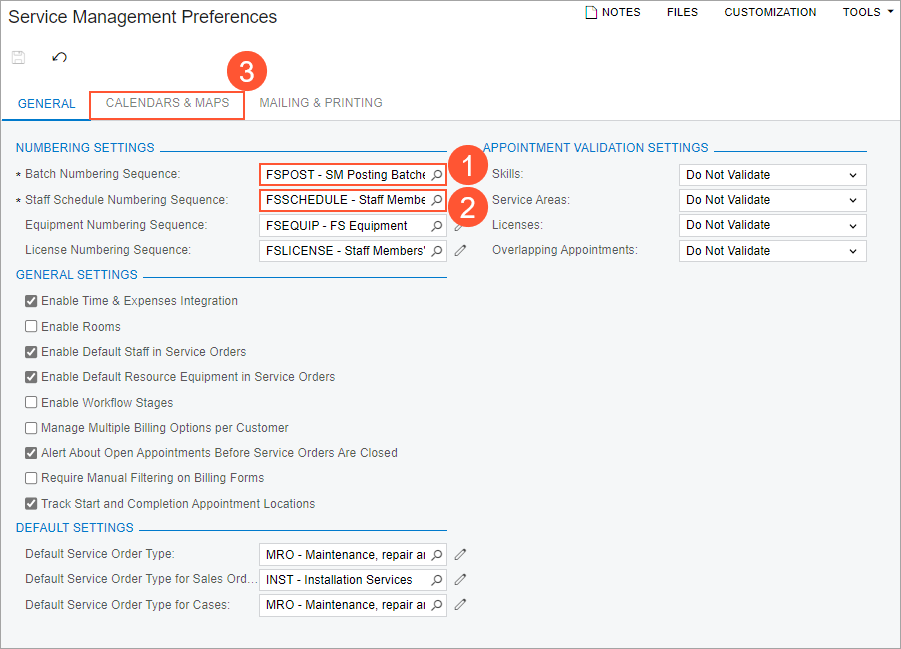
- Open the Service Management Preferences (FS100100) form.
- On the General tab, in the Numbering
Settings section, ensure that the following settings are specified (as shown
in the following screenshot):
- Batch Numbering Sequence: FSPOST - SM Posting Batches (see Item 1 in the screenshot)
- Staff Schedule Numbering Sequence: FSSCHEDULE - Staff Members' Schedules (Item 2)
- On the Calendars & Maps tab (Item 3), in the Calendar Settings section, make sure that MAIN - Main Calendar is selected in the Work Calendar box.
If these configuration steps have been performed, the service management forms are available, and the system is set up for the use of the service management capabilities.