
Modern UI Editor: To Add a Field
To add a custom field to a fieldset, you need to create TypeScript and HTML extensions of the form. You can use the Modern UI Editor to generate these extensions. The generated files are automatically saved to the customization project and can later be built and published.
This activity will walk you through the process of adding a custom field to a fieldset and generating the corresponding TypeScript and HTML extension files.
Story
Suppose that you need to add a custom field, UsrRepairItem, to the
Item Settings section on the
General tab of the Stock Items (IN202500) form. You need to create a
TypeScript extension, which will include the definition of this custom field. You
also need to create an HTML extension to place the field in the appropriate
fieldset.
Process Overview
By using the Add Field button of the Modern UI Editor, you will add the custom field and generate the TypeScript extension. You’ll then use the element tree to locate the custom field, add the field in the appropriate position in the HTML layout, and create an HTML extension.
System Preparation
Before you begin performing the steps of this activity, do the following:
- Install an MYOB Acumatica instance (Version 2026.1.1 or later) with the T100 dataset.
- Create a customization project and customize an existing form, such as Stock Items (IN202500), by adding a custom field to the corresponding database table and creating a DAC extension.
Step 1: Adding the Field and Generating the TypeScript Extension
To add the custom field and generate the extension:
- Open the Modern UI Editor for this form.
- On the page toolbar, click Add Field (Item 1 below), which opens the Add Field dialog box.
- Specify the data view where the new field is accessible. The corresponding DAC is selected automatically.
- Specify the field name in the Field or Display Name box;
the field appears automatically in the table as you start typing its name (Item
2).
Figure 1. The Add Field dialog box 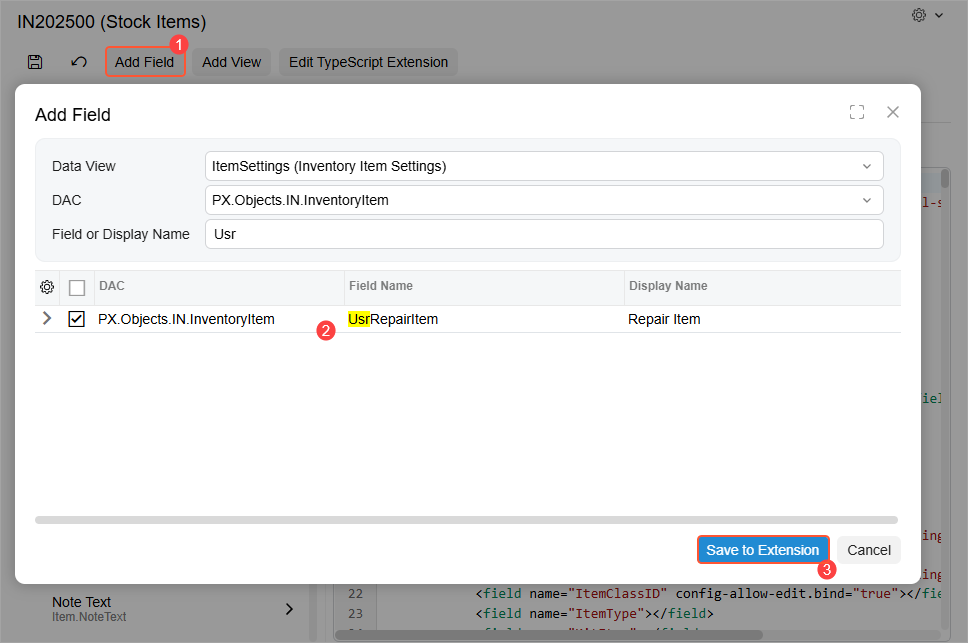
- Select the unlabeled check box for the field in the table.
- Click Save to Extension (Item 3), which closes the dialog box.
- Click Save on the page toolbar.
The system adds the file with the generated TypeScript extension to your customization project and lists it on the Modern UI Files page of the Customization Project Editor.
- To apply the changes, publish the customization project. The system validates and builds the frontend code, including the TypeScript extension.
Step 2: Adding the Field to the HTML Code and Generating the HTML Extension
To customize the HTML layout, you can use the Modern UI Editor to generate the HTML extension. The file is automatically saved to the customization project and can later be built and published.
To add the custom field to the Item Settings section on the General tab of the Stock Items (IN202500) form:
- Open the Modern UI Editor for the form.
- In the element tree, locate the custom field you want to add to the HTML
template: Click Customized (Item 1 below) to list all the
custom views and fields, or use the Search box (Item 2) to find the custom
field.
Notice the blue Customized tag next to the
UsrRepairItemfield (Item 3), which indicates that this is a custom field. - On the HTML tab of the Modern UI Editor, find the fieldset where the field should be. Place the cursor after
the definition of the element you want it to follow (Item 4).Tip:To quickly find the location of an existing control in the code editor on the HTML tab, you can click the control in the element tree. Once you click it, the system automatically scrolls to the right place in the code editor and highlights the code line corresponding to the control. This is useful when you're trying to add a custom control to the HTML code and need to place it before or after an existing control.
Figure 2. Adding a field to the HTML code 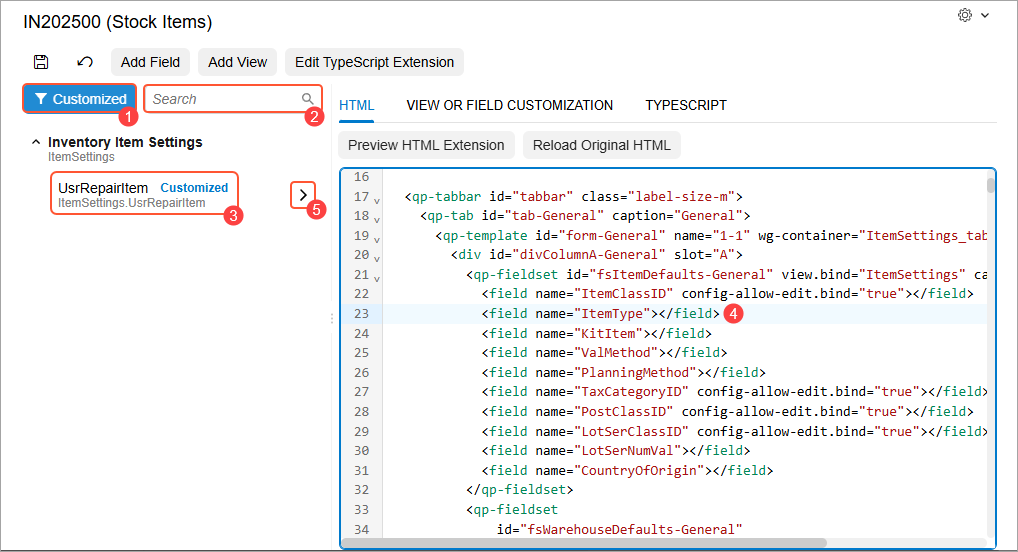
- In the element tree, click the arrow button next to the new field (Item 5
above).
The new field tag appears in the HTML code.
- On the page toolbar, click Save. The generated file is added to the Modern UI Files page.
- To apply the changes, publish the customization project.
The editor handles the technical details of creating properly formatted customization files so that you can focus on your code changes rather than file management.