- Contents
- Index
- Search

Show results that include all search words
Creating Sales Orders
Transactions > Sales Orders
Create customer Sales Orders from the Transactions menu or on the Orders tab in the Debtor Account Details window.
To create a sales order:
-
Click the New button or click the arrow to the right of the button to create a quote, layby, or standing order. The type of Sales Order displays in the title bar.
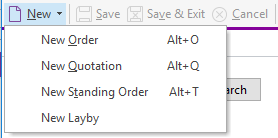
-
A Quotation is a Sales Order that doesn't commit any stock until it is converted to an invoice or standard Sales Order. No general ledger transaction is created until it is converted.
-
A Standing Order is a Sales Order which is not actioned until you process it in the Process Standing Orders window. Each standing order is converted to an invoice. It is used when the debtor wants exactly the same Sales Order to be supplied, often at regular intervals. No general ledger transaction is created until it is converted.
-
A Layby Sales Order does commit the stock item quantity. Deposits are made on laybys, and you can specify a default deposit percentage, and enforce it.
-
-
The Sales Order window opens:
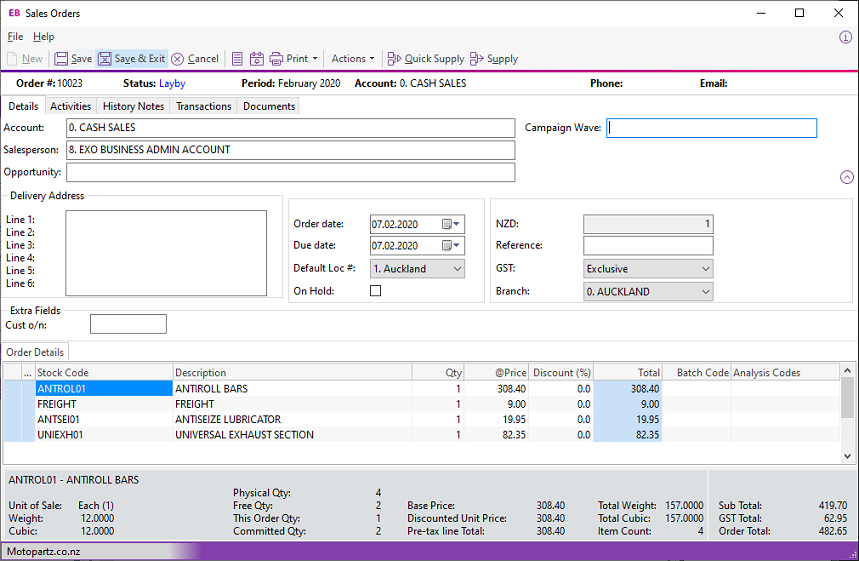
Enter the details of the Sales Order:
Field
Description
Account
The account for which you are creating the Sales Order.
You cannot process a Sales Order for an account on stop credit. A warning displays.
Contact
If the Add debtor contact details to transactions profile setting is enabled, you can select a Contact for the Sales Order. Correspondence about order is sent to this Contact's email address, rather than the account's email address.
Salesperson
Enter the name of the salesperson who made the sale. To search for a salesperson, type ? in the field and press Tab.
Campaign Wave
If the Exo Business CRM module is installed, you can associate Sales Orders with a campaign wave to track sales against a marketing campaign.
Opportunity
This field is enabled if the Exo Business CRM module is installed.
If the Sales Order was generated from an Opportunity, the Opportunity is entered here automatically. You can also enter one. Type ? in this field and press Tab to search for an Opportunity.
Delivery Address
The default address of the debtor account. Select Addresses from the Actions menu to create another delivery address for the account.
Order Date
The date the Sales Order is created.
Due Date
The date on which the customer receives of the Sales Order.
Default Loc#
Choose the stock location from which you are supplying the stock. You can specify location at the Sales Order line level by clicking on the Sales Order Line Periscope button and selecting the location from the Location field.
On Hold
Putting a Sales Order On Hold changes its status to Not Processed. The quantity of the ordered stock item is still committed. The status bar at the top of the Sales Order has a red background.
In the Sales Order search window, you can filter on Sales Orders which are on hold.
AUD/NZD
The currency of the transaction.
Reference
An annotation for your reference.
GST
Select whether the prices shown on the Sales Order are GST-inclusive or -exclusive. Changing this setting affects the Sub Total, GST Total, and Order Total values at the bottom of the window.
Consign loc
This field displays if the Allow Consignment stock orders through Sales Orders profile setting has been enabled in Exo Business Configurator. To create a consignment order, select the location from which the stock is supplied.
Branch
The branch of the Sales Order. If the profile setting Allow Sales Order search, view & creation for other branches is enabled, you can specify any branch in this field.
Extra Fields
Cust o/n
Extra Fields created for the Sales Order header display in this section.
Note: You can configure Extra Fields on the Sales Order header to update their values whenever the Debtor account number on the Sales Order changes. You can also configure Extra Fields on Sales Order lines to update whenever the Stock code on the line changes.
If you have an Extra Field for the Customer Order Number set up, entering an order number for the Sales Order is mandatory if:
-
The profile setting Validate debtor order numbers in is set to On Entry or On Save, and
-
The Debtor for which you are creating the Sales Order has the Need Ord No option selected in the Debtor Account Details window.
Exo Business also checks to ensure the order number hasn't already been used.
-
-
Enter the stock item details for the Sales Order in the grid below.
Field
Description
...
Click in this column to open the Sales Order Line Periscope for the current line.
Stock Code
Enter the stock item code, or type ? and press Tab to select from a list.
To add a Bill of Material in Sales Order entry window, enter a full stop (.) then the Bill code in the Sales Order line stock code column.
Description
The description of the stock item.
Qty
Enter the quantity of the stock item being ordered.
@Price
The price of the stock item.
Note: You can click the calculator button to check the prices of all lines against the latest cost and selling prices from the Stock ledger.
Discount (%)
Enter a discount for the line. This column is not enabled if you disabled the profile setting Allow manual entry/override of discounts on debtor invoice and sales order lines in Exo Business Configurator. This also applies to the Discount field in the Sales Order Line Periscope.
Total
The total for the line.
Analysis Codes
Enter the analysis code to use for this Sales Order line.
Note: Sales Orders are limited to a maximum of 1000 lines.
-
To add a description of the Sales Order, click the Narrative button.
-
To add a one-off stock item, right-click in the grid and choose Create One-Off Stock Item.
-
Once you have entered information in the header part of the Sales Order, you can minimise the Sales Order header by clicking on the Minimise/maximise button in the top right corner of the window. You can also view the Sales Order line total excluding tax and the discounted unit price, excluding tax, of a Sales Order line in the bottom panel of the window.
-
Click Save to save the Sales Order. Exo Business assigns the next number and prompts you to print the Sales Order.
-
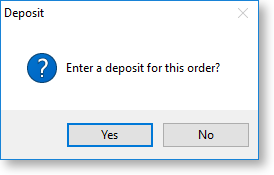
To make deposits against Sales Orders, enable the profile setting Allow deposits in sales orders and general ledger in the Configuration Assistant.
If enabled, you're prompted to make a deposit against the Sales Order. You can also specify the percentage required for a minimum deposit on any Sales Order, using the Minimum Layby Deposit Percentage profile setting.
-
Click Yes. The Payment/Receipt window displays. Enter the payment details.
-
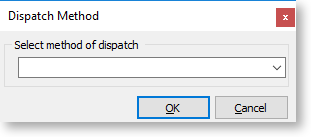
If you use dispatch methods, and the profile setting Prompt for dispatch information for debtor invoices and sales orders is enabled, Exo Business prompts you to select the dispatch method from the list.
This table describes the toolbar functions at the top of the window:
|
Button |
Description |
|
Narrative |
Add a narrative to the Sales Order. |
|
All Lines/Outstanding |
For partly processed Sales Orders, click this button to filter the Sales Order lines to view all, or view only lines that are not processed. |
|
Quick Supply |
Quick Supply all Sales Order lines in the Sales Order. |
|
Supply |
Supply, or partly supply, the order. |
|
|
Email a copy of the Sales Order to the email address recorded for the Debtor account on the order. |
|
Addresses |
Add extra delivery addresses to the Sales Order. |
|
More Actions |
|
|
Tax Summary |
Display a summary of all tax rates that apply to the items on the Sales Order. |
|
Account |
View the Debtor Account Details window for the debtor account of the Sales Order. |
|
Check Prices |
Check the prices on the Sales Order against the latest cost and selling prices from the Stock ledger. |
|
History |
|
|
Generate PO(s) |
Generate one or more Purchase Orders based on the Sales Order. |
|
Review Stock Availability |
This option is enabled for unprocessed Sales Orders when back orders are enabled. It opens a new window where stock levels for the items on the Sales Order are displayed. |
Adding a Bill of Materials to a Sales Order
You can select Bills of Materials (BOMs) by entering a full stop in the Stock Code column and pressing Enter. This opens a list of active BOMs for you to select from. After selecting a BOM, you are prompted for a quantity:
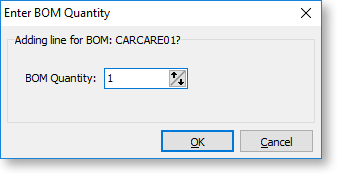
Note: You can enter decimal quantities if the Quantities value at Exo Business Config > Essential > General Settings > Decimal Places in Numeric Values is set to a value greater than zero.
When inserting a BOM, Exo Business draws in its default components. A BOM header displays in bold. The cost and sell price are calculated from the sum of the component lines, which have a shaded background. Changes to these component lines rolls the change up to the BOM header. The totals are calculated on the sum of the component lines of BOMs together with normal non-component lines.
If the BOM is priced by total, then after inserting the BOM lines you must confirm the total price for the BOM:
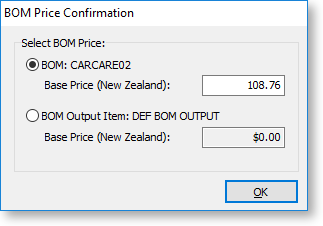
The top option obtains its price from the Bill of Materials setup screen. You can edit a price and Exo Business apportions it across the kit lines. If the BOM has an output code pointing at a stock item code, Exo Business tests for the best price on that stock code and the result is offered with the bottom option. You can't edit this price but you can select it.
Copying Sales Orders
You can also create a Sales Order by copying an existing order.
To copy a Sales Order:
-
Select the sales order and select Copy Order from the Actions menu. This window opens:
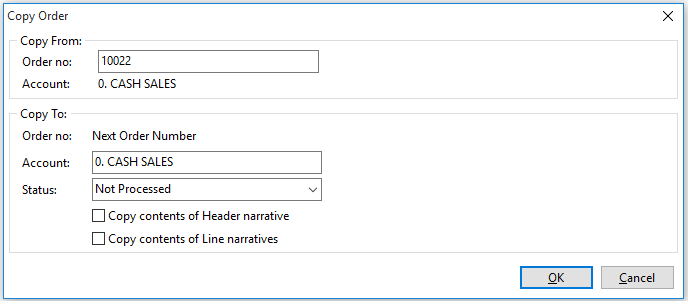
Note: You can specify a different order to copy by entering a different number into the Order no field.
-
Enter the Debtor account for which to raise the order. This defaults to the account of the order that you're copying.
-
Select a Status for the new order.
-
Select whether to copy header and/or line narratives to the new order.
-
Click OK. The Sales Order opens.
-
Save the order and close.
Reviewing Stock Availability
If back orders are enabled, the More Actions > Review Stock Availability option is enabled for unprocessed Sales Orders. Selecting this option checks for stock shortages on the Sales Order. If Exo Business detects shortages, the Stock Availability window opens, displaying stock levels for the items on the Sales Order:

Note: For this window to appear, the Check available stock for sales orders profile setting must be enabled. The Default response to backorder prompt profile setting must be set to either Yes or No.
By default, only line items that have stock shortages display. Select the Show all lines options to display the details of all lines on the Sales Order.
You can edit the Back Order quantities for each stock item. The Back Order dropdown contains these options for backordering stock items:
- Backorder shortage quantities
- Force backorder entire quantities for shortage lines
- Force backorder entire quantities for all lines
- Reset backorder quantities to zero
Note: If the Default response to backorder prompt profile setting is set to Yes, the Back Order quantities is set to the Shortage quantities by default.
Additional Tabs
These tabs are enabled after you save a Sales Order: