- Contents
- Index
- Search

Show results that include all search words
Extra Fields
You can use Extra Fields to collect information when you enter data. The Extra Fields appear on forms and you can analyse and report on the data in them
Extra Field can:
-
Capture demographic information at the point of sale.
-
Capture personal information about customers, such as birth dates or anniversaries.
-
Record information on stock items, such as warranty terms or links to images.
You can create Extra fields in these windows:
-
Sales Orders
-
Purchase Orders
-
Debtor, Creditor and GL accounts
-
Contacts
-
Stock items
-
Activities
-
Invoices
Extra fields display on the Details 1 tab or the Extra Fields tab of an account window. On transaction windows, they display in the header or in line periscope windows.
You can also create Extra Fields in custom tables, then access them using the Exo API.
Creating Extra Fields
Exo Business Configurator > System > Extra Fields
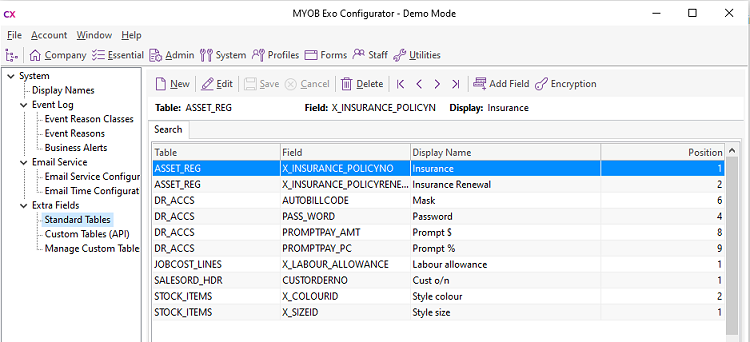
To create Extra Fields:
-
Open Exo Business Configurator and go to the System > Extra Fields section.
-
All Extra Fields are listed on the right panel. Double click on a record to drill down and check its details.
-
Click New.
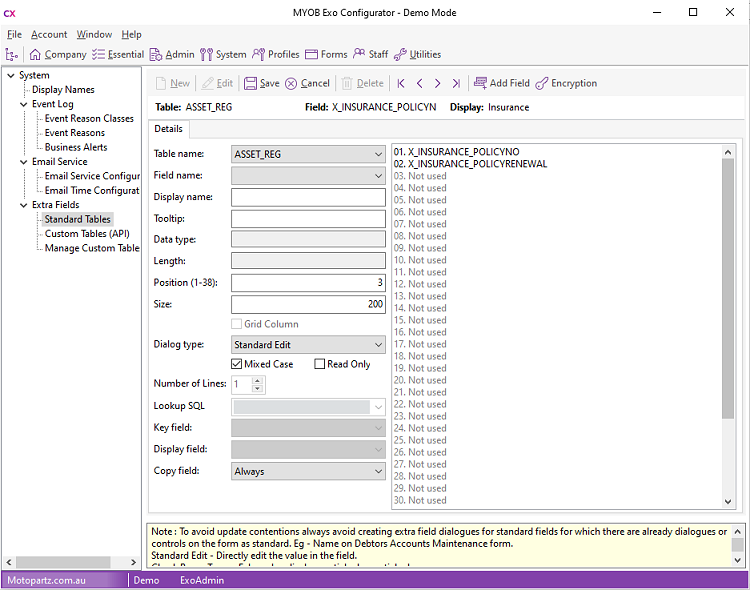
-
In the Table name field, specify the table in the Exo Business database that you want to add a field to or display a field from.
-
In the Field name field, select the field from the database table to display as an Extra Field.
If the field display does not already exist, click the Add Field toolbar button to add a field to the selected table. Exo Business X_ as a prefix if you don't enter it. Enter the data type and default value. Use underscores to insert spaces in the name — for example, International_Number.
-
Enter a Display name. This is the label that displays next to the Extra Field.
-
Enter the Position and Size of the Extra Field. The position must be unique across Extra Fields on this table. Used and unused positions are displayed on the right side panel of the window.
-
The Grid Column option applies to Extra Fields in Sales Orders, Jobs, Opportunities, and Subscriptions windows. Enable this option to include the Extra Field as a column on the main grid of a window.
You must enable the column using the Select visible columns right-click menu option on the grid.)
Note: For header tables, the Grid Column option is always deselected. It's always selected for line tables. With the SALESORD_LINES table, Extra Fields display in the grid if this option is selected. If it isn't, they display n the line periscope.
-
Select the Dialog Type based on the field — for example, choose Date Picker for dates, Standard Edit for nvarchars, Check Box for char(1), and the like.
-
The Copy field option is enabled if you specify one of these tables for the Table name field:
-
ASSET_REG
-
DR_TRANS
-
JOBCOST_HDR
-
OPPORTUNITY
-
OPPORTUNITY_QUOTE
-
PURCHORD_HDR
-
SALESORD_HDR
This field determines what happens to the Extra Field when you copy a record:
-
-
Always - the Extra Field does not display on the Copy window. it is copied when a record is copied.
-
Never - the Extra Field does not display in the Copy window. It is never copied when a record is copied.
-
Prompt for value (not available for the OPPORTUNITY_QUOTE table) - the Extra Field displays in the Extra Fields section of the Copy window, where the you can choose to keep the original value or enter a new one.
Dialog Types
Selection Controls
Setting the Dialog Type to Drop-Down Edit, Drop-Down Selection, or Drop-Down SQL Selection enables the combo boxes for Lookup SQL, Key field, and Display field.
The Lookup SQL can contain:
- A table name, in which case the Key field and Display field combo boxes contain all fields for the specified table.
- A SQL select statement that specifies which fields the Extra Field uses, in which case the Key field and Display field combo boxes contain only the fields specified by the SQL statement.
If you are using a Drop-Down Edit or Drop-Down Selection control, the Key field and Display field are concatenated together into a single string — for example, 1. ACCOUNTNAME. The Data type for the Extra Field must be CHARACTER, so that it can record the concatenated string.
If you are using a Drop-Down SQL Selection control, only the Key field is recorded. The Data type should match the data type of the selected key field.
Memo Fields
Set the Dialog Type to Memo to enable the Number of Lines field . This property specifies how many lines high the memo box is in windows in whch the Extra Field displays. Use the scroll bars if the text extends out the bottom of the memo box.
URL Controls
URLs display using the URL or Shortcut and URL Label types.
The URL or Shortcut type displays a raw URL as text that you can click — for example, https://myob.com.
The URL Label type can display a user-friendly HTML label that links to a URL — for example, a field that was populated with:
<a href="https://myob.com">MYOB website</a>
displays as MYOB website, and links to https://myob.com when you click it.
Extra Field Events
You can configure some Extra Fields to update their values whenever a field on the record type changes — for example, Extra Fields on a Sales Order can update when the Debtor account changes.
The Events tab is enabled when you select one of these for the Table name field:
- JOB_TRANSACTIONS
- JOBCOST_HDR
- JOBCOST_LINES
- OPPORTUNITY
- OPPORTUNITY_QUOTE
- SALESORD_HDR
- SALESORD_LINES
The Event Field Name field displays the field that triggers the Extra Field update. For Extra Fields on header records, this is ACCNO. For Extra Fields on lines, it is STOCKCODE.
The Event SQL field contains the SQL statement that updates the Extra Field when the Sales Order field is changes. Use these parameters to pass in information:
|
Record Type |
Supported Parameters |
|
Job header |
:Accno :Current_User |
|
Job quote line |
:Stockcode :Current_User |
|
Job transaction line |
:Stockcode :Jobno :MasterJobno :Accno :Current_User |
|
Opportunity header
|
:Accno :Company_Type_Int :Company _Type_Char :Company _Id |
|
Opportunity quote line |
:Stockcode :Opportunity_Seqno |
|
Sales Order header |
:Accno |
|
Sales Order line |
:Stockcode |
In the example above, an Extra Field on SALESORD_LINES has been set up to display the WEIGHT value for the Stock item. This value updates whenever the STOCKCODE on a Sales Order line is changed.
Note: Extra Field events override default values - if a default value is specified for an Extra Field that is populated by events, it will be ignored.
Extra Fields on Custom Tables
You can add Extra Fields to custom tables you have added to the Exo Business database. Access them using the Exo API. Custom tables are accessed using the customtable endpoint, which was introduced in version 1.3 of the Exo API. See the Exo API documentation on the Exo Business Education Centre for more information.
Note: You can create custom tables Exo Business Configurator or in SQL Server. If you are creating a custom table in SQL Server, it must include a primary key field. This field must be an integer, and should be named SEQNO.
When the Exo API is installed, the Extra Fields section contains these subsections:
- Manage Custom Tables – use this section to set up the list of custom tables to which you can add Extra Fields.
- Custom Tables (API) – use this section to add Extra Fields to the custom tables. It is the same as the Extra Fields screen for core Exo Business tables, but the Table name dropdown contains only tables that have been added in the Manage Custom Tables section.
To add Extra Fields to a custom table:
- Open Exo Business Configurator and go to the System > Extra Fields > Manage Custom Tables section.
- Add the custom table:
- If you have already created the custom table in SQL Server, click Add Existing Table and enter the table name to create a entry in this section.
- If the table does not already exist, click Create Table and enter a name for the custom table. The table is created in the Exo Business database and a new entry for it displays this section.
- Go to the Extra Fields > Custom Tables (API) section and click New. The Table name dropdown contains all tables that you have added on the Manage Custom Tables section.
- Add and configure Extra Fields on the custom table.