- Contents
- Index
- Search

Display results with all search words
The Design Tab
Most of the work of building a report is done on the Design tab. After a data source has been set up on the Data tab, the content and appearance of the report is set on the Design tab.
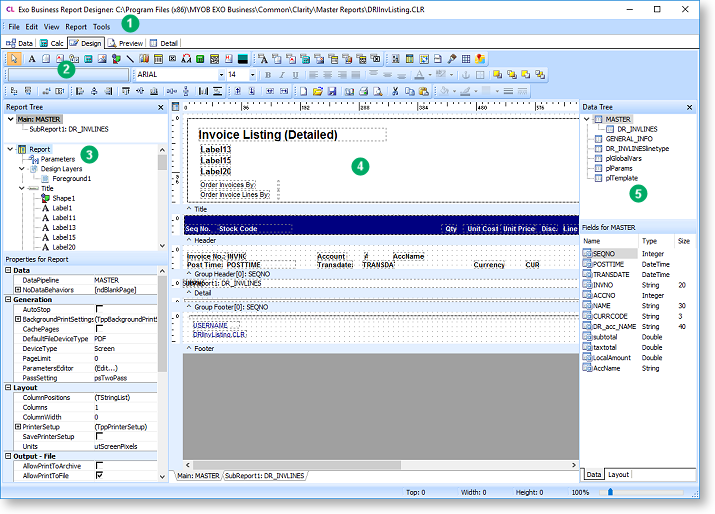
The Design tab is divided into the following main areas:
- Dropdown menus contain options for creating reports, controlling the appearance of the Design tab, and opening report utilities.
- A variety of toolbars contain the controls for placing and formatting content on the report.
- The Report Tree displays the components of the selected report band in a tree structure, with the properties of the selected component displayed below.
- The main editing canvas is where the various components of the report are arranged.
- The Data Tree displays the data sources that have been set up from the report, and lets you create data-aware report components by dragging fields onto the editing canvas.
Setting the Primary Table
Whenever you go to the Design tab after making changes on the Data tab, the Specify Primary Detail Table window opens:
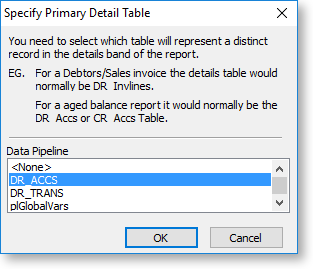
You must select which source on the Data tab represents the primary detail section of your report, i.e. the main table on which you will be building the report.
You can open this window at a later time by selecting Data from the Report menu.
Design Layers
A report can contain multiple layers, each with its own design. Layers are displayed on top of each other, allowing you to place elements like background images, watermarks or header/footer images into a background layer without affecting any parts of the main report in the foreground layer. Layers can also be saved and loaded independently of the main report, so that you can create reusable report elements or templates that are common to all of your reports.
Note: In older versions, the Page Style report band was used to contain background elements like watermarks. Enabling the Page Style option in the Report menu now adds a new page layer containing only a single Page Style band.
All design layers in the report are displayed on the Report Tree. Initially, there is only a single Foreground layer; if more layers are added, tabs appear at the bottom of the tree, allowing you to switch between them:
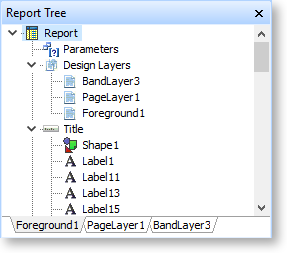
Whatever layer is selected in the Report Tree is displayed at the "top" of the report canvas, with all other layers appearing greyed out behind it.
To add a new layer, right-click on Design Layers and choose one of the following options:
- New Page Layer - adds a new design layer that contains only a single Page Style report band.
- New Band Layer - adds a new design layer that contains all of the report bands that are in the Foreground layer.
You can right-click on a layer in the Report Tree to access management options:
|
Option |
Description |
|
Open |
Loads the contents of the layer from a .LTM file. |
|
Save |
Saves the contents of the layer to a .LTM file, so that it can be reused in other reports. |
|
Rename |
Lets you enter a new descriptive name for the layer. |
|
Delete |
Deletes the layer and moves any items on it to the Foreground layer. |
|
Delete Item With Components |
Deletes the layer and all items on it. |
Note: Only the Rename option is available for the Foreground layer.