
WIP Labor Costs in Cost-Plus Projects: Process Activity
In this activity, you will learn how to temporarily allocate project expenses to a work-in-progress account group and then use the allocation transactions for billing.
Story
Suppose that in January, the West BBQ Restaurant customer ordered training for new employees on the operation of juicers from the SweetLife Fruits & Jams company. The customer did not know the exact number of employees or the number of training sessions that would be needed. The SweetLife company agreed with the customer to provide as many training sessions as the customer needed in January and February. Further, both parties agreed that on 2/25/2025, the customer would pay for all the hours of training sessions that took place.
The project manager of SweetLife created a project for this work. Then suppose that on 1/21/2025, a consultant of SweetLife provided eight hours of training and logged the time spent by creating and releasing a time card in MYOB Acumatica. In February, no additional training sessions were needed.
Acting as SweetLife's project accountant, you need to bill the customer, and you want the project expense incurred in January to be recorded in the same financial period as the project revenue—that is, in February. You will allocate the project expenses and bill the project.
Configuration Overview
In the U100 dataset, the following tasks have been performed to support this activity:
- On the Enable/Disable Features (CS100000) form, the Projects feature has been enabled to support the project accounting functionality.
- On the Projects (PM301000) form, the WESTBBQ6A project has been created and the TRAINING task has been created for the project.
- On the Account Groups (PM201000) form, the WIP and LABOR account groups have been created; the 12400 - Work in Progress account has been mapped to the WIP account group.
- On the Allocation Rules (PM207500) form, the WIPTM allocation rule
has been created. This allocation rule will be used to allocate project transactions that
represent a particular type of expenses to the 12400 - Work in Progress account.
Tip:For an example of the configuration of an allocation rule see WIP Labor Costs in Cost-Plus Projects: Implementation Activity.
- On the Billing Rules (PM207000) form, the WIP billing rule has been created, which processes the allocated transactions from the WIP account group during the project billing.
- On the Employee Time Cards (EP305000) form, the 0000001 time card, reflecting the work of Pam Brawner on the WESTBBQ6A project, has been created. The time card has also been released, and the PM00000019 batch of project transactions that corresponds to the time card has been created.
Process Overview
In this activity, you will first specify the allocation rule and billing rule for the project task on the Project Tasks (PM302000) form. You will review existing project transactions to be allocated on the Project Transaction Details (PM401000) form and then perform allocation for the project on the Projects (PM301000) form. On the same form, you will bill the project and release the AR invoice created as a result of the billing on the Invoices and Memos (AR301000) form. The system will create the reversing allocation transactions that you review on the Project Transaction Details form.
System Preparation
To sign in to the system and prepare to perform the instructions of the activity, do the following:
- Launch the MYOB Acumatica website, and sign in to a company with the U100 dataset preloaded; you should sign in as project accountant by using the brawner username and the 123 password.
- In the info area, in the upper-right corner of the top pane of the MYOB Acumatica screen, make sure that the business date in your system is set to 2/25/2025. If a different date is displayed, click the Business Date menu button, and select 2/25/2025 on the calendar. For simplicity, in this activity, you will create and process all documents in the system during this business date.
Step 1: Configuring the Project for Allocation and Allocating the Project
To configure the project for allocation and allocate project transactions, do the following:
- On the Projects (PM301000) form, open the WESTBBQ6A
project, and do the following:
- In the table on the Tasks tab, click the TRAINING link
in the Task ID column.
The system opens the task on the Project Tasks (PM302000) form.
- In the Billing and Allocation Settings section on the
Summary tab, specify the following settings:
- Allocation Rule: WIPTM
- Billing Rule: WIP
- Non-Billable WIP Account Group: Empty
- Save your changes, close the form, and return to the WESTBBQ6A project on the Projects form.
- In the table on the Tasks tab, click the TRAINING link
in the Task ID column.
- On the Cost Budget tab, click the only line in the table, and on
the table toolbar, click View Transactions.
On the Project Transaction Details (PM401000) form, which opens, review the only project transaction, and notice the values in the following columns:
- Orig. Doc. Type: The value in this column is Time Card because the transaction has been created based on the release of the time card created for Pam Brawner for the WESTBBQ6A project.
- Fin. Period: The transaction has been posted to the 01-2025 financial period.
- Debit Account Group: The transaction has debited the LABOR account group.
- Billed: This check box is cleared, indicating that the transaction has not been billed yet.
- Allocated: This check box is cleared, indicating that the transaction has not been allocated yet.
- Close the form and return to the WESTBBQ6A project on the Projects form.
- On the Balances tab, review the project balance. Notice that the actual amount of the project expenses ($360) is currently posted to the LABOR account group.
- On the More menu, under Billing and Allocations, click
Run Allocation to perform the allocation for the selected
project.
When the allocation is completed, on the Balances tab, review the project balance again. Notice that the actual amount of the project expenses has been moved from the LABOR account group to the WIP account group.
- On the Cost Budget tab, click the only line in the table, and on
the table toolbar, click View Transactions.
On the Project Transaction Details (PM401000) form, which opens, notice that the second transaction has appeared. Review the transactions, noticing the values in the following columns:
- Orig. Doc. Type: The value in this column is Allocation for the new transaction, which means the transaction is an allocation transaction.
- Date: The date of the allocation transaction is the same as the date of the original transaction. Thus, the allocation transaction has been posted to 01-2025, which is the same financial period to which the original transaction was posted.
- Debit Account Group: The allocation transaction has debited the WIP account group.
- Credit Account Group: The allocation transaction has credited the LABOR account group, which is the debit account group of the original transaction.
- Billed: This check box is cleared, indicating that the allocation transaction has not been billed yet (as is the case with the original transaction).
- Allocated: This check box is selected for the original transaction with the Time Card original document type, indicating that the transaction has been used as the source for allocation.
- Close the form and return to the WESTBBQ6A project on the Projects form.
Step 2: Billing the Project
To bill the project, do the following:
- While you are still reviewing the WESTBBQ6A project on the Projects (PM301000) form, click Run Billing on
the form toolbar.
The system creates an AR invoice and opens it on the Invoices and Memos (AR301000) form.
- In the Summary area of the form, make sure that the Date of the invoice is 2/25/2025, which is the current business date, and that the Post Period is 02-2025.
- On the form toolbar, click Remove Hold to assign the invoice the Balanced status, and then click Release to release the AR invoice.
- Open the Project Transaction Details (PM401000) form; in the Selection area, select
WESTBBQ6A in the Project box, and make sure the other
boxes are cleared.
In the table, notice that two new transactions have been created (see the following screenshot).
Figure 1. Project transactions of the WESTBBQ6A project 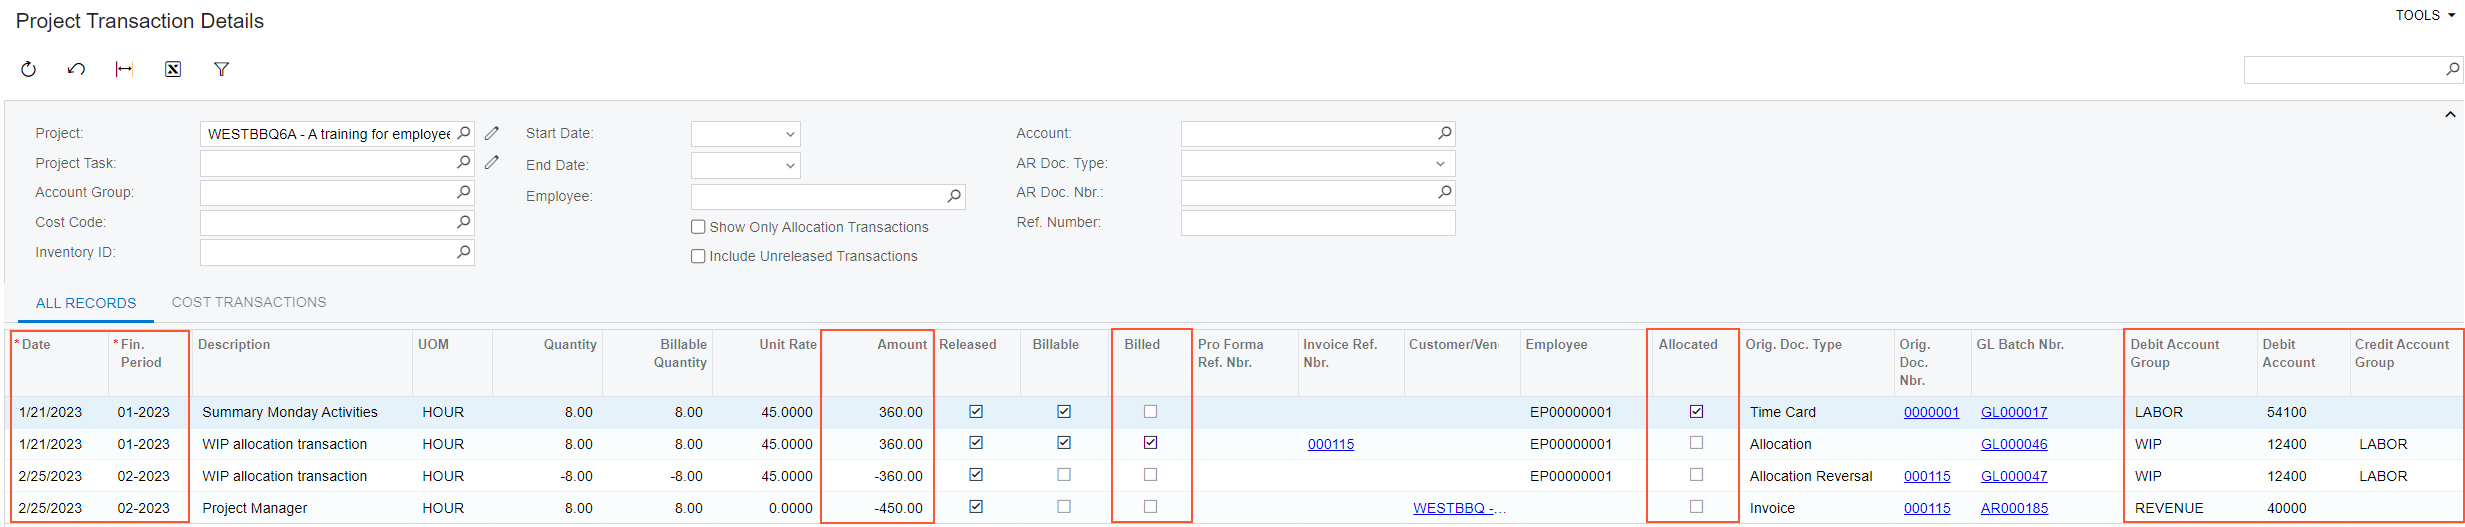
Review the transactions, noticing the values in the following columns:
- Orig. Doc. Type: The values in this column are Allocation Reversal and Invoice for the new transactions, which means that the first one is a reversing transaction for the allocation transaction, and the second one originates from the released invoice.
- Date: The date of the new transactions is the invoice date. Thus, the transactions have been posted to the 02-2025 financial period.
- Debit Account Group: The transaction with the Allocation
Reversal original document type has cleared the WIP account group
(debited the account group with an opposite amount) and debited the LABOR
account group. This reversing allocation transaction, which moved the expenses back to
the original account group, was created on release of the AR invoice, based on the
Reverse Allocation setting of the allocation rule on the
Allocation Settings tab of the Allocation Rules (PM207500) form.
The transaction with the Invoice original document type has debited the REVENUE account group with the amount calculated with the billing rule of the project task.
- Released: This check box is selected for all the transactions, including the transaction with the Allocation Reversal original document type, indicating that all the transactions have been released.
- Billed: This check box is selected for the transaction with the Allocation original document type, indicating that the allocation transaction has been used in billing.
- On the Projects form, open the WESTBBQ6A project, and on the Balances tab, review the project balance. Notice that the actual amount of project expenses ($360) has been moved back from the WIP account group to the LABOR account group. The actual amount of the REVENUE account group has been updated and is now $450.
You have allocated project expenses to a work-in-progress account group and then performed billing based on the allocation transactions.