Pivot Tables: To Create a Pivot Table
In this activity, you will learn how to create a pivot table and share it with other users.
Story
Suppose that you are a technical specialist in your company who is working on simple customizations, including the creation and modification of generic inquiry forms and pivot tables. A warehouse manager of your company has asked you to create a pivot table that groups stock keeping units (SKUs) by item class and shows the total number of all units and the number of units in each class. Also, the pivot table should be viewed as a data view of the predefined Stock Items (IN2025PL) inquiry form, which has the IN-StockItem inquiry title and the Stock Items site map title specified on the Generic Inquiry (SM208000) form.
Configuration Overview
In the U100 dataset, the following tasks have been performed to support this activity:
- The Inventory and Order Management feature has been enabled on the Enable/Disable Features (CS100000) form to provide support for the stock item functionality.
- On the Item Classes (IN201000) form, multiple item classes have been defined.
- On the Stock Items (IN202500) form, multiple stock items have been defined.
- The Stock Items (IN2025PL) inquiry form, which displays the list of the stock items that have been created on the Stock Items (IN202500) form, has been set up as the substitute form that is opened when you click the Stock Items link in a workspace or a list of search results.
Process Overview
In the activity, on the Stock Items (IN2025PL) generic inquiry form, you will create the requested pivot table and save it as a shared data view of this inquiry form.
System Preparation
Launch the MYOB Acumatica website, and sign in to a tenant with the U100 dataset preloaded as system administrator Kimberly Gibbs. You should sign in by using the gibbs username and the 123 password.
Step 1: Creating the Pivot Table
To create the pivot table as a data view, do the following:
- Open the Stock Items (IN2025PL) generic inquiry form.
- Open the View List menu and click Create View.
- In the Create View dialog box, which opens, do the following:
- In the Name box, type Items by Item Class.
- Select the Shared check box.
- Click Create to add the shared data view.
The system opens the Settings dialog box where you can configure the pivot table.
Step 2: Configuring the Pivot Table
To configure the pivot table, do the following in the Settings dialog box:
- To configure the rows of the pivot table, add fields to the pivot table as follows:
- Drag Item Class from the Fields pane to the Rows pane. The identifiers of the item classes will be displayed as row headers in the pivot table.
- Drag Inventory ID from the Fields pane to the Rows pane as a second row after Item Class. This will group stock items that belong to the same item class.
- In the Rows pane, click Item Class to display its
properties in the Properties pane, and do the following in this
pane:
- Make sure that the Show Total check box is selected. With this setting, the system will add the Total row at the bottom of the table, which will display the total number of items in stock for all item classes.
- Type Total SKUs in the Total Label box. With this setting, the system will change the caption for the Total row at the bottom of the table.
- Select the Collapsed check box. With this setting, the system will collapse item class groups by default.
- In the Rows pane, click Inventory ID to display its properties in the Properties pane. In this pane, clear the Show Total check box. The total number of stock items in a class will be displayed with the collapsed groups of item classes.
- To configure the values of the pivot table, add fields to the pivot table as follows:
- Drag Inventory ID from the Fields pane to the Values pane. The pivot table will display the number of SKUs aggregated by item class.
- While Inventory ID is selected in the Values pane, in the Properties pane, clear the Show Total check box.
- Close the Settings dialog box to switch to view mode.
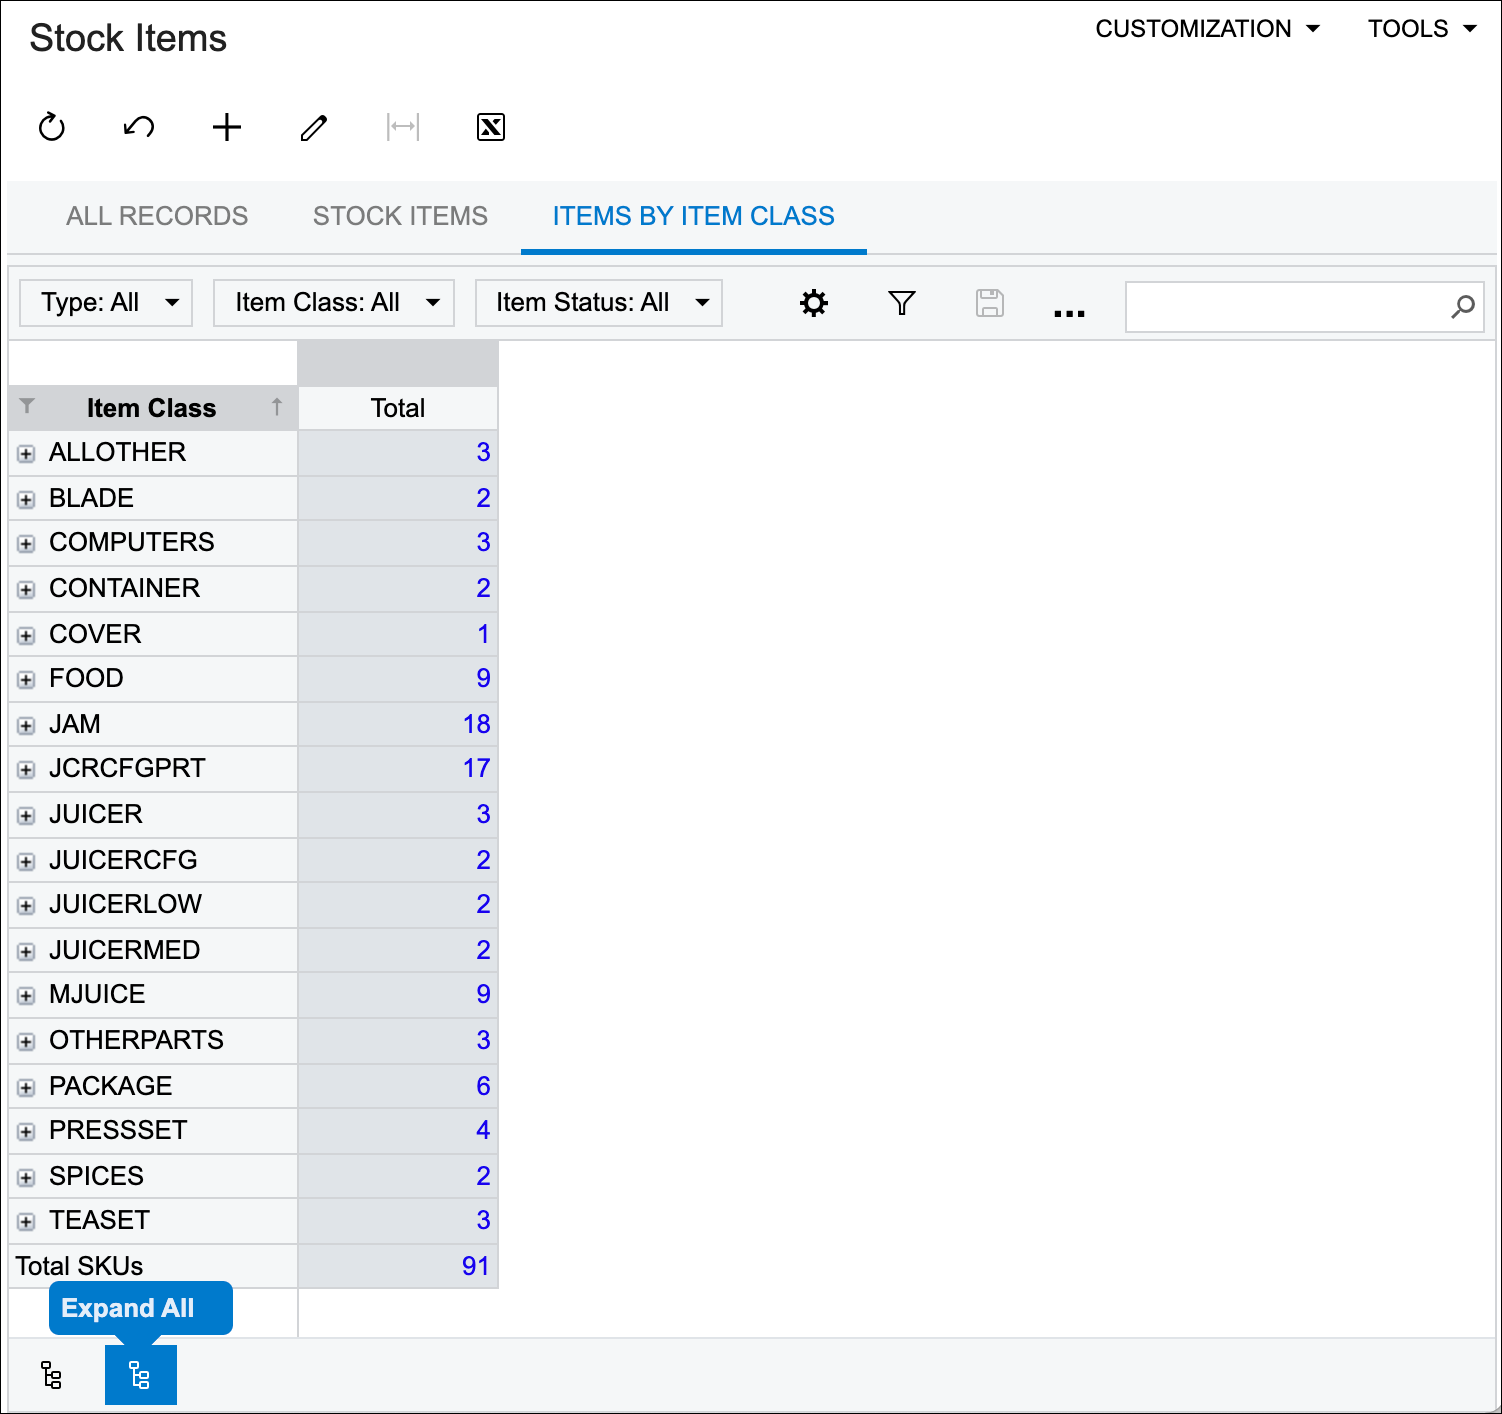
The system will display the pivot table, which aggregates SKUs by item class. Item class groups are collapsed by default, and the total number of SKUs in the group is displayed in the Total column. The Total SKUs row is added at the bottom of the table and shows the total number of stock keeping units available. A user can expand a particular group by clicking the plus sign next to a group name or click the Expand All button at the bottom of the form (shown in the following screenshot) to expand all groups at once. The button next to Expand All is the Collapse All button.
Figure 1. A pivot table with the groups collapsed