
Pivot Tables: To Create a Pivot Table as a Form
In this activity, you will learn how to create a pivot table and make it available as a standalone form in MYOB Acumatica.
Story
Suppose that you are a technical specialist in your company who is working on simple customizations, including the creation and modification of generic inquiry forms and pivot tables. An accountant of your company has asked you to create a pivot table that aggregates invoice totals by quarter for each customer and displays this customer's percentage of the grand total of all sales to customers in the quarter.
Process Overview
In this activity, on the Pivot Tables (SM208010) form, you will create the requested pivot table.
While creating the pivot table, you will notice that the inquiry does not include the field that holds the line total of the document. You will add the missing field to the inquiry, refresh the data in the Fields pane, and continue configuring the table.
When the table has been created and all the necessary settings have been specified, you will preview the pivot table and then add it to the site map.
System Preparation
Launch the MYOB Acumatica website, and sign in to a tenant with the U100 dataset preloaded as system administrator Kimberly Gibbs. You should sign in by using the gibbs username and the 123 password.
Step 1: Creating a Pivot Table
To create the pivot table, do the following:
- Open the Pivot Tables (SM208010) form.
- In the Screen ID box, select Invoices and Memos with the
AR3010PL screen identifier.Tip:You can look for the generic inquiry by typing its name (Invoices and Memos) or screen identifier (AR3010PL) in the search box in the lookup table. The lookup table shows the Title column (with the site map title) and the Screen ID column (with the screen ID). When you double-click a row to select it, the system inserts the title rather than the screen ID into the Screen ID box.
- In the Name box, type Invoice Totals by Customer, which describes the type of data that is shown with this pivot table. The value will be used as the default value for the pivot table title in the site map.
- On the form toolbar, click Save. The system saves the pivot table and copies the specified name to the Pivot Table ID box.
Step 2: Adding a Missing Field to the Inquiry
Suppose that you have realized that you need the Line Total field to calculate the percentage. To add the missing field to the inquiry for the pivot table, do the following:
- On the form toolbar of the Pivot Tables (SM208010) form with the
Invoices and Memos pivot table selected in the Screen ID
box (and with the Invoice Totals by Customer in the Name
box), click Edit Inquiry.
The system opens the Generic Inquiry (SM208000) form in a separate tab. (Do not close the other browser tab, with the Pivot Tables form opened with the Invoices and Memos pivot table selected; you will return to it in the next step.)
- On the Results Grid tab of the Generic Inquiry
form, add a row with the following settings:
- Object: ARInvoice
- Data Field: LineTotal
- Visible: Cleared
- Default Navigation: Cleared
- Caption: Line Total
Tip:If some columns mentioned in the activity are not available in the table, make them visible by using the Column Configuration dialog box of the table. - On the form toolbar, click Save.
Step 3: Configuring the Pivot Table
To configure the pivot table, do the following:
- Switch to the browser tab with the Pivot Tables (SM208010) form with the Invoices and Memos pivot table selected.
- On the toolbar of the Fields pane, click Refresh to update the list of available fields. Make sure that the Line Total is listed.
- To configure the rows of the pivot table, do the following:
- Drag Customer from the Fields pane to the Rows pane. The names of customers will be displayed as row headers in the pivot table.
- While Customer is selected in the Rows pane, in the Properties pane, make sure that the Show Total check box is selected. With this setting, the system will add the Total row, which will display a total for all customers in each column.
- To configure the columns of the pivot table, do the following:
- Drag Date from the Fields pane to the Columns pane.
- While Date is selected in the Columns pane, in the Properties pane, make sure that the Show Total check box is selected. With this setting, the system will add the Total column, where a total for all dates in each row will be displayed.
- In the Round To box, select Quarters to aggregate invoice totals by quarter. Notice that in the Format box, the format of the date is displayed automatically.
- To configure the values of the pivot table, do the following:
- Drag Line Total from the Fields pane to the Values pane. The pivot table will display invoice amounts, aggregated by quarter, for each customer.
- While Line Total is selected in the Values pane, in the Properties pane, type $#,##0.00 in the Format box.
- Drag Line Total from the Fields pane to the Values pane one more time.
- While Line Total is selected in the Values pane, in the Properties pane, type % of Grand Total in the Caption box.
- Select % of Grand Total in the Show Value As box.
- On the form toolbar, click Save.
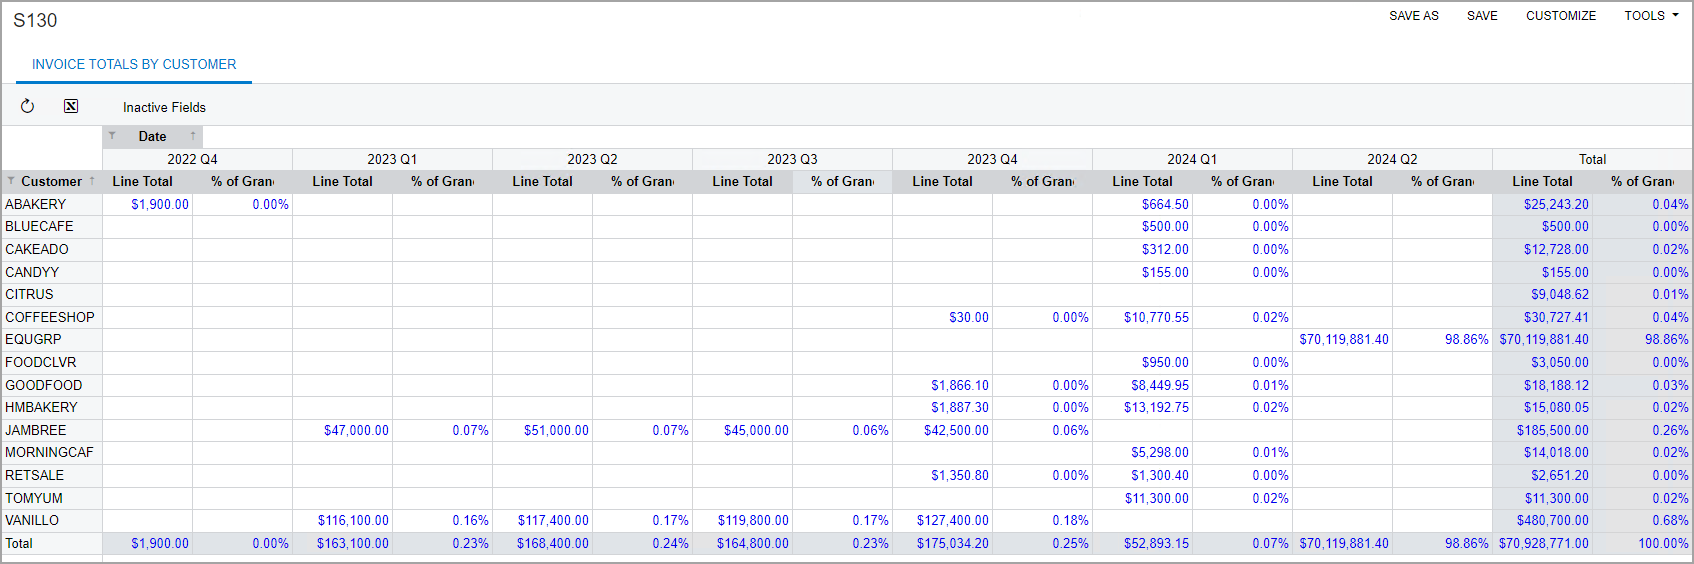
Step 4: Previewing the Pivot Table
To preview the pivot table you have created, with the Invoices and Memos pivot table selected on the Pivot Tables (SM208010) form, click View Pivot on the form toolbar. The system opens the table in a separate browser tab. The pivot table that you have created is shown in the following screenshot.
Step 5: Making the New Table Visible to Other Users
To add the pivot table you have created to the site map, do the following while viewing the Invoices and Memos pivot table on the Pivot Tables (SM208010) form:
- On the form toolbar, click Publish to the UI. In the dialog box
that opens, do the following:
- In the Site Map Title box, modify the table title, if needed. Other boxes are populated automatically, based on the values you specified. The Workspace and Category boxes are populated with the default values for the pivot tables which are Data Views and Pivot Tables respectively. For details see, Categories and Workspaces for Entities of Specific Forms.
- In the Screen ID, leave the automatically assigned identifier.
- In the Access Rights section, select the Set to Granted for All Roles option button.
- Click Publish to publish the pivot table and close the dialog box.
- On the main menu, click Data Views, and in the workspace, under the Pivot Tables category, make sure the pivot table you created is listed.
Self-Test Exercise
Now that you have learned how to create a pivot table as a separate form and specify different properties, try to apply this knowledge and modify the pivot table on the Pivot Tables (SM208010) form as follows:
- Make the system aggregate invoice totals by quarters, using the Date Part setting in the Properties pane.
- Make the system display the percentage of the column total instead of the grand total.
- Move the pivot table to the Receivables workspace.