
Modern Customer Portal: Completing Portal Setup
You complete the portal creation process by specifying additional settings on the tabs of the Portals (SP701000) form.
At a Glance: Portal Setup Completion
- Select the categories and forms that will be available in the portal
- Specify finance, order, and customer relationship management (CRM) settings
- Save the portal to make it available
- Specify and save branding and landing page settings
Who performs these steps: An MYOB Acumatica administrator of the portal owner—the company whose customers will use the Modern Customer Portal.
The sections that follow describe these steps.
Controlling the Available Forms
On the General tab of the Portals (SP701000) form, you specify which categories and forms are available in the portal. The tab shows a navigation pane (Item 1 below) with check boxes for:
- Categories (top-level nodes): Select a category’s check box to make its forms available. If a category’s check box is cleared, the check boxes for its forms are also cleared and unavailable for editing.
- Forms within categories: Select a form’s check box to make the form available to portal users. If a form’s check box is cleared, the form is hidden from portal navigation and can’t be opened, even if its URL is entered directly.
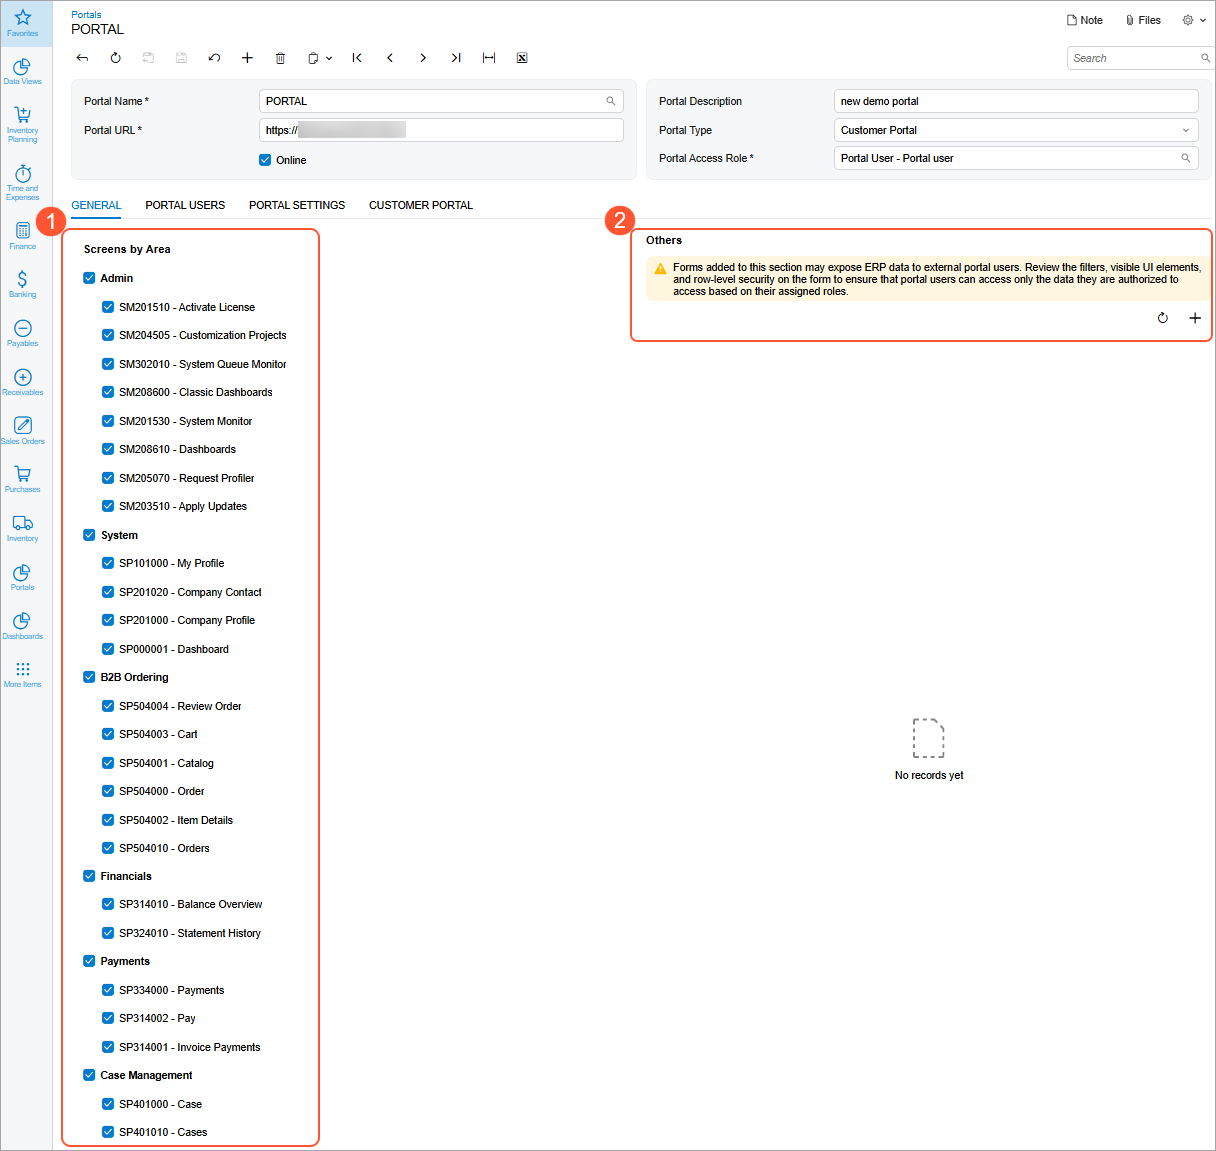
In the Others section (Item 2), you can select uncategorized forms to make them available in the portal. These might include dashboards, generic inquiry forms, and pivot tables that you create in MYOB Acumatica and then add to the portal.
If you haven't added uncategorized forms, the Others section is hidden, and you'll see a warning about the steps you need to take to secure these forms' data.
Security Requirements for Forms Your Company Creates
In MYOB Acumatica, sensitive customer-related data includes data associated with a customer’s business account, such as cases, orders, invoices, payments, and debit and credit memos. This data needs to be protected on all forms, including dashboards, generic inquiry forms, pivot tables, and custom and customized forms—the ones that will appear in the Others section of the General tab.
When you create custom or customized forms for use in the Modern Customer Portal, follow these guidelines:
- Limit your company’s data that’s visible to portal users.
- Ensure that each customer’s data is visible only to that customer’s portal users.
You can use the following filtering approaches:
- BAccount-based filtering: Compare the BAccount record of the new form to the BAccount record of the existing form in the system. You can use built-in portal filters, including filtering by the current BAccount and its child BAccounts tree.
- Visibility-based filtering: Select only records visible to the current user by using the CurrentMatch condition.
You can use the following conditions to validate data:
- Restriction.PortalCustomers. This filter is equivalent to
PXAccess.GetBAccountIDTree() filtering. It selects only
data related to the current BAccount and its child
BAccounts.
SelectFrom<SPCRCase>.Where<SPCRCase.customerID.IsInSequence <Restriction.PortalCustomers>> Restriction.PortalConsolidatedCustomers. This filter selects data for the current account’s consolidating family.SelectFrom<SPSOOrder>. Where<SPSOOrder.customerID.IsInSequence<Restriction.PortalConsolidatedCustomers>>- CurrentMatch. This filter selects data that’s visible to the
signed-in user.
SelectFrom<InventoryItem>.Where<CurrentMatch<InventoryItem, AccessInfo.
userName>>
When you create a customized generic inquiry form, on the Conditions tab of the Generic Inquiry (SM208000) form (Value 1 column), filter data by using the following conditions:
- Current
BAccount: The@mybaccountfilter variable - Current
BAccounttree:@mybaccounttree(the currentBAccountand all descendantBAccounts)
Alternatively, you can filter data by the signed-in user or current contact.
Specifying Finance, Order, and CRM Settings
On the Portals (SP701000) form, you can specify settings that will be used by portal forms. These include:
- In the Portal Access Role box (Item 1 below), select the role assigned to portal users. For external customers, select Portal Users.
- In the User Type box (Item 2), specify the user type of users who can access the portal. For external customers, specify Portal External User.
- In the Finance and Order Management section (Item 3), specify the financial source (the company or branch the portal obtains data from), the default warehouse and sales order type for portal orders, and warehouse visibility settings.
- In the CRM and Support section (Item 4), select the
default case class for cases submitted in the portal and the default contact
class for contacts created in the portal.
Figure 2. The general portal settings 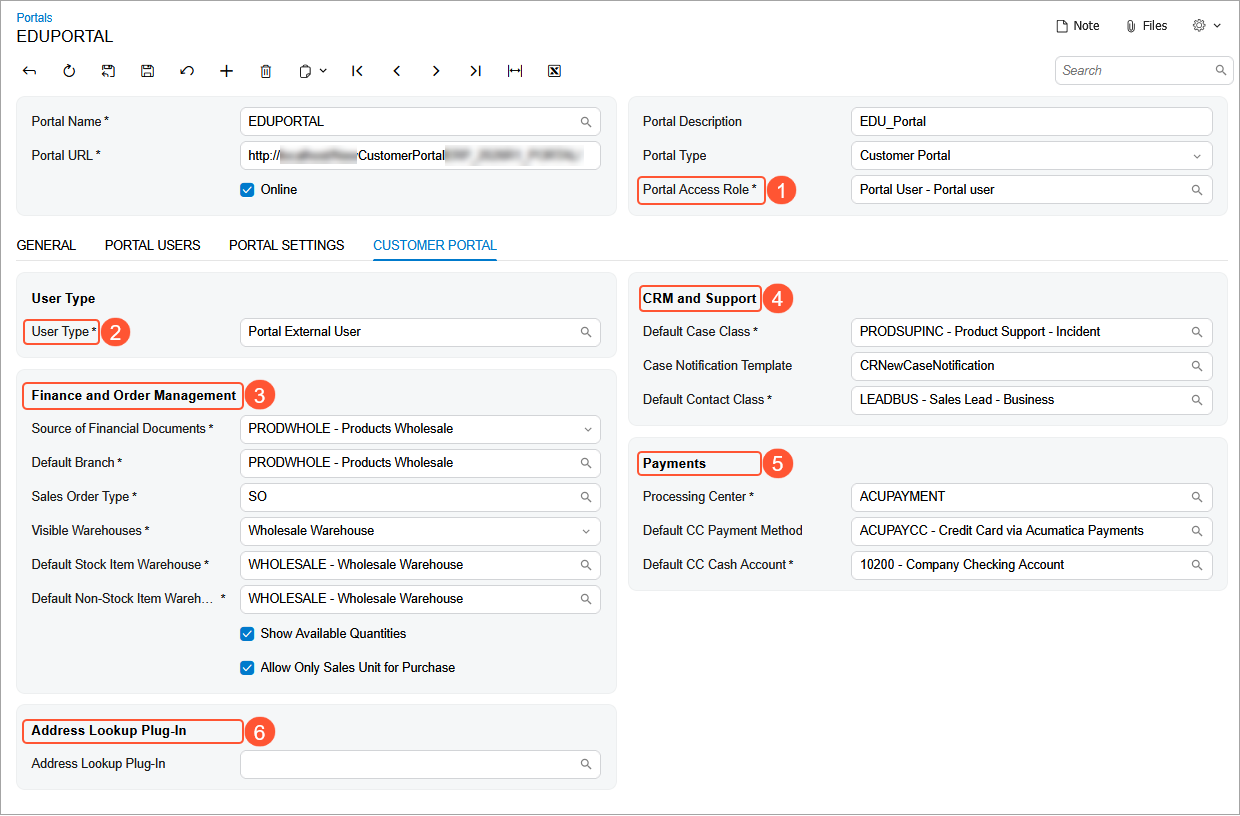
When you enter the required settings, you can save the portal. Now portal users with appropriate rights can sign in to the portal and start working in it. The system creates a customer profile on the Company Profile (SP201000) form automatically. The data on this form is copied from the customer's business account, which was previously created on the Business Accounts (CR303000) form of MYOB Acumatica.
Specifying Display and Landing Page Settings
On the Portal Settings tab of the Portals (SP701000) form, you can specify the display and landing page settings:
- In the Display Settings section (Item 1 below), specify the interface theme, primary color, and company name. You can also upload the company logo and sign-in image to reinforce branding.
- In the Landing Page Settings section (Item 2), specify
the default Home form and enter the text to be shown as the top message and on
the Go to Catalog button. You can also upload images for
both.
You can also control the visibility of navigation panels, the top message, and the Go to Catalog button by using the corresponding check boxes (Items 3—4).
Figure 3. Branding and landing page settings 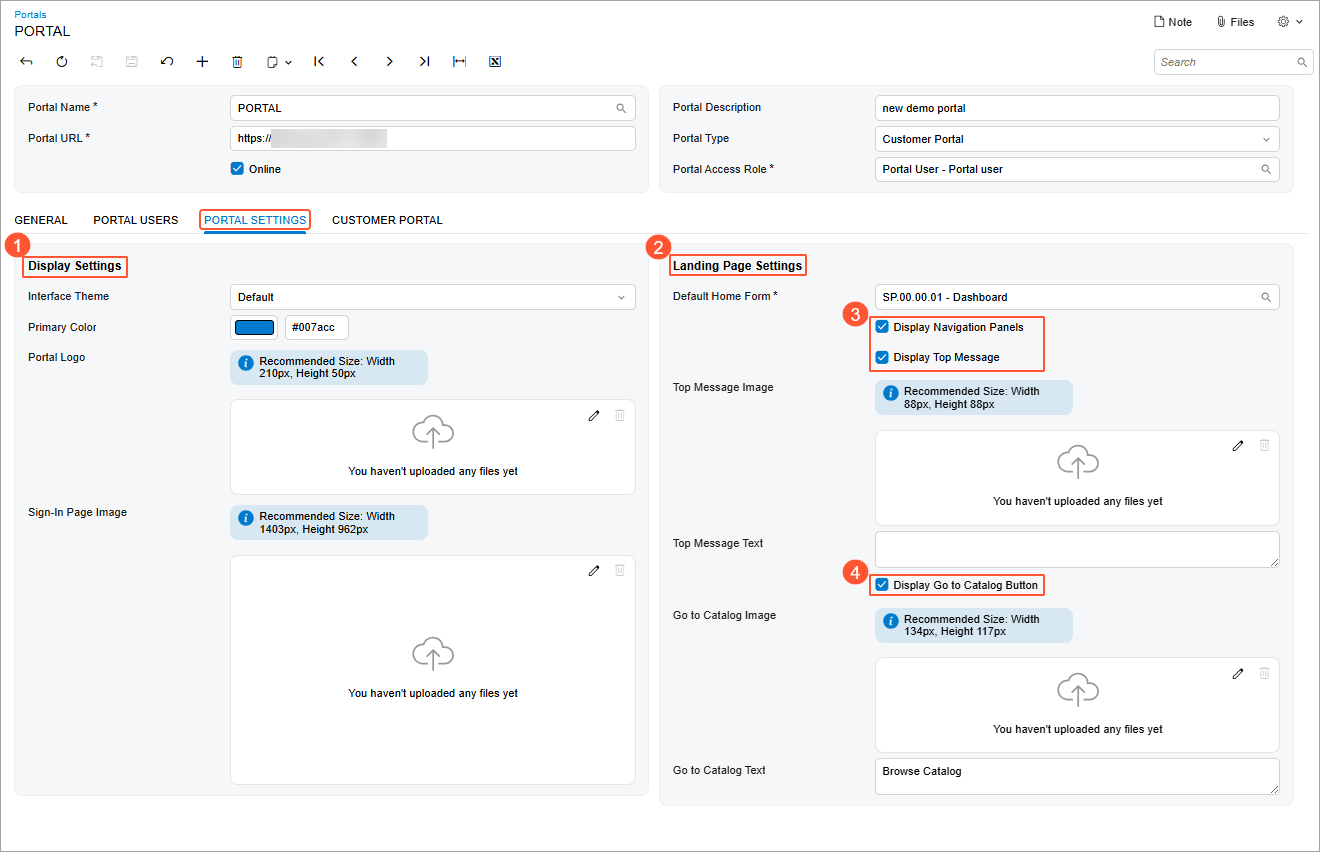
Save your changes again.
What's Next?
After you’ve set up a portal, you need to assign roles to portal users. For more information, see Assigning Roles to Portal Users.