
Tenant Maintenance: To Explore Tenant Visibility
The following activity will walk you through the process of exploring how tenant visibility affects the existing MYOB Acumatica application instance.
Story
Suppose that you are the system administrator of your company, and you have been asked to add a new tenant to the existing MYOB Acumatica application instance. You will explore how to use the visible tenant as a parent tenant. Additionally, you will verify the capability of having an instance where all tenants are invisible.
Process Overview
In this activity, you will explore the visible capabilities of tenants.
System Preparation
Before you begin performing the step of this activity, make sure that you have performed the following prerequisite activity: Instance Deployment: To Deploy an Instance with Demo Data.
Step: Exploring the Capabilities of Tenant Visibility
To explore the capabilities of tenant visibility, do the following:
- On the Start menu, click Acumatica ERP Configuration to open the MYOB Acumatica ERP Configuration Wizard.
- On the Welcome page, click Perform Application Maintenance.
- In the list of existing application instances, select the row with the MYOB Acumatica instance and click the Maintain Tenants button. For more details about how to create the application instance, see Instance Deployment: To Deploy an Out-of-the-Box Instance.
- In the SQL Server Authentication dialog box, leave the default settings, and
click OK.
This opens the Tenant Setup page, which shows the full list of tenants for the selected application instance.
- Select the Advanced Settings check box below the list of
tenants.
The system displays the default System tenant with an ID of 1 in the list of tenants.
Tip: With the Advanced Settings check box selected, you can also select a new data template in the Insert Data column for an existing tenant. If you finish updating the tenant, the MYOB Acumatica ERP Configuration Wizard replaces the tenant data with the data of the selected template. - Clear the Visible check box in the row with the
Company tenant, and click Next.
The system displays a warning informing you that you cannot continue with all the instance's tenants being invisible.
- In the warning dialog box, click OK.
- On the Tenant Setup page, to which you return, do the following:
- Click Create below the list of tenants to add one more tenant.
- For the new tenant, select 2 in the Parent Tenant ID column.
- Select the Visible check box in the row with the Company tenant.
- Click Next.
The system displays an error message informing you that you cannot continue because only an invisible tenant can be specified as a parent of another tenant, as shown in the following screenshot.
Figure 1. The error message 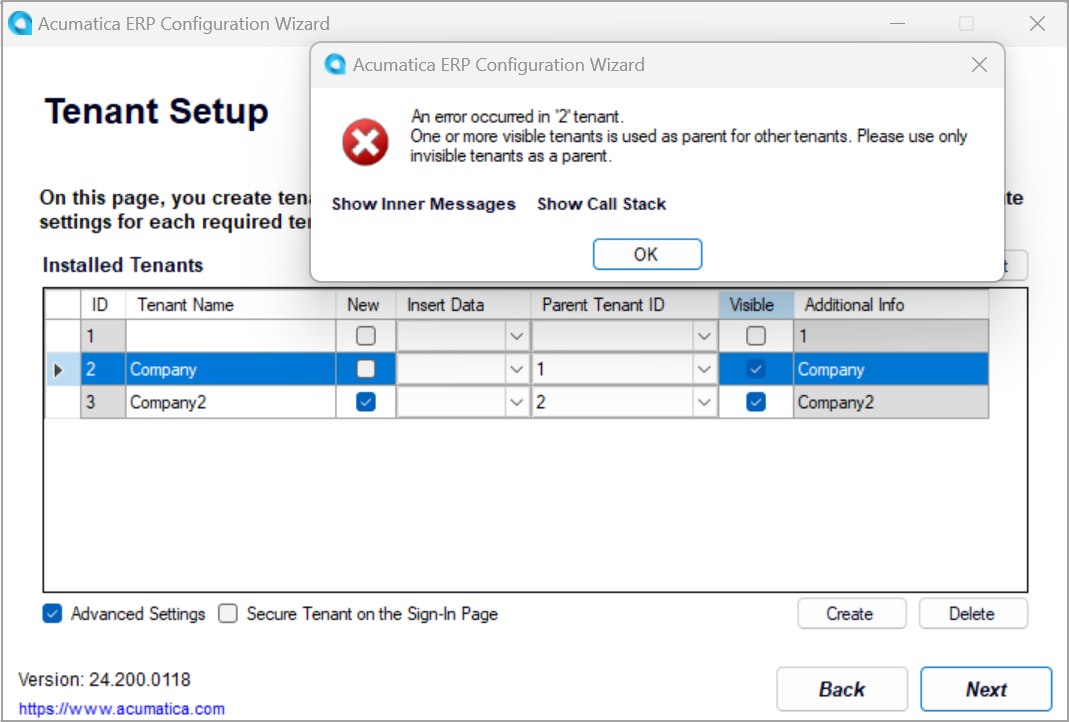
- In the dialog box, click OK.
The system automatically clears the Visible check box in the row with the Company tenant.
- On the Tenant Setup page, to which you return, do the following:
- Make sure that the Visible check box is selected only in the row with the new tenant, and that 2 is selected as the Parent Tenant ID in this row.
- Click Next.
- On the Confirmation of Configuration page, review your changes, and click Finish.
- Wait while the application instance settings are updated, and click OK.