
Instance Deployment: To Deploy an Instance with Demo Data
In this activity, you will learn how to deploy an MYOB Acumatica application instance with demo data.
Story
Suppose that you are the system administrator of your company, and you need to deploy the MYOB Acumatica application instance with the T100 dataset.
Process Overview
In this activity, you will deploy the MYOB Acumatica application instance with the T100 dataset.
System Preparation
Before you begin deploying an MYOB Acumatica application instance, make sure that you have performed the following prerequisite activity: MYOB Acumatica Installation On-Premises: To Install the MYOB Acumatica Configuration Wizard.
Step: Deploying an Instance with the Demo Data
To create an MYOB Acumatica instance with the T100 dataset inserted, do the following:
- On the Start menu, click Acumatica ERP Configuration to open the MYOB Acumatica ERP Configuration Wizard.
- On the Welcome page, which opens, click Perform Application Maintenance.
- Below the list of existing application instances, click Create.
- On the Database Server Connection page, specify the following settings, and then
click Next to go to the next page:
- Server Type: Microsoft SQL Server
- Server Name: (local)
- Windows Authentication: Selected
- On the Database Configuration page, specify the following settings, and then
click Next to go to the next page:
- Create a New Database: Selected
- New Database's Name: AcumaticaT100
- On the Tenant Setup page, double-click in the Insert Data
column for the automatically created row with the Company tenant name,
and select T100, as shown in the following screenshot.
Figure 1. Selection of a dataset for a new tenant 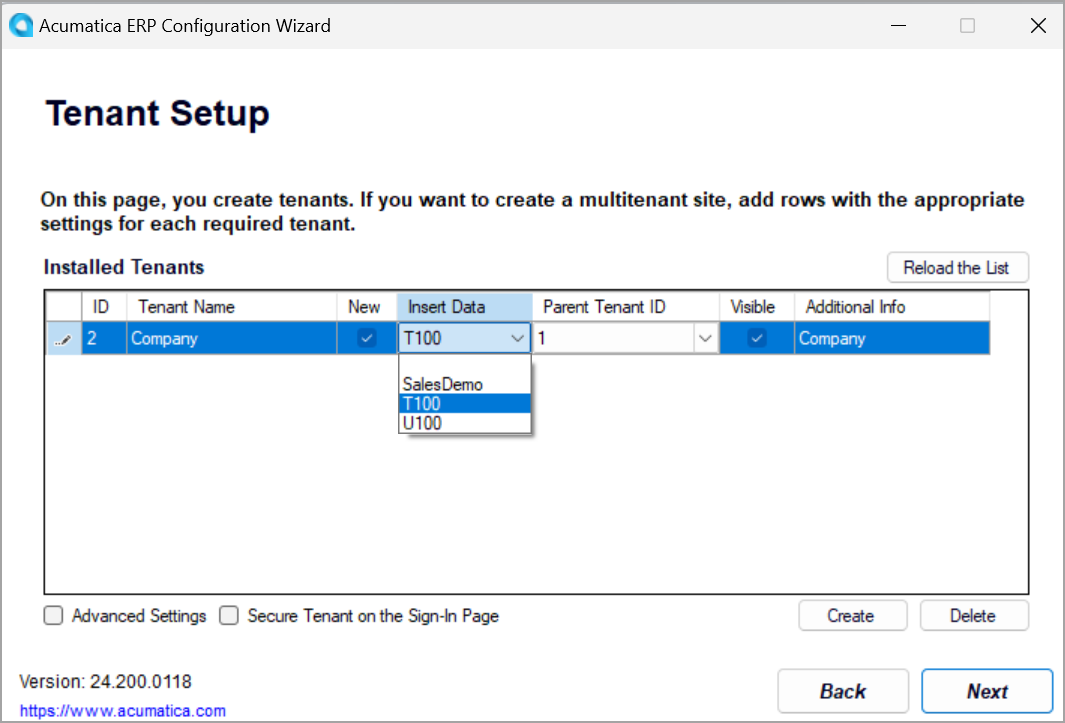
- Click Next to go to the next page.
- On the Database Connection page, select Windows Authentication; click Next.
- On the Instance Configuration page, specify the following settings, and then
click Next to go to the next page:
- Instance Name: AcumaticaT100
- Create Acumatica ERP Site: Selected
- Local Path to the Instance: The path to the application instance on the local computer
- On the Website Configuration page, specify the following settings, and then
click Next to go to the next page:
- Website Settings: Default Web Site
- Create Virtual Directory: Selected
- Virtual Directory Name: AcumaticaT100
- Use Existing Application Pool: Selected
- Available Application Pools: DefaultAppPool
Leave the other settings without changes.
- On the Confirmation of Configuration page, review the settings, and click Finish. Wait while the new application instance is created.
- After the installation is completed, click OK in the dialog box to return to the MYOB Acumatica ERP Configuration Wizard.
- Click Perform Application Maintenance.
- Click the row with AcumaticaT100 instance, and then click
Launch.
The instance opens in a new tab of your default browser.
- Use the admin username and the setup password to sign in to the
instance for the first time, and change the default password. Important:By default, a password must be at least eight characters and contain characters from three of the following four categories: English uppercase characters (A through Z), English lowercase characters (a through z), numerals (0 through 9), and special characters (such as !, $, #, and %). For details, see Preparing an Instance: System-Wide Security Policy.
The home page of the MYOB Acumatica instance opens.
- To verify that the demo data has been inserted, open the Employees (EP203000) form, and make sure that there are six employees (Michael Andrews, Maxwell Baker, Layla Beauvoir, Joseph Becher, Martin Bernia, and Todd Bloom). These employees do not come in the out-of-the-box tenant; they have appeared in the instance because you directed the wizard to insert the demo data.