Anomaly Detection: Process Activity
The following activity will walk you through the process of configuring the process that detects anomalies in generic inquiries.
Story
Suppose that you are a technical specialist who is working on configuring generic inquiries. Further suppose that a purchase manager in your company monitors the cost information of inventory items included in accounts payable documents. This purchase manager has requested the sending of notifications when the cost of an item in a particular AP document is too high or too low for a particular vendor, depending on the average value of the item for this vendor. Acting as a system administrator, you need to do the following:
- Configure the anomaly detection process for the generic inquiry that lists the cost information of inventory items
- Configure a business event that the system will trigger when any anomalies are detected
- Create a widget that displays the number of new anomalies and add this widget to a dashboard
Configuration Overview
In the U100 dataset, the Costs in AP Documents (AP3010ML) generic inquiry form has been added for the purposes of this activity. The table on this form displays AP document lines that have been entered on the Bills and Adjustments (AP301000) form. The Selection area contains elements that give the user the ability to select the start and end dates of the documents, the vendor, and the inventory item. The form does not yet display any information related to anomaly detection.
Process Overview
On the Generic Inquiry (SM208000) form for the Costs in AP Documents (AP3010ML) generic inquiry, you will specify the settings for anomaly detection. On the resulting Costs in AP Documents (AP3010ML) generic inquiry form, you will manually start the anomaly detection process. You will then set up a schedule for anomaly detection on the Generic Inquiry form. Finally, you will add a widget to the predefined Purchasing Manager (PO3015DB) dashboard and configure a business event on the Business Events (SM302050) form.
System Preparation
Before you begin performing the steps of this activity, do the following:
- Launch the MYOB Acumatica website with the U100 dataset preloaded, and sign in as a system administrator by using the gibbs username and the 123 password.
- On the Enable/Disable Features (CS100000) form, enable the Detection of Numeric Anomalies in Generic Inquiries feature.
Step 1: Configuring Anomaly Detection
To configure anomaly detection for the Costs in AP Documents (AP3010ML) generic inquiry, do the following on the Generic Inquiry (SM208000) form:
- In the Inquiry Title box of the Summary area, select AP-ML-Costs in AP Documents.
- Select the Detect Anomalies check box.
The Anomaly Detection tab appears on the form.
- On this tab, specify the following settings:
- Field for Analysis: Ext. Cost
- Date Field for Timeline: Date
- In the Grouping section, do the following:
- On the table toolbar, click Add Row. In the Data Field column of the row, select Vendor ID.
- Select the Skip Empty Groups check box.
- In the Update Frequency box, select On Demand.
- On the form toolbar, click Save.
Step 2: Starting the Anomaly Detection Process
While your are still working on the Generic Inquiry (SM208000) form with the Costs in AP Documents (AP3010ML) generic inquiry selected, do the following:
- On the form toolbar, click Detect Anomalies.
The Detect Anomalies in Generic Inquiries (ML502000) form opens.
- In the table with generic inquiries (the top table), select the unlabeled check box in the only row, which contains the AP-ML-Costs in AP Documents generic inquiry.
- On the form toolbar, click Process.
The Processing dialog box opens, and the system uploads data to the cloud service.
- When the uploading completes, close the dialog box.
Notice that in the only row in the table with results (the bottom table), the status of anomaly detection is Data Uploaded. (This is the same status that is shown for the generic inquiry in the top table.)
- In the table with generic inquiries, again select the unlabeled check box in the
row with the generic inquiry, and click Process on the
form toolbar.
The system starts the calculation for the selected row and changes the status to Calculation in Progress.
Tip:Depending on the size of the data, the calculation could take a considerable amount of time. You can check the status by selecting the unlabeled check box for the needed row in the top table and then clicking Process on the form toolbar. Alternatively, you can click the row in the top table and then click Execute Next Step on the table toolbar of the bottom table. - After the status becomes to Ready to Download, click
Process on the form toolbar again to download the
calculation results into the system.
The final status of anomaly calculation is Completed.
Step 3: Reviewing the Results of Anomaly Calculation
To review the results of anomaly calculation and create a tab that lists records with the Significant and Medium anomaly severities, do the following on the Costs in AP Documents (AP3010ML) generic inquiry form:
- Notice that the following columns are shown:
- Anomaly Severity
- Expected Value (Ext. Cost)
- Comment
- Reviewed
- On the table toolbar, click Filter Settings.
- In the Filter Settings dialog box, which opens, add four
rows with the following settings.
Brackets Property Condition Value Brackets Operator ( Anomaly Severity Equals Significant Or Anomaly Severity Equals Medium ) And ( Reviewed Equals Cleared Or Reviewed IsEmpty Cleared ) - In the Filter Settings dialog box, click Save.
- In the dialog box that opens, enter Significant and Medium Anomalies as the filter name and click OK.
- In the Filter Settings dialog box, to which you return,
select the Shared check box and click
Apply.
The Significant and Medium Anomalies tab appears on the generic inquiry form. This tab lists the records with only Medium or Significant in the Anomaly Severity column. Notice that the system highlights these records in red.
- In the row with the 00028 bill, enter Reviewed in the Comment column and select the check box in the Reviewed column.
- Refresh the form in the browser.
Notice that the row with the 00028 bill is not highlighted anymore. Based on the filter settings, the system does not display the records for which the Reviewed check box has been selected.
Step 4: Setting Up a Schedule
Now that you have run the initial anomaly calculation, you can set it up to run on a schedule. To cause the system to run the anomaly calculation once a week, do the following:
- On the Generic Inquiry (SM208000), select AP-ML-Costs in AP Documents in the Inquiry Title box.
- In the Update Frequency box on the Anomaly Detection tab, select Weekly.
- On the form toolbar, click Save.
- Open the Detect Anomalies in Generic Inquiries (ML502000) form. If you have this form
open, refresh it in the browser.
Notice that the value in the Next Run column has changed from On Demand to the date that is a week from today.
- Select the unlabeled check box in the only row with the generic inquiry, and
click Process on the form toolbar.
The system displays a warning that the calculation will run according to the schedule and does not process the generic inquiry.
Step 5: Adding a Widget
To add a dashboard widget that displays the number of new anomalies, do the following:
- On the dashboard title bar of the Purchasing Manager (PO3015DB) dashboard, click Design.
- In the widget placeholder, click Add a New Widget.
- In the Add Widget dialog box, click Key Performance Indicator (KPI), and click Next.
- In the Widget Properties dialog box, which opens, specify
the following settings:
- Inquiry Screen: Costs in AP Documents
- Shared Filter to Apply: Significant and Medium Anomalies
- Field to Aggregate: Reference Nbr.
- Alarm Color: Purple
- Caption: Anomalies in AP Documents
- Click Finish, which saves your changes, closes the dialog
box, and adds the widget.
The following screenshot shows the Purchasing Manager (PO3015DB) dashboard with the added widget.
Figure 1. The widget with the number of detected anomalies 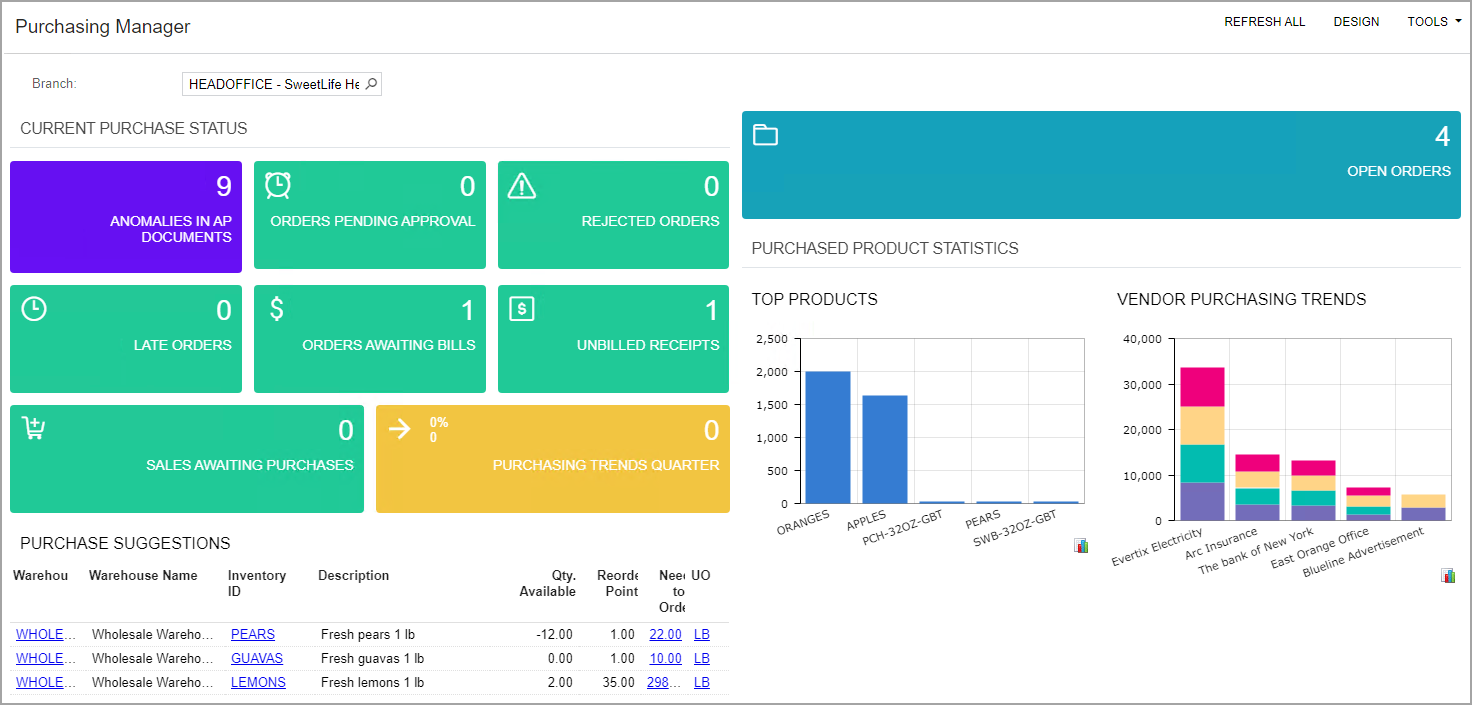
Step 6: Configuring the Business Event
To configure a business event to send notifications when the system detects anomalies with certain severities, do the following:
- On the Business Events (SM302050) form, add a new
record, and specify the following settings in the Summary area:
- Event ID: Anomaly Event
- Type: Trigger by Schedule
- Screen Name: Costs in AP Documents
- Raise Event: Once for All Records
- Description: Anomaly is detected
- On the Trigger Conditions tab, add rows with the settings
listed in the following table.
Brackets Table Name Field Name Condition From Schema Value 1 Brackets Operator ( GIMLResult Anomaly Severity (anomalyClass) Equals Selected Significant Or GIMLResult Anomaly Severity (anomalyClass) Equals Selected Medium ) And ( GIMLReview Reviewed (reviewed) Equals Selected Or GIMLReview Reviewed (reviewed) Is Empty Selected ) - On the Subscribers tab, click .
- On the Email Templates (SM204003) form, which opens, specify the
following settings:
- Description: Anomaly Cost AP
- From: SweetLife Marketing
- To: Kimberly Gibbs
- Subject: Anomaly cost in AP document detected
Attention:The email accounts that you use in the email template should have the appropriate settings. For details, see Configuring Email Accounts. - On the Message tab, select HTML on the formatting
toolbar, and add the following
text:
<p class="richp">Here is the list of new anomalies:</p>
<p class="richp"><br></p>
<p class="richp">
<table class="rtetable">
    <tbody>
        <tr>
            <td>Anomaly Class</td>
            <td>Reference Nbr.</td>
            <td>Type</td>
            <td>Vendor ID</td>
            <td>Status</td>
            <td>Ext. Cost</td>
            <td>Expected Value</td>
        </tr>
        <tr data-foreach-view="">
            <td>((GIMLResult_AnomalyClass))</td>
            <td>((APInvoice_refNbr))</td>
            <td>((APInvoice_docType))</td>
            <td>((APInvoice_vendorID))</td>
            <td>((APInvoice_status))</td>
            <td>((APTran_curyLineAmt))</td>
            <td>((GIMLResult_expectedValue))</td>
        </tr>
    </tbody>
</table></p>
The following screenshot shows the resulting subscriber of the business event.
Figure 2. The subscriber of the business event 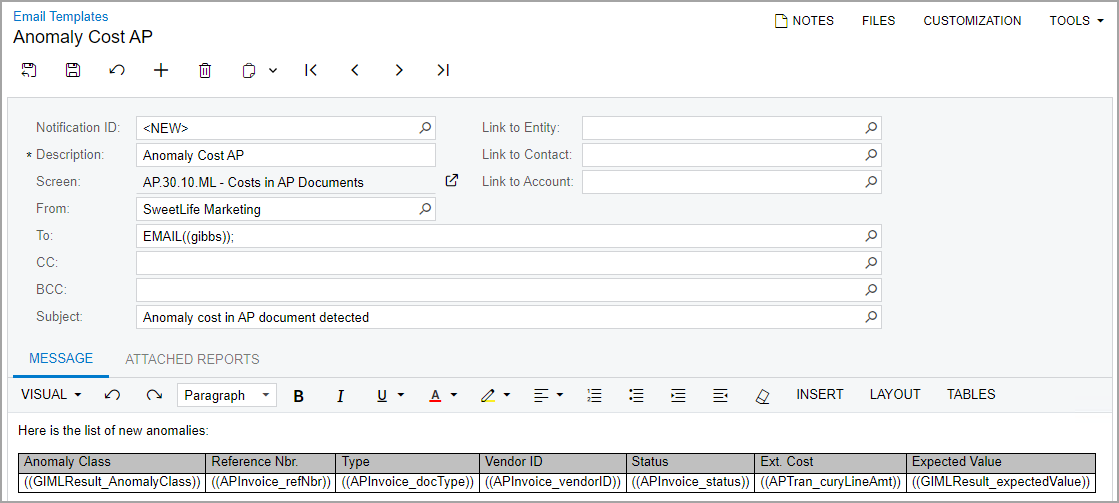
- On the form toolbar, click Save and Close to save your changes, close the Email Templates form, and return to the Business Events form.
- On the table toolbar of the Schedules tab, click
Create Schedule.
The Automation Schedules (SM205020) form opens.
- In the Summary area, type Anomaly Cost AP Schedule as the Description.
- On the Schedule tab, select Weekly as the
Frequency.Important:You must specify the same frequency in the schedule as specified on the Anomaly Detection tab of the Generic Inquiry (SM208000) form.
- On the form toolbar, click Save and Close to save your changes, close the Automation Schedules form, and return to the Business Events form.
- On the form toolbar, click Save.
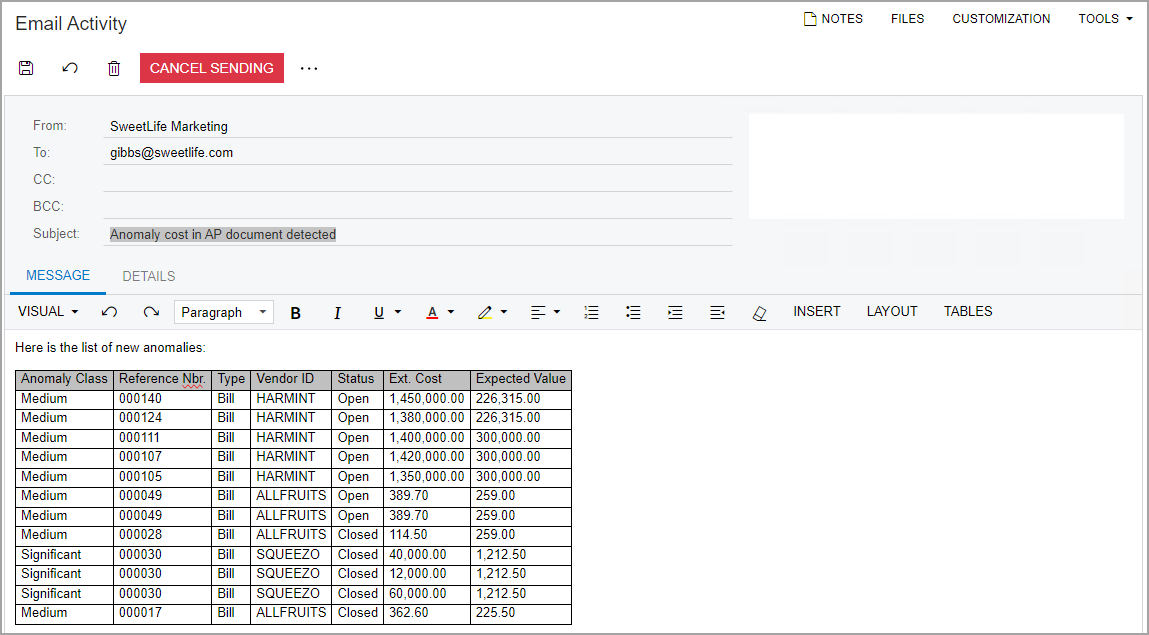
The following screenshot shows an example of an email that the purchase manager will receive when the business event is triggered.
Figure 3. An email with the results of anomaly detection