
Submittals: Process Activity
This activity will walk you through the processing of a submittal.
Story
Suppose that the ToadGreen Building Group company is building an Italian restaurant for the Equity Group Investors customer. The company needs to confirm that the customer wants to use the carpet being proposed for the dining area of the restaurant.
Ellen Watson, as the construction project manager, is managing the submittal process. Jonathan Stone, the customer’s designer, needs to approve a sample of the carpet. Teresa Willis—a new sales manager of Karn Design Inc., for which the construction project manager needs to add a contact in the system—needs to send the carpet sample to Jonathan Stone, who should approve the color and the material of the carpet. Also, the construction project manager needs to send the approved sample for an informational review to Larry Robinson, a purchase manager of the ToadGreen company.
Also suppose that after reviewing the sample, the designer rejects the submittal because a part of the carpet's pattern was cut off; the designer requests a larger sample.
Acting as the construction project manager, you need to create a new contact to be used in the submittal, enter the submittal in the system, open it, and add the necessary information during the processing of the submittal. Then you need to close the submittal and create a new revision for it.
Configuration Overview
In the U100 dataset, the following tasks have been performed to support this activity:
- On the Enable/Disable Features (CS100000) form, the Construction and Construction Project Management features have been enabled.
- On the Contacts (CR302000) form, a contact record for Jonathan Stone has been created, and on the Employees (EP203000) form, employee accounts for Larry Robinson and Ellen Watson have been created.
- On the Projects (PM301000) form, the ITALIAN project with the 12 - FURNISHINGS project task has been created. Also, on the Cost Codes (PM209500) form, the 12-460 - Furnishings- Misc Accessories cost code has been added.
Process Overview
To process the submittal in the system, you will create and open it on the Submittals (PJ306000) form. During the entry of the submittal, you will add a new contact for the submitter on the Contacts (CR302000) form. You will send the emails to the submitter and then the approver by using the Email Activity (CR306015) form, and will change the status of the corresponding rows on the Submittal Workflow tab to indicate that a response from the responsible person is pending. After the response is received, you will indicate this in the submittal document. After the approver rejects the submittal, you will close the submittal and prepare a new submittal revision.
System Preparation
To prepare to perform the instructions of this activity, do the following:
- As a prerequisite to this activity, complete the Submittals: Implementation Activity.
- Launch the MYOB Acumatica website, and sign in to a company with the U100 dataset preloaded. You should sign in as Ellen Watson, the construction project manager, by using the ewatson username and the 123 password.
- In the info area, in the upper-right corner of the top pane of the MYOB Acumatica screen, make sure that the business date in your system is set to today's date.
Step 1: Entering and Opening a Submittal
To enter a submittal for the carpet sample, including the employees with roles in the submittal, and then open the submittal, do the following (acting as Ellen Watson):
- On the Submittals (PJ306000) form, add a new record.
- In the Summary area, specify the following settings:
- Submittal Type: Product Samples
- Summary: Carpet for the dining area
- Project: ITALIAN
- Project Task: 12 - FURNISHINGS
- Cost Code: 12-460
- Owner: Ellen Watson (inserted automatically)
In the Summary area, notice that the status and the reason of the submittal are both set to New.
- On the Description tab, type Sample of the carpet to be laid in the dining area.
- On the form toolbar, click Save.
- On the table toolbar of the Submittal Workflow tab, click Add Row. In this row, you will add Teresa Willis as the submitter, but you need to create a contact in the system for her.
- In the added row, click in the Contact column, and then click the magnifier icon to open the lookup table with the list of existing contacts.
- On the table toolbar of the lookup table, click Add Row. The system opens the Contacts (CR302000) form.
- In the Summary area, select KADESIGN as the Business Account.
- On the Details tab of the form, specify the following
settings:
- First Name: Teresa
- Last Name: Willis
- Job Title: Sales Manager
- Email: twillis@kadesign.example.com
- Business 1: +1 (212) 209-0982
- On the form toolbar, click Save & Close to save the record, close the form, and return to the Submittal Workflow tab of the Submittals form. The system has inserted the newly created contact in the Contact column of the row you added.
- In the row, specify the following settings:
- Role: Submitter
- Status: Planned
This is the status of this contact's work on the submittal.
- Days for Review: 10
- To add the designer approving the submittal, on the table toolbar, click
Add Row, and specify the following settings in the
row:
- Contact: Jonathan Stone
- Role: Approver
- Status: Planned
- Days for Review: 3
- To add the purchase manager performing an informational review, on the table
toolbar, click Add Row, and specify the following
settings in the row:
- Contact: Larry Robinson
- Role: Reviewer
- Status: Planned
- Days for Review: 3
- On the form toolbar, click Save.
- On the form toolbar, click Open. In the
Details dialog box, which is opened, leave
Issued as the reason, and click OK.
In the Summary area, notice that the system has changed the status of the submittal to Open and the reason to Issued.
Step 2: Sending an Email to the Submitter
In this step, you will continue managing the submittal, acting as Ellen Watson. To send an email to the sales manager of Karn Design Inc., proceed as follows:
- While you are still viewing the submittal on the Submittals (PJ306000)
form, on the Submittal Workflow tab, select the
Email To check box in the row with the Teresa
Willis contact, and click Email on the form
toolbar.
The Email Activity (CR306015) form opens with the email address of Teresa Willis inserted in the To box.
- On the Message tab, type the following
text:
Dear Teresa,
Please provide a sample of the carpet that you proposed for the dining area.
Best regards,
Ellen Watson
Important:In a production system, you would also attach any needed documents to the email. In this activity, for simplicity, you are skipping this step for all emails you sent. - On the form toolbar, click Send to send the email, close the form, and return to the submittal on the Submittals form.
- On the Activities tab, make sure that the email you sent is now listed.
- On the Submittal Workflow tab, in the Status column of the row for Teresa Willis, select Pending to indicate that you are waiting on a response from the submitter.
- Click Save on the form toolbar.
In the Ball in Court box in the Summary area, notice that the system has specified Teresa Willis to reflect the person who currently has to perform an action for the submittal. Also, on the Submittal Workflow tab, in the row for Teresa Willis, the system has set the Start Date to the current business date and calculated the Due Date based on the start date and the days for review that you specified earlier in this row.
Step 3: Receiving an Answer from the Submitter
In this step, you will prepare and send an email response from the submitter (which the submitter would instead do in a production environment) and indicate that the requested sample has been provided. Do the following:
- In the info area, in the upper-right corner of the top pane, change the business date to eight days after the previously specified date.
- While you are still viewing the submittal on the Submittals (PJ306000) form, on the Activities tab, click Create Email.
- In the To box on the Email Activity (CR306015) form that opens, specify Ellen Watson.
- In the From box, enter twillis@kadesign.example.com.
- On the Message tab, type the following
text:
Dear Ellen,
The sample of the carpet has been sent to you by delivery service.
Best regards,
Teresa Willis
- On the form toolbar, click Send to send the email and
close the form.
On the Activities tab of the Submittals form, notice that the email from Teresa is listed. Suppose that the sample from the delivery service has arrived.
- On the Submittal Workflow tab, in the Status column of the row for Teresa Willis, select Completed to indicate that she has submitted the needed sample. Notice that in the Completion Date column, the system inserts the current business date (that is, the date you specified at the beginning of this step).
- Click Save on the form toolbar to save your changes.
In the Summary area, notice that the system has changed the name in the Ball in Court box to Ellen Watson because currently there are no rows with the Pending status on the Submittal Workflow tab.
Step 4: Requesting the Approval of the Submitted Sample
To request approval from the designer for the documents, do the following (acting as Ellen Watson):
- While you are still viewing the submittal on the Submittals (PJ306000)
form, on the Submittal Workflow tab, select the
Email To check box in the row with the Jonathan
Stone contact, and on the form toolbar, click
Email.
The Email Activity (CR306015) form opens with the email address of Jonathan Stone automatically specified in the To box.
- On the Message tab, type the following
text:
Dear Jonathan,
I have sent you the sample of the carpet that Karn Design Inc. provided us. Please let me know if this is what you want to see in the dining area of the restaurant.
Best regards,
Ellen Watson
- On the form toolbar, click Send to send the email and close the form to return to the submittal on the Submittals form. Refresh the form, and on the Activities tab, notice that the email to Jonathan is now listed.
- On the Submittal Workflow tab, in the Status box of the row for Jonathan Stone, select Pending to indicate that you are waiting on a response from the approver.
- Click Save on the form toolbar. In the Summary area, notice that the system has changed the name in the Ball in Court box to Jonathan Stone because you changed the status in his row. Also, on the Submittal Workflow tab, the system has set the Start Date to the current business date (which you set in Step 3) and calculated the Due Date accordingly.
Step 5: Rejecting the Submitted Documents
To prepare and send an email from the designer (which Jonathan Stone himself would do in a production environment) and indicate that the provided sample has been rejected, do the following:
- In the info area, in the upper-right corner of the top pane, change the business date to three days after the previously specified date.
- While you are still viewing the submittal on the Submittals (PJ306000), on the Activities tab, click Create Email.
- In the To box of the Email Activity (CR306015) form that opens, specify Ellen Watson.
- In the From box, specify jstone@italian.example.com.
- On the Message tab, type the following
text:
Dear Ellen,
I like the color and material. But the sample is too small, and part of the pattern was cut off from the sample. Could you please provide a larger sample?
Best regards,
Jonathan Stone
- On the form toolbar, click Send to send the email and close the form. On the Activities tab of the Submittals form, notice that the new email from Jonathan is listed.
- On the Submittal Workflow tab, in the Status box of the row for Jonathan Stone, select Rejected to indicate that the approver rejected the submittal.
Step 6: Creating and Opening a New Revision of the Submittal
To close the submittal and prepare a new submittal revision, do the following (acting as Ellen Watson):
- While you are still viewing the submittal on the Submittals (PJ306000) form, on the Submittal Workflow tab, in the Status column of the row for Larry Robinson, select Canceled.
- Click Save on the form toolbar, and then click Close on the form toolbar.
- In the Details dialog box, which opens, select Revise
and Resubmit in the Reason box, and click
OK.
In the Summary area, notice that the system has changed the status of the submittal to Closed and the reason to Revise and Resubmit, as shown in the following screenshot.
Figure 1. Closed submittal revision 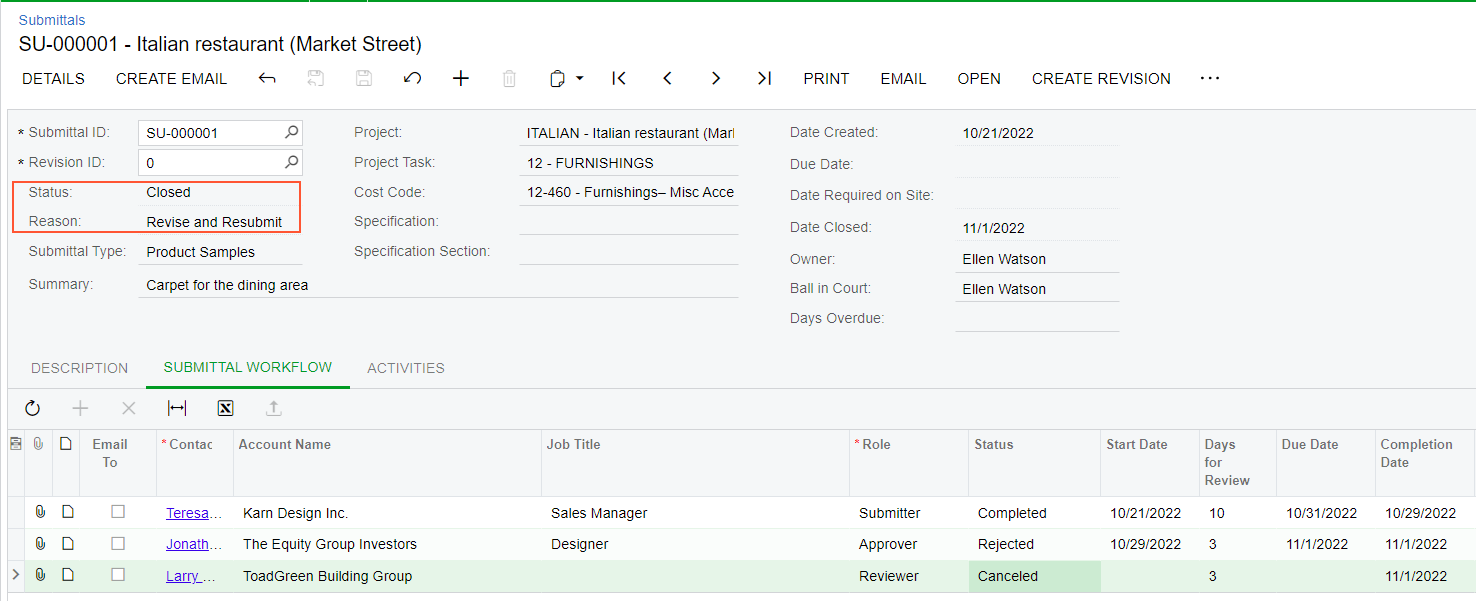
- On the More menu, click Create Revision.
The system creates a new revision of the submittal with the same submittal ID, a new revision ID (1), and the New status. Other settings in the Summary area have been copied from the previous submittal revision.
- Review the Submittal Workflow tab, and make sure that the new revision contains all the rows from the original submittal.
- On the form toolbar, click Open.
- In the Details dialog box, which is opened, leave Issued as the reason, and click OK.
You have finished working with the first submittal and created a new revision.