
Business Accounts: To Create a Business Account Manually
The following activity demonstrates how to manually create a business account, review and update the settings of the newly created account, and associate a primary contact with the account.
Story
Suppose that you are David Chubb, a sales manager of the SweetLife Fruits & Jams company. You have received an inquiry submitted via the company’s website form by Debbie Euston, the assistant bakery manager at Delicious Crispy, a bakery that bakes pastries, usually with jam filling. Debbie is considering purchasing 100 jars of apple jam. You have created the lead in the system, emailed the company’s price list to Debbie, and called her, and Debbie confirmed her interest in purchasing the jam. You have created a contact, and now you need to create a business account in the system.
Configuration Overview
In the U100 dataset, for the purposes of this activity, the following tasks have been performed:
- On the Enable/Disable Features (CS100000) form, the following features
have been enabled:
- Customer Management: This feature provides the customer relationship management (CRM) functionality, including lead and customer tracking, as well as the handling of sales opportunities, contacts, marketing lists, and campaigns.
- Duplicate Validation in the Customer Management group of features: This feature provides the duplicate validation functionality.
- On the Duplicate Validation (CR103000) form, duplicate validation settings for business accounts have been specified.
- On the Business Account Classes (CR208000) form, the BAKERY business account class has been defined in the system.
- On the Contacts (CR302000) form, the Debbie Euston and Patrick Roberts contacts have been created in the system.
Process Overview
In this activity, you will do the following
- By using the Contacts (CR302000) form as a starting point, create a business account manually based on a contact that has been added to the system.
- By using the Business Accounts (CR303000) form, do the
following:
- Review and update the settings of the newly created business account.
- Select a primary contact for the newly created business account.
- Select an owner for the newly created business account.
System Preparation
Before you start creating a business account, you should do the following:
- Launch the MYOB Acumatica website with the U100 dataset preloaded
- Sign in to the system as sales manager David Chubb by using the following
credentials:
- Username: chubb
- Password: 123
- Make sure that on the Company and Branch Selection menu, in the top pane of the MYOB Acumatica screen, the SweetLife Head Office and Wholesale Center branch is selected.
Step 1: Creating a Business Account Based on a Contact
To create a business account for the contact Debbie Euston, and specify additional settings for it (its primary contact and its owner in your company who will work with the account) do the following:
- Open the Debbie Euston contact record on the Contacts (CR302000) form.Tip:To search for a record in a list of records, you can enter a keyword or phrase in the Search box of the table toolbar. The system will find all the records that match your search criteria and display these records in the table. For details, see Searching in MYOB Acumatica.
- On the More menu, under Record Creation, click Create
Account.Tip:You open the More menu by clicking the More button (…) on the form toolbar.
- In the Create Account dialog box, which opens, do the
following:
- On the Main tab of the dialog box, specify the
settings of the business account as follows:
- In the Business Account ID box, type DELICRISP.
- In the Business Account Class box, select BAKERY.
- Click Create & Review. The system creates a business account and opens the newly created account on the Business Accounts (CR303000) form.
- On the Main tab of the dialog box, specify the
settings of the business account as follows:
- On the Contacts tab of the form, notice that the row has been added for the Debbie Euston contact associated with the business account. Also notice that the Primary check box is cleared for the contact.
- On the General tab, in the Name box of the Primary Contact section, select the Debbie Euston contact. Notice that the Primary Contact section has become populated with the data from the associated contact.
- On the Contacts tab, you can see that the Primary check box has been selected for the Debbie Euston contact because the contact was defined as primary for the business account.
- On the Relations tab of the form, notice that the row has been added for the Debbie Euston contact associated with the business account. Also notice that the Source relational role is assigned to the contact meaning that the business account is created from the contact. For details, see Managing Relations.
- In the Owner box of the Summary area, select David Chubb, because this is the user account to which you are signed in and you are the employee in your company who will primarily work with this business account.
- Click Save and Close. The system returns you to the Contacts form. In the Business
Account box of the Summary area, you can see the name of the
business account: DELICRISP—Delicious Crispy.Tip:In situations where you do not want to specify additional settings for the business account until later, you could click Create to close the Create Account dialog box. In this case, the new business account would be created. Also, the name of the business account would be inserted in the Business Account box of the Summary area on the Contacts form, and the contact would be added to the Contacts tab of the Business Accounts form, but no primary contact would be specified in this business account.
You have created a business account for the Debbie Euston contact.
Step 2. Associating a New Contact with a Business Account
Suppose that Patrick Roberts, a new manager at Delicious Crispy has contacted you and asked to send him the SweetLife price list. You have created a new Patrick Roberts contact in the system and need to associate this contact with the DELICRISP business account.
To associate the Patrick Roberts contact with the DELICRISP business account, do the following:
- Open the Patrick Roberts contact record on the Contacts (CR302000) form.Tip:To search for a record in a list of records, you can enter a keyword or phrase in the Search box of the table toolbar. The system will find all the records that match your search criteria and display these records in the table. For details, see Searching in MYOB Acumatica.
- In the Summary area of the form, in the Business Account box, click the magnifier button.
- In the lookup table that opens, select DELICRISP.
- On the form toolbar, click Save.
You have associated a new contact with the business account. The system has added this contact on the Contacts tab of the Business Accounts (CR303000) form.
Step 3: Changing the Primary Contact for the Business Account
Suppose that Debbie Euston has been promoted to another job in the company, and now you should contact her colleague, Patrick Roberts. You have created the Patrick Roberts contact and associated this contact with the DELICRISP business account as described in the previous step.
To change the primary contact for the DELICRISP business account, do the following:
- While you are still viewing the Patrick Roberts contact on the Contacts (CR302000) form, in the Summary area, click the Edit button right of the Business Account box.
- On the General tab of the Business Accounts (CR303000) form, which opens in a pop-up window, in the Name box of the Primary Contact section, click the magnifier button.
- In the lookup table, which opens, select Patrick Roberts. Notice that the
Primary Contact section has become populated with the
contact and address settings of the new primary contact. On the
Contacts tab, you can see that the
Primary check box has been selected for the
Patrick Roberts contact because the contact was defined as primary
for the business account (see the following screenshot).
Figure 1. The primary contact for the business account 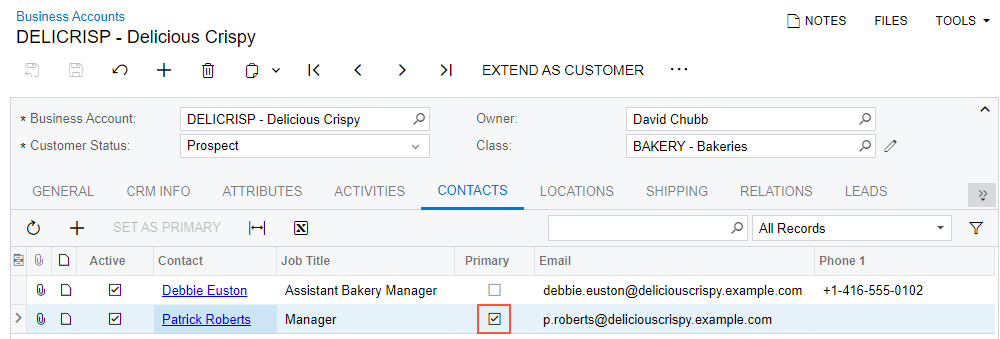
- On the form toolbar, click Save.
You have changed the primary contact for the DELICRISP account to Patrick Roberts.