UI Definition in HTML and TypeScript: To Create the UI of a Form
The following activity will walk you through the process of creating the UI of an MYOB Acumatica form from scratch.
Story
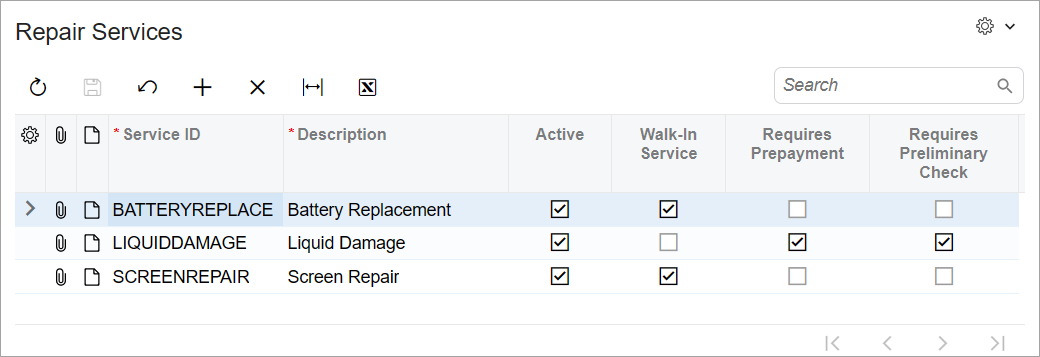
The Repair Services (RS201000) form, which you will develop, will be used to view the list of services provided by the Smart Fix company. By clicking buttons on the form toolbar, users will be able to add a new service, edit an existing service, and delete a service. The following screenshot shows what this form should look like.

You have already implemented the backend for the form, which includes the
RSSVRepairServiceMaint graph and the
RSSVRepairService data access class (DAC). You have also
already added the RSSVRepairService table to the application
database.
Process Overview
You will create TypeScript and HTML files for the Repair Services (RS201000) form. In the TypeScript file, you will define the screen class and view class for the form. In the HTML file, you will define the layout of the form.
System Preparation
Before you begin the creation of the UI of the Repair Services (RS201000) form, do the following:
- Complete the following prerequisite activity: Modern UI Development: To Deploy an Instance with Custom Forms and the Modern UI. Make sure that the
prepared instance contains the following items:
- The
RSSVRepairServiceMaintgraph in the customization code - The
RSSVRepairServiceDAC in the customization code - The
RSSVRepairServicedatabase table
- The
- Perform the prerequisite actions and build the source code for the first time, as described in Modern UI Development: To Build the Source Code of All MYOB Acumatica Forms for Modern UI Development.
Step 1: Creating Files for the Form
To create the Modern UI for the Repair Services (RS201000) form, you need to create TypeScript and HTML files for the form. Create the files as follows:
- In Visual Studio Code, open the FrontendSources\screen folder. (You can open the folder by clicking on the toolbar.)
- In the FrontendSources\screen\src\screens folder of your MYOB Acumatica instance, create a folder with the RS name if it has not been created yet. You will store the UI sources for all forms with the RS prefix in this folder.
- In the FrontendSources\screen\src\screens\RS folder, create a folder with the RS201000 name if it has not been created yet. You will store the UI sources for the Repair Services form in this folder.
- In the FrontendSources\screen\src\screens\RS\RS201000
folder, create the following files:
- RS201000.ts
- RS201000.html
Step 2: Defining the Screen Class in TypeScript
To define the view of the Repair Services (RS201000) form in TypeScript, you define a screen class and a property for the data view of the form. Do the following:
- In the RS201000.ts file, add the following
import
directives.
import {
	PXScreen, graphInfo, createCollection,
} from "client-controls";
Tip: When you start typing the name of an API element in a TypeScript file in the FrontendSources\screen folder in Visual Studio Code, the list of available elements is shown. You can also hover over an element to see its description. - Define the screen class for the form, as follows. The class name is the ID of
the
form.
export class RS201000 extends PXScreen {} - For the screen class, add the graphInfo decorator, and
specify the graph and the primary view of the form in the decorator properties,
as follows. Hide the Note and
Files buttons on the form title bar by using the
hideFilesIndicator and
hideNotesIndicator properties. You do not need notes and
files for the whole form because each record in the table on the form has its
own notes and
files.
@graphInfo({ graphType: "PhoneRepairShop.RSSVRepairServiceMaint", primaryView: "RepairService", hideFilesIndicator: true, hideNotesIndicator: true, }) export class RS201000 extends PXScreen {} - Define the property for the data view of the form by using the following code.
Because the data view is used to display a table, you need to initialize the
property with the createCollection method. The input
parameter of this method is an instance of the view class, which you will define
in the next
step.
export class RS201000 extends PXScreen {
	RepairService = createCollection(RSSVRepairService);
}
Step 3: Defining the View Class in TypeScript
You need to define a view class for the single data view of the Repair Services (RS201000) form. Proceed as follows:
- In the RS201000.ts file, update the list of
import directives, as the following code
shows.
import { PXScreen, graphInfo, createCollection, PXView, PXFieldState, gridConfig, PXFieldOptions, GridPreset } from "client-controls"; - Define the view class as
follows.
export class RSSVRepairService extends PXView {} - In the view class, specify the properties for all data fields of the data view,
as shown below. You use the name of the data field as the property
name.
export class RSSVRepairService extends PXView  {
	ServiceCD : PXFieldState;
	Description : PXFieldState;
	Active : PXFieldState;
	WalkInService : PXFieldState<PXFieldOptions.CommitChanges>;
	Prepayment : PXFieldState;
	PreliminaryCheck : PXFieldState<PXFieldOptions.CommitChanges>;
}
The
WalkInServiceandPreliminaryCheckfields should commit changes to the server; therefore, you have used the PXFieldOptions.CommitChanges option for the property type. - Add the gridConfig decorator to the view class, as the
following code shows. In the gridConfig decorator, you must
specify the preset property. Because the table is the primary
element of the Repair Services form, you use the Primary
preset.
@gridConfig({
	preset: GridPreset.Primary
})
export class RSSVRepairService extends PXView  {
	ServiceCD : PXFieldState;
	Description : PXFieldState;
	Active : PXFieldState;
	WalkInService : PXFieldState<PXFieldOptions.CommitChanges>;
	Prepayment : PXFieldState;
	PreliminaryCheck : PXFieldState<PXFieldOptions.CommitChanges>;
}
Step 4: Defining the Layout in HTML
<template>
  <qp-grid id="grid-RepairService" view.bind="RepairService"></qp-grid>
</template>
You have specified the ID of the qp-grid control and bound the
control to the RepairServices property, which you have defined in
the RS201000.ts file.
Now you can build the source files and view how the converted form looks in the Modern UI. For details, see Modern UI Development: To Build the Source Code of a Particular Form for the Modern UI Development.
