To Change the Label of a Field
You can change the label for an original data field on the DAC and graph levels. The following
sections provide detailed information:
To Change the Label of a Field on the DAC Level
To change the label of a control for a field used on multiple forms, you should customize the
PXUIField attribute of the field in the data access class extension. To
do this, perform the following actions:
- Open the field in the Data Class Editor, as described in To Customize a Field on the DAC Level.
- In the Customize Attributes box, select Append to Original.
- On the More menu (under Actions), click Edit Attributes.
- In the Attribute list of the Customize Attributes dialog box, which opens, click the PXUIField attribute to select it.
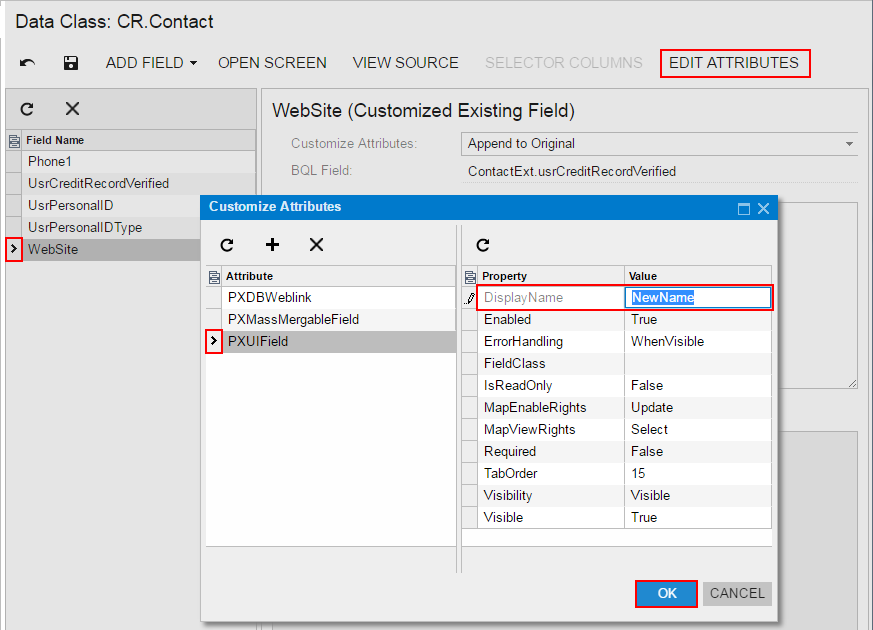
- In the parameter list, specify a new label for the DisplayName parameter, as the screenshot below shows.
- Click OK to exit the dialog box.
- Click Save on the editor toolbar to save your changes to the
customization project.
Figure 1. Changing the display label of a field 
[PXCustomizeBaseAttribute(typeof(PXUIFieldAttribute), "DisplayName", "NewName")]To Change the Label of a Field on the Graph Level
To change the label of a field for a single form, you should customize the
PXUIField attribute of the field in the graph extension. To do this, perform
the following actions:
- Create the code template that includes the original attributes of the field and the DACName_FieldPropertyName_CacheAttached() event handler, which replaces the attributes within the graph, as described in To Customize a Field on the Graph Level.
- By using the Code editor, replace the original attributes in the template, as shown in the
following code
snippet.
[PXCustomizeBaseAttribute(typeof(PXUIFieldAttribute), "DisplayName", "NewName")] protected void DACName_FieldPropertyName_CacheAttached(PXCache cache) { } - Click Save on the editor toolbar to save your changes to the customization project.
