- Contents
- Index
- Search

Show results that include all search words
Searching for an Existing Job
To search for an existing job, select Account > Job Management Screen, from the Job Costing main menu. The following screen appears:

The Search tab is displayed by default. The following tabs are also available:
Applying Job Filters
The job filters at the top of the Search tab allow the search results to be ‘filtered’ to facilitate processing of jobs within certain ‘ranges’.
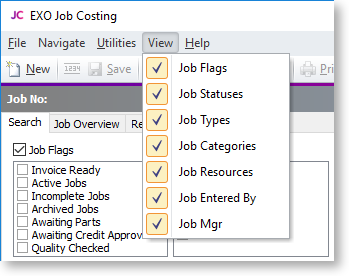
By default all of the filter options are displayed, but if your implementation does not employ all of the categorisations of jobs you can hide selected options using the toolbar View settings.
Tip: The thin line between the filters and the search key can be dragged to use more or less screen space for the filter options.
Select the check box next to the filter title to enable that filter. This check box allows an entire filter to be enabled or disabled, without altering the individual settings of the filter items, e.g. in the example above, filtering by Job flags and Job statuses is enabled, but Job types do not form part of the filter.
Once a specific filter has been enabled, individual filter settings can be selected.
|
Filter |
Description |
|
Job Flags |
Tick these boxes to show jobs that have the selected job flags associated with them. Flags are updated whenever the job is saved. Their settings are based on the characteristics of the current job status. |
|
Job Statuses |
Tick these boxes to show jobs that have the selected job statuses, types and/or categories. |
|
Resources |
Shows jobs that involve any of the resources selected. |
|
Entered by |
Select from a list of active staff members to show jobs that have been entered/serviced by them. |
Tip: Right-clicking in an activated flag set provides the option to tick or un-tick all options in one step
The computer remembers the combination of selected filter options. This allows the search screen to be set up for specific workflow purposes at specific workstations, or enables the options to be remembered if the user works in a consistent way.
Performing the Search
Once the optional filter options have been selected, enter text into the Search key field that will sufficiently narrow down the list of jobs returned in a search. This would part of the job code, customer name, job title, or ‘our ref’ reference field.
If the Extensive search option is selected, the Search key will also be checked against the contents of the description and notes fields. While more comprehensive, it will cause the search to take longer to list the results.
Clicking Search will list all jobs matching the statuses ticked in the box at top of the screen and the criteria entered into the Search key field.
Some job lines are colour-coded to indicate their status or job flags:
- GREEN = Invoice Ready
- RED = Completed
- OLIVE = Archived
- PURPLE = Overdue
From the list that appears, select the required job. The screen that is displayed shows the job details, as entered when the job was created. Changes can then be made to the job.
Note: The search result grid is an ExoGrid and can therefore be used to sort, shuffle or only display selected columns. Any extra fields that are added to the job header will become available as extra columns of the job list, although these columns are not matched against the search key.
Applying Custom Filters
An additional customisable filtering mechanism can be used to filter the records displayed in the grid. This custom filter is accessible by right-clicking on the grid column headings and select Custom Filter. This method is common to many search grids within MYOB Exo Business. See the Exo Business online Help on ExoGrids for more information.
When a custom filter is active, the funnel icon will appear in the column headings. Select Clear Filter to remove the action of the filter.