- Contents
- Index
- Search

Display results with all search words
About Report Parameters
When a report is run, it can prompt the user for parameters that will be fed into the report. Common parameters include "From" and "To" options to set a date range for the report, or ordering options. Parameters are selected on the Clarity Report Parameters window, which appears when the report is run:

Note: If you choose to preview the report from this window, the parameter controls are displayed on the left of the Print Preview window - this avoids the need to close the preview and return to the parameters window if you want to change the selected values.
Adding Parameters
Parameters are added to a report and configured using the Parameters Editor window - open it by selecting Runtime Parameters from the Tools menu.
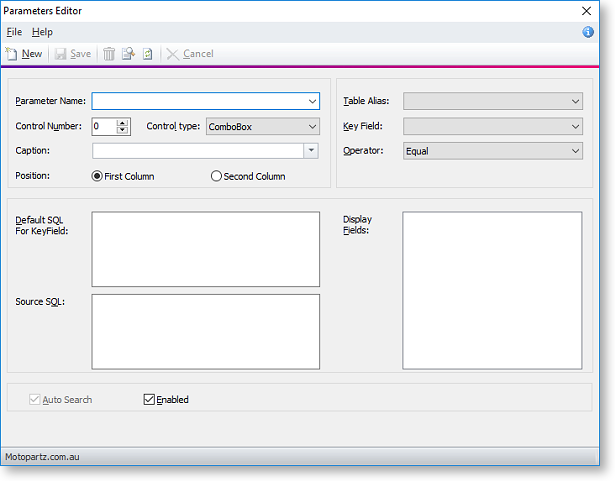
Note: Settings for all report parameters are saved in a separate file. This file has the same name as the report file, with the extension .CLS. The parameter settings file is a plain text file, which you can edit in any text editor.
|
Field |
Description |
|
Parameter Name |
This is the name of the parameter that will be used when the parameter value is accessed in code on the Calc tab. |
|
Control Number |
This determines the order of the parameters when they show on the parameter dialogue box. 0 is first, 1 is second, and so on. |
|
Control Type |
The type of control that will appear on the Clarity Report Parameters window (text box, combo box, etc). |
|
Caption |
The label that will appear alongside the control on the Clarity Report Parameters window. The caption is important because it will describe to the user which field the selection criteria will control (see item 6 in the example below). Note: Captions can include the Display Names that are set up in Exo Business Config. Enter @PARAMETER_ID, where PARAMETER_ID is the field’s ID on the Display Names screen in Exo Business Config. For example, if you enter @STOCKGROUP_PRIMARY in a caption, at runtime it will be replaced with the Display Name that has been set up for Primary Stock Group. The dropdown control on this field lets you select an @ parameter from a list of available ones. |
|
Position |
Parameters can be arranged into two columns on the Clarity Report Parameters window - select whether the parameter will be in the First (left) or Second (right) column. If all parameters are in the same column, they will all extend across the entire window. |
|
Table Alias |
The name of the data pipeline that the selection criteria affect. |
|
Key Field |
The field within the data pipeline that is filtered by the selection criteria. |
|
Operator |
The search operator that is applied to the key field, e.g. equal / greater than / less than. |
|
Default SQL for Key Field |
Used with Listbox, Combobox, Checkbox, Textbox, OrderBy, DebtorPeriod, CreditorPeriod, StockPeriod and GLPeriod parameters. The value that is entered into this box determines what is selected by default in the Listbox / Combobox when the Clarity Report Parameters window pops up. For OrderBy fields, this field becomes "Order By" Fields and contains a comma-separated list of fields that you can select to order your data by (the labels on this window change to reflect this when you select an OrderBy type parameter). For the period selection control types, a short SQL query must be used to specify the default, such as: SELECT SEQNO FROM Period_Status WHERE Ledger = 'D' and AGE = 1 |
|
Source SQL |
Only used with Listbox, Combobox and OrderBy components. The SQL that will retrieve the values to be displayed in the Listbox / Combobox when the Clarity Report Launcher pops up. The name of the field for your Key Field must match one of the names of the fields in your source SQL statement. If there’s a difference (e.g. your Key Field is HDR_SEQNO and your combo has the field SEQNO), change "SEQNO" to "SEQNO AS HDR_SEQNO". This is called aliasing a field and allows Clarity to match that field to the Key Field. For OrderBy parameters, this field becomes Default, and determines the default OrderBy field. For Search parameters, the field becomes Filter SQL, where you can enter conditions to filter the search results. |
|
Display Fields |
The fields that are highlighted in this box are the fields that will be displayed in a Listbox or Combobox when the Clarity Report Parameters window pops up. To enter values into this box, double click on the SQL statement in the Source SQL box. If it is a valid SQL statement, the list will automatically populate. The key field must be included in this list to be able to save the parameter. Of the selected fields, you can determine which ones will actually show by CTRL-clicking to select and de-select fields. |
|
Enabled |
Whether or not the parameter is enabled by default. Enabling / disabling can also be achieved at runtime by checking or un-checking the checkbox displayed alongside the parameter. |
|
Visible lines |
Used with Listbox parameters. The number of lines high the control should be on the Clarity Report Parameters window - if there are more options than this, a scroll bar will be available. Note: If the data is too wide to fit in the list box, there will be a horizontal scrollbar at the bottom of the list - this will take up one of the available lines. |
|
Add to days |
Used with Date parameters. Adds the specified number of days to the date that is selected and passes that date to the report. |
Displaying Parameters on the Report
All of the parameters you set up will appear on the Clarity Report Parameters window; to make a parameter value appear on the report itself, you can add it as a DBText field. Instead of selecting a data source, select 'plParams' from the first dropdown on the Edit toolbar, and select the parameter to display from the second dropdown. For each parameter, there will be three options:
- ParameterName - displays the parameter's caption.
- ParameterNameEnabled - displays "Y" or "N" depending on whether or not the parameter is enabled.
- ParameterNameValue - displays the value entered for the parameter by the user.
For example, in the image below, the parameter is 'AcctOrderBy' - this option will display the value that the user entered for the 'AcctOrderBy' parameter.

Using Parameters with Stored Procedures and Functions
If SQL editing has been enabled on the SQL tab of the Query Designer, it is possible to take data from a function or stored procedure. In this case, you can use a runtime parameter as an input parameter to the stored procedure/function. To do this:
- Create the parameter as normal.
- On the Data tab, create a data source using the Query Designer.
- On the SQL tab of the Query Designer, right-click and select Edit SQL to enable manual SQL editing.
- Enter the SQL query that uses the stored procedure or function. To substitute a runtime parameter, enter the parameter name preceded by a colon parameters, e.g. SELECT *FROM FN_CR_AGEDBALANCES_BACKWARDS(:Age).
- Click OK.
- Go to the Calc tab and find the OnInitializeParameters Report event in the Events list. Right click on this event and select New.
- Enter a script similar to the following to copy the values set
in plParameters to the report parameters:
procedure ReportOnInitializeParameters(var aCancel: Boolean);
begin
aCancel := False;
{ set Age parameter to value entered by user }
Report.Parameters['Age'] := plParams['AgeValue'];
end;
Using $COMPUTERID and $USERID
You can include the $COMPUTERID and $USERID variables in statements in the Default SQL for Keyfield field, e.g.
SELECT BRANCHNO WHERE BRANCHNO = $COMPUTERID
This will set the branchno to the default branchno stored for your computer and will run the report for that particular branch. When you preview the report, the Branchno will default to the ID of the computer.