Payroll Setup Page 1
![]()
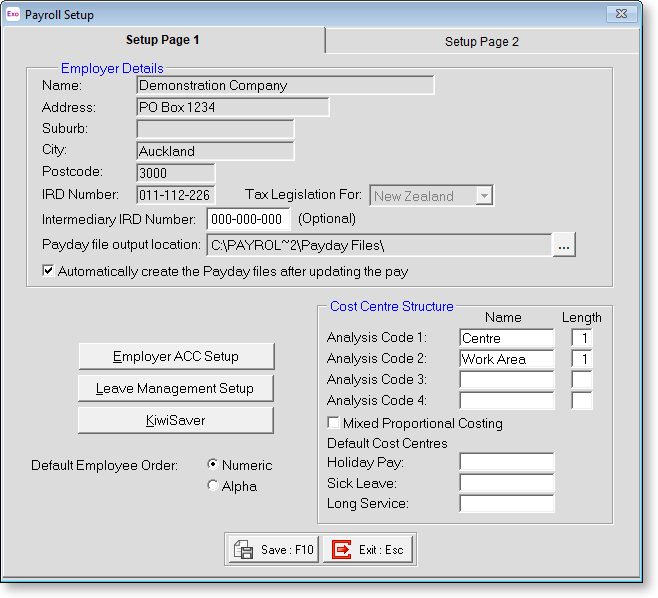
Select Step One from the Payroll Setup Cycle. The setup window is divided into two pages. Page 1 is displayed by default:

Employer Details
Enter the details of the company name, address, suburb, city, postcode and the company's IRD Number.
Tax Legislation For This indicates the tax rules that are currently active. This setting defaults to New Zealand.
Intermediary IRD Number If your organisation uses an intermediary, e.g. a tax agency who files on your behalf, enter their IRD number here.
Payday file output location Specify the location where Employment Information (EI) return and New and Departing Employees files for payday filing should be created.
Automatically create the Payday files after updating the pay If this option is ticked, you will be prompted to generate files for payday filing every time a pay is updated. If it is not ticked, you will need to create the files manually on the Employer Information Return window.
Cost Centre Structure
This determines the overall Cost Centre structure of the field sizes and number of sub-groups for Cost Centres generally. It is not for setting up the Cost Centres themselves (this is done in Step Five of the Payroll Setup Cycle). The Cost Centre structure is based on a 12-digit number broken down into up to four separate levels. The separate levels can contain any number of digits, as long as the total number of digits does not exceed 12.
For example, the total Cost Centre number of 12 digits could be set up as:
|
Code |
Name |
Length |
|
Code 1 |
Area |
2 digits (Up to 99 different) |
|
Code 2 |
Lab type |
3 digits (Up to 999 different) |
|
Code 3 |
Job type |
3 digits (Up to 999 different) |
|
Code 4 |
Job no. |
4 digits (Up to 9999 different) |
For this 12-digit number the code/level breaks would look like this:
99 / 999 / 999 / 9999
So the number 100010505645 could mean this when broken down into its particular levels:
10 / 001 / 050 / 5645 meaning Area code 10 = Auckland
10 / 001 / 050 / 5645 meaning Lab type 001 = Microbiology
10 / 001 / 050 / 5645 meaning Job type 050 = Cosmetics
10 / 001 / 050 / 5645 meaning Job no 5645 = J/N 5645
A Cost Centre can be as complex or as simple as required - it all depends on your particular analysis needs. If you have any further questions, call the MYOB Employer Services Support Team for advice.
To set up the structure for your company's Cost Centres, type in the description for a code, then type in the length of the number (in digits). Repeat for all four codes.
Mixed proportional costing Selecting this option activates the ability to have both proportional costing and direct costing in the same pay. With direct costing, a value is directed straight to a Cost Centre; however, with proportional costing, the values are valued to Cost Centres by either a percentage or the number of hours worked.
In other words, payments that would otherwise be proportionally costed can be direct costed in the transaction itself, by means of a checkbox called Direct cost to this code.
If mixed proportional costing is switched off (the default), then any cost valued to a Cost Centre directly is overridden by any proportional costing that has been set up for the individual employee. With mixed proportional costing switched on, any values costed to Cost Centres directly are costed to the appropriate Cost Centres, and the balance value is then proportionally costed by either percentages or by hours worked. You should only turn on mixed proportional costing if you are really sure it is appropriate. If your company has no special requirements regarding mixed proportional costing, leave this option off.
Default Cost Centres When paying any holiday pay, sick pay or long service leave, the amount is automatically costed to the employee's default Cost Centre (the one that is listed against an employee when you add new employees, or edit existing ones).
If you do not want the values to be costed to a different Cost Centre (normally because you have one general ledger code for any holiday pay that has been paid to the employees) then leave these fields blank otherwise, enter the number of the new default Cost Centre for any of the following:
- Holiday Pay
- Sick Pay
- Long Service
TIP: Remember that you have to add the Cost Centres first. If you have not, you can press F2 key to access the Maintenance menu and choose Cost Centres.
Other Options
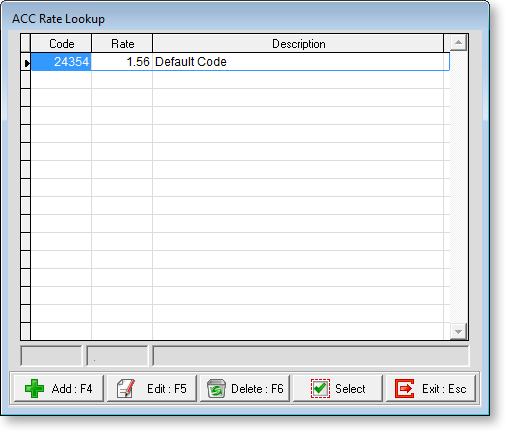
Click the Employer ACC Setup button to set up the applicable Employer Levy class codes and rates, according to the primary type of work done in your industry. Note that some companies are allowed to declare more than one levy class.

Click on the Add button to add a new code & rate. The data entry fields will become enabled as shown above. Having entered the appropriate values press F10 to save this screen, then click on Exit to return to the Payroll Setup screen.
Click the Leave Management Setup button to set up employees' leave entitlements.
Click the KiwiSaver button to set up KiwiSaver details for the company.
Default Employee Order When scrolling through your employee masterfile or pay screens you can choose whether to sort employees in alphabetical or numerical staff code order. Click on the order you want to use as your default.
