- Contents
- Index
- Search

Show results that include all search words
Payday Filing
Payday filing is a way of reporting employee details to the IRD. Introduced in 2018, it is compulsory for all pays after 1 April 2019. Instead of sending an Employer monthly schedule (IR348) every month, under payday filing you generate and send an Employment Information (EI) return file for every pay run. The EI file contains the same information as the IR348, as well as ESCT amounts for each employee and dates for the pay run. Information about new and departing employees is also sent to the IRD in an Employee Details file.
NOTE: The IRD's website has information, including a video tutorial, on how to payday file through myIR.
NOTE: Video Help is available for this topic on the Exo Employer Services Education Centre.
Setting up Payday Filing
Before you can upload EI return files, you need to be registered for filing using the IRD's myIR website. The IRD's website has information on registering for myIR.
Once you are registered for myIR, you can opt in to payday filing from the myIR website - the IRD's website has information on shifting to payday filing.
Payday filing is used automatically by MYOB Exo Payroll. Before starting to submit EI return files, check the following settings on the Setup Page 1 tab of the Payroll Setup window:
- If you use an intermediary, e.g. a tax agency who files on your behalf, enter their IRD number into the Intermediary IRD Number field.
- Check the Payday file output location field, which specifies where the files for payday filing will be created.
- Tick or clear the Automatically create the Payday files after updating the pay option, depending on whether you want files to be created automatically, or created manually from the Payday Filing window.
Creating and Uploading Files for Payday Filing
When the Automatically create the Payday files after updating the pay setup option is unticked, you must create files for each updated pay from the Employment Information Return window.
When the Automatically create the Payday files after updating the pay setup option is ticked, files will be created automatically when a pay is updated.
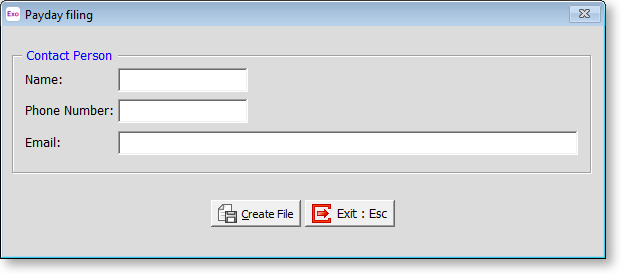
A window opens where you must enter contact details for the person responsible for submitting EI return files (this information is included in the file):
Enter the details and click Create File to generate the EI file. If the pay includes any employees whose start or end date falls within the pay period, an Employee Details file containing their details is created as well. A confirmation message appears, giving the name and location of the file(s):
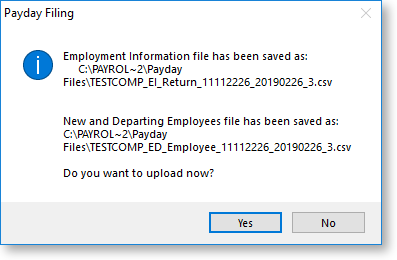
Clicking Yes on this window opens a browser window to the myIR website, where you can log in and upload the file.
Clicking No closes the window - to upload the file, you will need to browse to the myIR website at a later time, or open it from the Employment Information Return window.
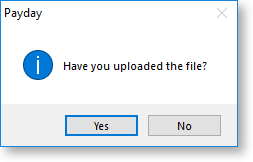
Afterwards, you are asked to confirm whether or not the file was successfully uploaded. Clicking Yes changes the EI return file’s status to "Uploaded" on the Employment Information Return window.
Managing EI Return Files
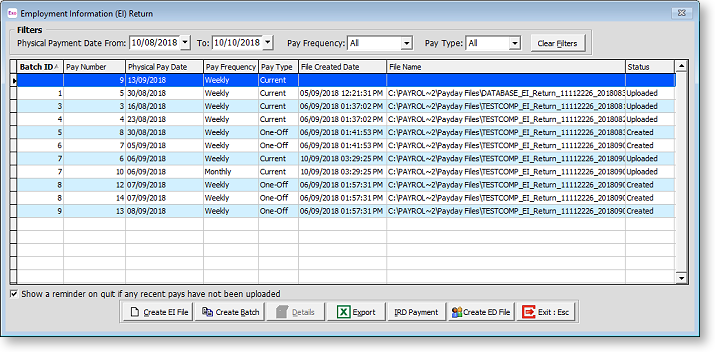
The Employment Information Return window lets you create and upload EI return files, view the details of existing files and perform other actions related to payday filing.
Open the Employment Information Return window in one of the following ways:
- Select Payday Filing from the Pay menu.
- Click the
 toolbar button.
 - Select Step 6 on the Pay Cycle.
The Employment Information Return window displays all updated pays in the system, with details of the EI return files generated for them.
From this window, you can:
- Create EI return files for any pays that do not yet have one.
- Upload or re-upload EI return files
- View the details of the selected EI return file.
- Export the contents of the main table to an Excel file.
- Generate the IRD Payment report.
- Create an Employee Details file.
- Manually set the status of an EI return by right-clicking on it.
NOTE: When the Show a reminder on quit if any recent pays have not been uploaded option is ticked, a message will appear when quitting MYOB Exo Payroll or changing to another company, if there are any return files in the “Created” status that are between two days and eight weeks old.
Creating and Uploading EI Return Files
To create an EI return file for a pay that does not yet have one, select the pay and click Create EI File. This creates the EI return file via the same process as when creating files after updating a pay, and then prompts you to upload it to the IRD.
For files that have not been uploaded, the Create EI File button changes to Upload EI File. Clicking this button gives you the option of re-generating the EI return file, then opens a browser window to the myIR website, where you can log in and upload the file. Afterwards, you are asked to confirm whether or not the file was successfully uploaded.
Clicking Yes on this window change's the EI return file's status to "Uploaded" on the Employment Information Return window.
For files that have been uploaded, the Upload EI File button changes to Upload Again. Clicking this button gives you the option of re-generating the EI return file, then opens a browser window to the myIR website.
EI Return Batches
It is possible to create a batch of EI return files from multiple pays in one operation. Clicking the Create Batch button opens a window displaying all updated pays in the selected date range that do not yet have an EI return file:
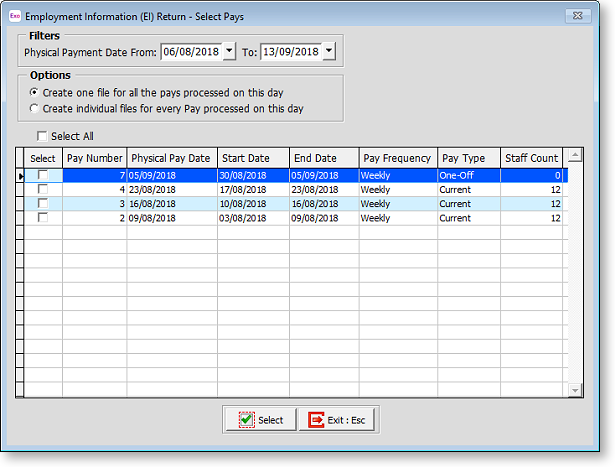
Select the pays to create EI return files for, then click Select to create an EI return file for each selected pay. You are asked for contact details as usual - these details will be included in all files created in this batch.
Two options are available for cases when there are multiple pays with the same Physical Pay Date:
- Create one file for all the pays processed on this day - value for all pays will be consolidated into a single EI return file. When viewing the file's details (see below), each pay included in the file is listed in the Pays table.
- Create individual files for every pay process on this day - a separate EI return file will be created for each pay, in the same way that separate files are created for pays on different days.
Viewing Details of EI Return Files
To view details of the information included in an EI return file, select the file and click the Details button.
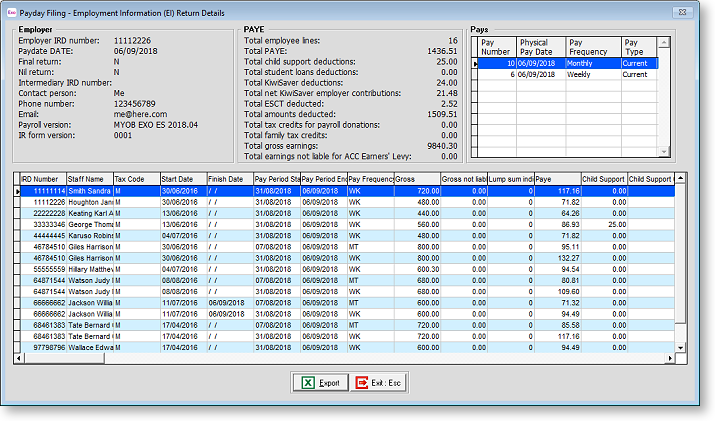
The details window has four main areas:
- The Employer area displays information about the employer, including the contact details entered when creating the file.
- The PAYE area displays total amounts across all employees in the file.
- The Pays table lists all pays included in the file - when creating EI return batches, it is possible to consolidate multiple pays with the same Physical Pay Date into one file.
- The table in the lower half of the window displays the pay details for each employee included in the file. Where a file contains multiple pays, there may be multiple lines for one or more employees.
EI Return File Statuses
The Status column on the Employment Information Return window will contain one of the following statuses:
- No status - no EI return file has been created for the pay.
- Created - a return file has been created but not uploaded yet.
- Uploaded - a return file has been created and uploaded to the myIR website.
- Not Required - there is no need to generate a return file for the pay (usually for pays from before payday filing became compulsory).
Right-clicking on a row gives the option to manually set the return file status. Clearing the status or setting it to "Not Required" deletes the existing EI return file - a new one will need to be created manually.
Backing up Return Files
EI and ED return files can be regenerated at any time, so keeping backups of them is not strictly necessary; however, if you do want to include return files in Exo Payroll backups, they must be stored in the default folder, i.e. the Payday Files folder under the main application folder. This is the recommended method of storing return files.
If you choose to save return files in one or more different folders, these folders will not be included in backups initiated from Exo Payroll, so you will need to arrange backups for them yourself.
Updating New or Departing Employees
Under payday filing, you must provide the IRD with the information of new and departing employees in your organisation. This information is included in a separate Employee Details file, which must be uploaded to the myIR website along with the EI return files.
When a pay is updated, if there are any employees whose start or end date fall within the pay period, an Employee Details file will be created automatically, provided the Automatically create the Payday files after updating the pay option is selected. If this option is not selected, or if you want to create an Employee Details file for a different date range, you will need to create the file manually.
To create an Employee Details file manually, click the Create ED File button on the Employment Information Return window. This opens a window showing either all employees or all employees whose start/finish date falls within the selected date range:

Tick the boxes for the employees you want to include, then click Create CSV File to create an Employee Details file containing details of all selected employees. You are then prompted to upload the file to the myIR website as usual.