
Single-Tier Change Management: To Track Changes to the Project Budget
In this activity, you will learn how you can turn on the change order workflow for a project and manage changes to the project’s budgeted values by creating change orders.
Story
Suppose that the Thai Food Restaurant customer has ordered two juicers, along with eight hours of the installation service from the SweetLife Fruits & Jams company. SweetLife's project accountant has created a project and configured the revenue and cost budgets based on the agreement reached with the customer. During project execution, the customer requests one more juicer, along with the installation, as a part of the same project. The project accountant has estimated that the installation of this additional juicer will require five hours of the installation service. Also, the project accountant has decided to track these changes to the project at the budget level because the installation of the third juicer was not planned initially.
Acting as the project accountant, you will turn on the change order workflow for the project to be able to track changes to the project budget. Then you will create a change order to update the project budget according to the customer's request and to reflect these changes at the project budget level.
Configuration Overview
In the U100 dataset, the following tasks have been performed to support this activity:
- On the Enable/Disable Features (CS100000) form, the following
features have been enabled:
- Projects, which provides support for the project accounting functionality
- Change Orders, which gives you the ability to manage changes to the project’s budgeted and committed values
- On the Projects (PM301000) form, the TOMYUM6 project has been created and the INSTALL project task has been created for the project.
- On the Change Order Classes (PM203000) form, the DEFAULT change order class has been created.
- On the Projects Preferences (PM101000) form, the DEFAULT change order class has been selected in the Default Change Order Class box on the General tab (General Settings section).
Process Overview
In this activity, you will turn on the change order workflow for the project on the Projects (PM301000) form. Then you will create and process a change order for the project on the Change Orders (PM308000) form. Finally, you will review how the changes have affected the values in the project budget.
System Preparation
To sign in to the system and prepare to perform the instructions of the activity, do the following:
- Launch the MYOB Acumatica website, and sign in to a company with the U100 dataset preloaded; you should sign in as Pam Brawner by using the brawner username and the 123 password.
- In the info area, in the upper-right corner of the top pane of the MYOB Acumatica screen, make sure that the business date in your system is set to 1/30/2025. If a different date is displayed, click the Business Date menu button and select 1/30/2025 on the calendar. For simplicity, in this activity, you will create and process all documents in the system on this business date.
Step 1: Turning on the Change Order Workflow for the Project
To turn on the change order workflow for the project, which makes it possible to create change orders for the project, do the following:
- On the Projects (PM301000) form, open the TOMYUM6 project.
- On the Summary tab, select the Change Order Workflow check box to turn on the change order workflow for the project.
- Save your changes to the project.
Since you turned on the change order workflow for the project, the Revised Budgeted Quantity and Revised Budgeted Amount columns on the Revenue Budget and Cost Budget tabs have become read-only. Now you can make changes to these values only by using the change orders.
Step 2: Creating a Change Order for the Project
To make changes to the project budget by creating a change order, do the following:
- While you are remaining on the Projects (PM301000)
form with the TOMYUM6 project selected, on the More menu, click Create Change Order. The system creates a change order for the project and opens it
on the Change Orders (PM308000) form.
Notice that the system has automatically selected the DEFAULT change order class for the change order because this class is the default change order class specified on the Projects Preferences (PM101000) form.
- In the Summary area of this form, in the Description box, enter One more juicer with installation requested by the customer.
- On the Revenue Budget tab, click Add Row
on the table toolbar and specify the following settings in the row:
- Project Task: INSTALL
- Account Group: REVENUE
- Description: Additional juicer with installation
- Amount: 2900
When you enter the Amount of the line, which represents the additional revenue, the system calculates the Revised Budgeted Amount as the sum of the Original Budgeted Amount and the Amount.
- On the table toolbar of the Cost Budget tab, click Add Budget Lines.
- In the
Add
Budget Lines dialog box, which opens, select the unlabeled check box for
both cost budget lines, and click Add Lines & Close.
The system closes the dialog box and adds the selected lines to the change order.
- In the added budget line with the LABOR account group (which is the line for the INSTALL item), enter 5 in the Quantity column.
- In the line with the MATERIAL account group (which is the line for the
JUICER15 item), enter 1 in the
Quantity column.
The system automatically calculates the Amount value based on the Unit Rate value of the line, which is inherited from the project budget line. In the line, the system also calculates the Revised Budgeted Quantity value as the sum of the Original Budgeted Quantity and Quantity values, and it calculates the Revised Budgeted Amount value as the sum of the Original Budgeted Amount and Amount values.
When you specify changes to the project budget, the revenue budget change total in the Summary area becomes $2,900 and the cost budget change total becomes $2,400. Until you release the change order, these changes will not affect the project budget.
- Save your changes to the change order.
- On the More menu, click Print to print the change order.
The system navigates to the Change Order (PM643000) report, which is a ready-to-print version of the change order. The printed form lists the revenue budget lines of the change order, which the customer might need to review and agree to.
- Click Back in the browser tab to return to the change order on the Change Orders form.
- On the form toolbar, click Remove Hold to assign the change order the Open status. Then click Release to release the change order.
- On the Projects form, open the TOMYUM6 project.
- On the Change Orders tab, make sure the change order you have created is shown. The change order has the Closed status.
- On the Cost Budget tab, review the cost budget lines that have
been updated by the change order you have processed (see the screenshot below).
The system has calculated the Revised Budgeted Quantity as the sum of the Original Budgeted Quantity and the Budgeted CO Quantity, and it has calculated the Revised Budgeted Amount as the sum of the Original Budgeted Amount and the Budgeted CO Amount (see the following screenshot). The Budgeted CO Quantity and Budgeted CO Amount are the quantity and amount of the change order.
Figure 1. The cost budget updated with the change order 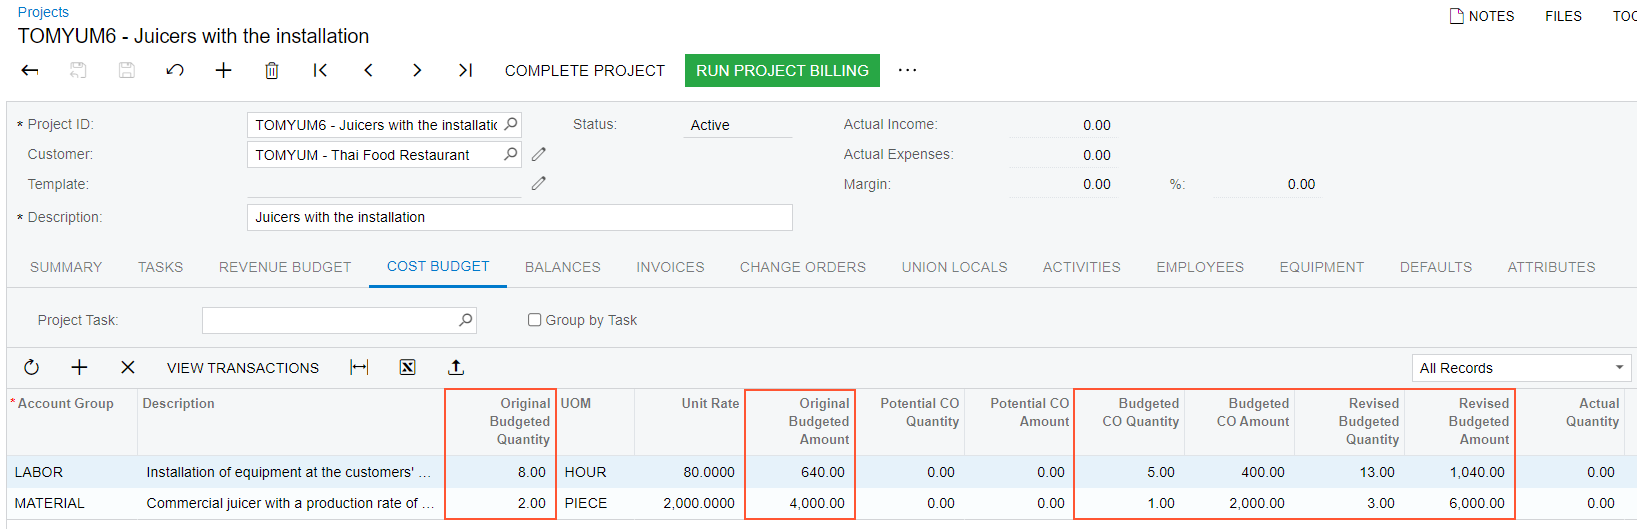
You have processed a change order for the project.