
Navigation Configuration: To Specify Visibility Conditions for a Side Panel
In this activity, you will learn how to specify the visibility conditions for tabs on a side panel.
Story
Suppose that you are a technical specialist in your company who works on simple customizations, including those involving the creation, modification, and use of generic inquiries. A sales representative of your company has requested an inquiry form that displays data about business accounts.
You have offered the predefined Business Accounts (CR3030PL) generic inquiry form, but the sales representative has asked you to give users the capability to view the following detailed information on a single tab of the side panel, depending on the type of the selected record:
- For a business account of the vendor type: Vendor details on the Vendors (AP303000) form
- For a business account of the customer type: Customer details on the Customers (AR303000) form
- For a business account of the business account type: Business account details on the Business Accounts (CR303000) form
Configuration Overview
You will work with a copy of the predefined Business Accounts (CR3030PL) generic inquiry form, which has the CR-BusinessAccounts2018R1 inquiry title and the Business Accounts site map title specified on the Generic Inquiry (SM208000) form. The original inquiry form has a side panel with eight tabs. For the purposes of this activity, the copy has been modified to have no navigation settings specified.
The copy that you will modify has the DB1-CRBAccounts inquiry title and the S130 Business Accounts site map title specified on the Generic Inquiry form.
Process Overview
On the Navigation tab of the Generic Inquiry (SM208000) form, you will configure navigation to the Vendors (AP303000) form, the Customers (AR303000) form, and the Business Accounts (CR303000) form with the Side Panel option selected as the navigation mode. You will provide the navigation settings that the system should use to display the details of the business account whose identifier the user clicks in the inquiry results. You will also specify the visibility conditions for each navigation target, which depend on the type of business account that the user clicks in the inquiry results.
System Preparation
Launch the MYOB Acumatica website, and sign in to a tenant with the U100 dataset preloaded as system administrator Kimberly Gibbs. You should sign in by using the gibbs username and the 123 password.
Step 1: Specifying the Navigation Settings for the Side Panel
To specify the needed navigation settings for the side panel of the generic inquiry, do the following:
- Open the Generic Inquiry (SM208000) form.
- In the Inquiry Title box of the Summary area, select DB1-CRBAccounts.
- On the Navigation tab, in the Navigation
Targets pane, add a row with the following settings:
- Link: AP303000 - Vendors
- Window Mode: Side Panel
- On the form toolbar, click Save.
- While the row you just added is still selected in the Navigation Targets pane, in the Icon box of the right pane of the Navigation tab, select directions car.
- On the Navigation Parameters table (in the right pane
within the Navigation tab), add a row with the following
settings:
- Field: AcctCD
- Parameter: BAccount.AcctCD
- On the form toolbar, click Save.
- On the Visibility Conditions tab (in the right pane
within the Navigation tab), add a row, and specify the
following settings:
- Data Field: BAccount.Type
- Condition: Equals
- From Schema: Selected
- Value: Vendor
Tip:If the Side Panel option is selected in the Window Mode column, the Visibility Conditions tab is displayed in the right pane. - On the form toolbar, click Save.
- On the Navigation tab, in the Navigation
Targets pane, add one more row with the following settings:
- Link: AR303000 - Customers
- Window Mode: Side Panel
- On the form toolbar, click Save.
- While the row you just added is still selected in the Navigation Targets pane, in the Icon box of the right pane of the Navigation tab, select shopping cart.
- On the Navigation Parameters tab (in the right pane), add
a row with the following settings:
- Field: AcctCD
- Parameter: BAccount.AcctCD
- On the form toolbar, click Save.
- On the Visibility Conditions tab of the
Navigation tab, add a row, and specify the following
settings:
- Data Field: BAccount.Type
- Condition: Equals
- From Schema: Selected
- Value: Customer
- On the form toolbar, click Save.
- On the Navigation tab, in the Navigation
Targets pane, add one more row with the following settings:
- Link: CR303000 - Business Accounts
- Window Mode: Side Panel
- On the form toolbar, click Save.
- While the row you just added is still selected in the Navigation Targets pane, in the Icon box of the right pane, select badge.
- On the Navigation Parameters tab (in the right pane), add
a row with the following settings:
- Field: AcctCD
- Parameter: BAccount.AcctCD
- On the form toolbar, click Save.
- On the Visibility Conditions tab of the
Navigation tab, add a row, and specify the following
settings:
- Data Field: BAccount.Type
- Condition: Equals
- From Schema: Selected
- Value: Business Account
- On the form toolbar, click Save.
Step 2: Verifying the Configuration of Visibility Conditions for the Side Panel
To verify the configuration of visibility conditions for the side panel, while you are still working on the Generic Inquiry (SM208000) form with the DB1-CRBAccounts inquiry selected, do the following:
- On the form toolbar, click View Inquiry to preview how your changes have affected the resulting generic inquiry form.
- In the inquiry results, click a row with a business account of the Vendor type, and notice that on the side panel, the system displays only one tab (with the directions car icon).
- Click this icon, and notice that in the side panel, the system displays detailed
information about the selected vendor on the Vendors (AP303000) form (see the following
screenshot).
Figure 1. The list of business accounts on the inquiry form and the Vendors form in the side panel 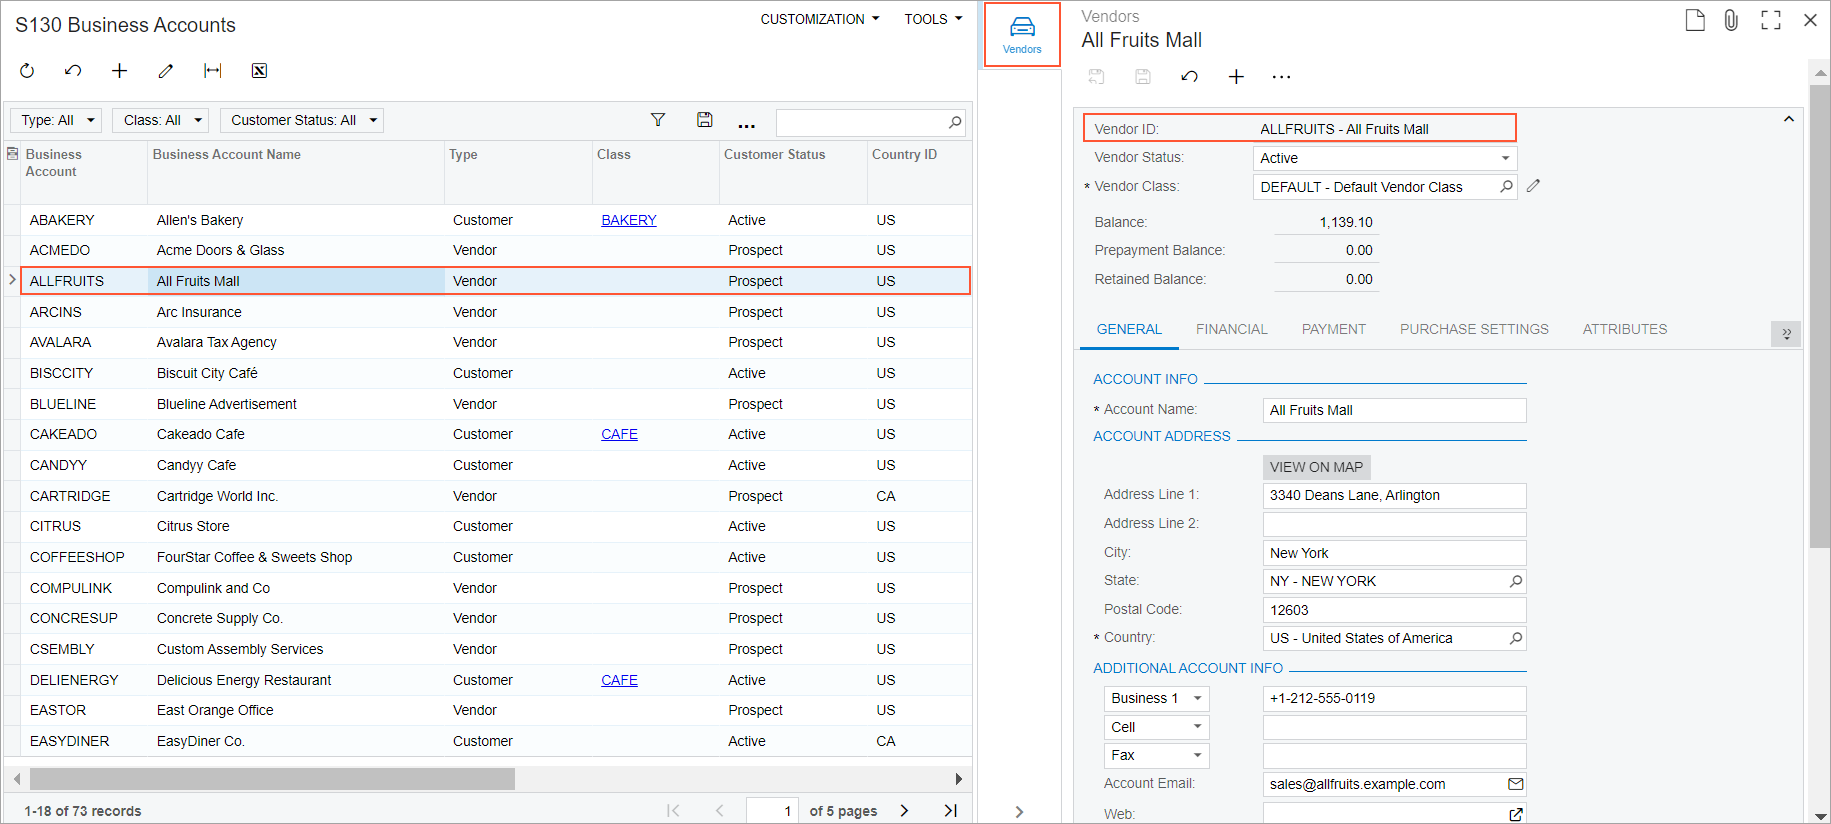
- In the inquiry results, click a row with a business account of the Customer type, and notice that on the side panel, the system has changed the icon to the shopping cart icon. In the side panel, which is already opened, notice that the system displays detailed information about the selected customer on the Customers (AR303000) form.
- In the inquiry results, click a row with a business account of the Business Account type, and notice that on the side panel, the system has changed the icon to the badge icon. In the side panel, notice that the system displays detailed information about the selected business account on the Business Accounts (CR303000) form.