
Credit Status: Process Activity
The following activity will walk you through the process of managing the credit status of a customer.
Story
Suppose that the Credit Control team of SweetLife Fruits & Jams regularly reviews a list of customers that have not paid for a long time and have ignored dunning letters. One of the customers, GOODFOOD has already received two dunning letters, but failed to pay the outstanding invoices. This customer has be put on credit hold to prevent users from creating documents for it.
Further suppose that on May 15, 2025 the customer called SweetLife to inform them that a bank transfer has been sent to pay the debt. The Credit Control team decided to remove the credit hold for the customer on the same day.
Acting as Yona Jones, you need to generate the final dunning letter for GOODFOOD, put this customer on credit hold, and remove the credit hold for the customer.
Configuration Overview
In the U100 dataset, the following tasks have been performed to support this activity:
- On the Enable/Disable Features (CS100000) form, the Dunning Letter Management feature has been enabled.
- On the Customers (AR303000) form, the GOODFOOD customer has been created and assigned to the DEFAULT customer class.
Process Overview
In this activity, you will prepare the final dunning letter on the Prepare Dunning Letters (AR521000) form and print it on the Print/Release Dunning Letters (AR522000) form. On the Manage Credit Holds (AR523000) form, you will put the customer on credit hold and review its status on the Customers (AR303000) form. Finally, on the Manage Credit Holds form, you will remove the credit hold for the customer.
System Preparation
Before you begin preparing dunning letters, do the following:
- Launch the MYOB Acumatica website with the U100 dataset preloaded, and sign in as Yona Jones by using the jones username and the 123 password.
- In the info area, in the upper-right corner of the top pane of the MYOB Acumatica screen, make sure that the business date in your system is set to 4/3/2025. If a different date is displayed, click the Business Date menu button, and select 4/3/2025 on the calendar.
- As a prerequisite activity, in the company to which you are signed in, be sure you have set up the dunning process, as described in Dunning Process Setup: Implementation Activity.
- As a prerequisite activity, be sure that you have prepared dunning letters for the customer, as described in Preparation of Dunning Letters: To Prepare Dunning Letters.
- On the Company and Branch Selection menu on the top pane of the MYOB Acumatica screen, select the SweetLife Head Office and Wholesale Center branch.
Step 1: Preparing the Final Dunning Letter
To prepare the final dunning letter for the GOODFOOD customer, do the following:
- Open the Prepare Dunning Letters (AR521000) form.
- In the Selection area, specify the following settings:
- Company/Branch: SWEETLIFE
- Customer Class: DEFAULT
- Dunning Letter Date: 4/3/2025
- Add Coming-Due Documents: Selected
The GOODFOOD customer appears in the table along with other customers because its overdue invoices match the level 3 settings and because two dunning letters have already been prepared for the customer. In the Dunning Letter Level column, you can see the level of the dunning letter to be generated, which is 3.
- Select the check box in the unlabeled column for the GOODFOOD customer, and on the form toolbar, click Process to generate the dunning letter for the customer.
- On the Print/Release Dunning Letters (AR522000) form, make sure that the
following settings are specified:
- Action: Print Dunning Letter
- Start Date: 4/3/2025
- End Date: 4/3/2025
Notice that for the only row in the table, the check box in the Final Reminder column is selected, indicating that this is the final dunning letter.
- Select the check box in the unlabeled column for row, and on the form toolbar,
click Process to view a printable preview of the dunning
letter.
The system displays the preview of the dunning letter; you can then print the letter.
The dunning letter lists all of the customer's outstanding documents. The generated letter shows seven overdue invoices, including the dunning fee invoice, and asks the customer to settle the documents by 4/6/2025, which is the dunning letter date of 4/3/2025 plus 3 days. The 3 days is the Days to Settle that you have specified for level 3 of dunning letters on the Accounts Receivable Preferences (AR101000) form.
Step 2: Putting the Customer on Credit Hold
To put the customer on credit hold, do the following:
- Open the Manage Credit Holds (AR523000) form.
- In the Selection area, specify the following settings:
- Action: Credit Hold
- Start Date: 4/3/2025
- End Date: 5/7/2025
The GOODFOOD customer with the overdue balance of $8,503.81 appears in the table (see the following screenshot), because with the specified settings, the system displays the customers with the Active status, which have an overdue balance on 4/3/2025 and to which the last-level dunning letter has been sent in the specified time interval (3/3/2025 to 4/3/2025).
- Select the check box for the only row in the table, and on the form toolbar,
click Process to put the selected customer on credit
hold.
Figure 1. Customer to be put on credit hold 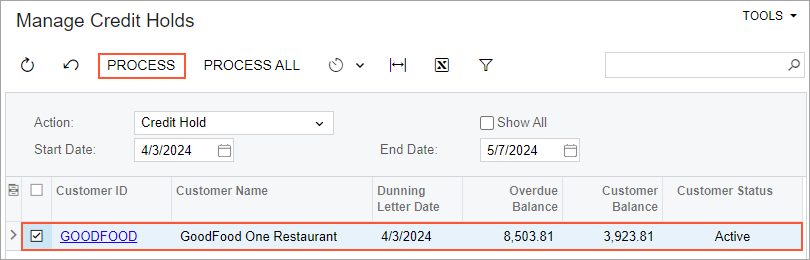
Step 3: Reviewing the Customer Record
To review the settings of the GOODFOOD customer, do the following:
- On the Customers (AR303000) form, open the GOODFOOD customer.
- Review the customer's settings.
Notice that the customer record has Credit Hold displayed in the Customer Status box. Because of this status, users cannot create new invoices and debit memos for this customer. On the Invoices and Memos (AR301000) form, the customer record does not appear in the lookup table of the Customer box.
Step 4: Removing Credit Hold for the Customer
To remove the credit hold for the GOODFOOD customer, do the following:
- In the info area, click the Business Date menu button and select 5/15/2025 on the calendar.
- Open the Manage Credit Holds (AR523000) form.
- In the
Action
box, select Remove Credit
Hold.
The GOODFOOD customer appears in the table, because with this action selected, the form shows all customers that have the Credit Hold status.
- Select the unlabeled check box for the customer, and on the form toolbar, click
Process to release the customer from credit
hold.Tip:Alternatively, you can release the customer from credit hold manually by changing the status of the customer on the Customers (AR303000) form.