
Product Synchronization: To Sync Product Images
The following activity will walk you through the process of synchronizing product images between MYOB Acumatica and the Shopify store.
Story
Suppose that the SweetLife Fruits & Jams company wants to store some images of the products it sells in the online store in an external storage. Some of the images, however, are attached to items in the MYOB Acumatica instance.
Acting as an implementation consultant helping SweetLife to set up the integration of MYOB Acumatica with the Shopify store, you want to test how images stored in MYOB Acumatica are exported to the Shopify store.
Configuration Overview
In the U100 dataset, for the purposes of this activity, on the Stock Items (IN202500) form, the APJAM08 stock item of the JAM item class been created.
Process Overview
In this activity, you will do the following:
- On the Shopify Stores (BC201010) form, activate the Customer Locations entity.
- On the Stock Items (IN202500) form, add images to the APJAM08 stock item.
- On the Prepare Data (BC501000) form, prepare the stock item data for synchronization.
- On the Process Data (BC501500) form, process the stock item data prepared for synchronization.
- In the admin area of the Shopify store, review the exported stock item.
- On the Shopify Stores (BC201010) form, activate the Product Image entity.
- On the Prepare Data form, prepare the product image data for synchronization.
- On the Process Data form, process the product image data prepared for synchronization.
- In the admin area of the Shopify store, review the exported images.
System Preparation
Before you complete the instructions in this activity, do the following:
- Make sure that the following prerequisites have been met:
- The Shopify store has been created and configured, as described in Initial Configuration: To Set Up a Shopify Store.
- The connection to the Shopify store has been established and the initial configuration has been performed, as described in Initial Configuration: To Configure the Store Connection.
- Download the AppleJam1.png and AppleJam2.png files to your device.
- Launch the MYOB Acumatica website with the U100 dataset preloaded, and sign in with the
following credentials:
- Username: gibbs
- Password: 123
- On the Shopify Stores (BC201010) form, select the SweetStore - SP store.
- On the Entities tab, select the Active check box in the row of the Product Image entity.
- On the form toolbar, click Save.
- Sign in to the admin area of the Shopify store as the store administrator in the same browser.
Step 1: Adding an Image to the Stock Item
To add an image to the APJAM08 stock item in MYOB Acumatica, do the following:
- On the Stock Items (IN202500) form, select the APJAM08 inventory item.
- On the Attributes tab, drag each of the files you
downloaded to the Image area.
The files are attached to the form. You can browse them in the Image area or access them by clicking Files on the form title bar. The image that is visible in the Image area, after being exported, will be the main image of the product in the Shopify store.
- On the eCommerce tab, in the Media
URLs table, add a row and specify the following settings of the
image in the added row:
- URL: http://acumatica-builds.s3.amazonaws.com/builds/University/CommerceTraining/AppleJam3.png
- Type: Image
- On the form toolbar, click Save.
Step 2: Preparing the Stock Item Data for Synchronization
Before you can synchronize images for a stock item, you need to synchronize the stock item itself. To prepare the stock item data for synchronization, do the following:
- On the Prepare Data (BC501000) form, specify the following settings in the Summary area:
- Store: SweetStore - SP
- Prepare Mode: Incremental
- In the table, select the check box in the unlabeled column in the row of the Stock Item entity, and on the form toolbar, click Prepare.
- In the Processing dialog box,
which opens, review the results of the processing, and click
Close to close the dialog box and return to the Prepare Data form.
Notice that the Prepared Records column shows the number of synchronization records that have been prepared and are ready to be processed.
Step 3: Processing the Prepared Stock Item Data
To process the stock item data prepared for synchronization, do the following:
- While you are still viewing the Prepare Data (BC501000) form,
click the link in the Ready to Process column in the row
of the Stock Item entity.
The Process Data (BC501500) form opens with the SweetStore - SP store and the Stock Item entity selected in the Summary area.
- Select the unlabeled check box in the row with the Apple jam 8 oz. item, and on the form toolbar, click Process.
- In the Processing dialog box, which opens, click Close to close the dialog box.
Step 4: Reviewing the Synchronized Stock Item
To review the Apple jam 8 oz. stock item, in the Shopify store, do the following:
- In the left menu, click Products.
- On the Products page, which opens, click the row of the
Apple jam 8 oz. product to open the product management page of this
product.
Notice that the Media section contains only one image, which you added as an external link to the Media URLs table on the eCommerce tab of the Stock Items (IN202500) form. Images added to this table are synchronized as part of the synchronization of the Stock Item entity.
In the next steps, you will synchronize the images that you uploaded on the Attributes tab of the Stock Items form.
Step 5: Preparing the Image Data for Synchronization
To prepare the image data for synchronization, in MYOB Acumatica, do the following:
- On the Prepare Data (BC501000) form, specify the following
settings шn the Summary area:
- Store: SweetStore - SP
- Prepare Mode: Incremental
Because you have not processed the Product Image entity before, the system will prepare all images attached to the synchronized items as it would if Full mode were selected.
Attention:Note that images are synchronized only for stock and non-stock items that have been synchronized with the Shopify store. If an item has not been synchronized, images added to it will not be exported during the synchronization of the Product Image entity. - In the table, select the unlabeled check box in the row of the Product Image entity, and on the form toolbar, click Prepare.
- In the Processing dialog box,
which opens, review the results of the processing, and click
Close to close the dialog box and return to the Prepare Data form.
Notice that the Prepared Records column shows the number of synchronization records that have been prepared and are ready to be processed.
Step 6: Processing the Prepared Image Data
To process the image data prepared for synchronization, do the following:
- While you are still viewing the Prepare Data (BC501000) form,
click the link in the Ready to Process column in the row
of the Product Image entity.
The Process Data (BC501500) form opens with the SweetStore - SP store and the Product Image entity selected in the Summary area. The table displays two synchronization records of the Product Image entity.
Tip:The ERP ID column displays the item type (stock items) and identifier (APJAM08) followed by the backslash and then the name of the image file. You can click the link in this column to open the image details on the File Maintenance (SM202510) form. - On the form toolbar, click Process All to process both synchronization records displayed in the table.
- In the Processing dialog box, which opens, click Close to close the dialog box.
Step 7: Reviewing the Synchronized Images
To review the images that have been exported for the Apple jam 8 oz. product, do the following:
- On the Sync History (BC301000) form, specify the following
settings in the Summary area:
- Store: SweetStore - SP
- Entity: Product Image
- Open the Processed tab.
The table displays synchronization records of the Product Image entity, as shown in the following screenshot. In the External ID column, notice that the identifier of each image in the Shopify store consists of the identifier of the product and the identifier of the image.
Figure 1. Synchronization records for the product images 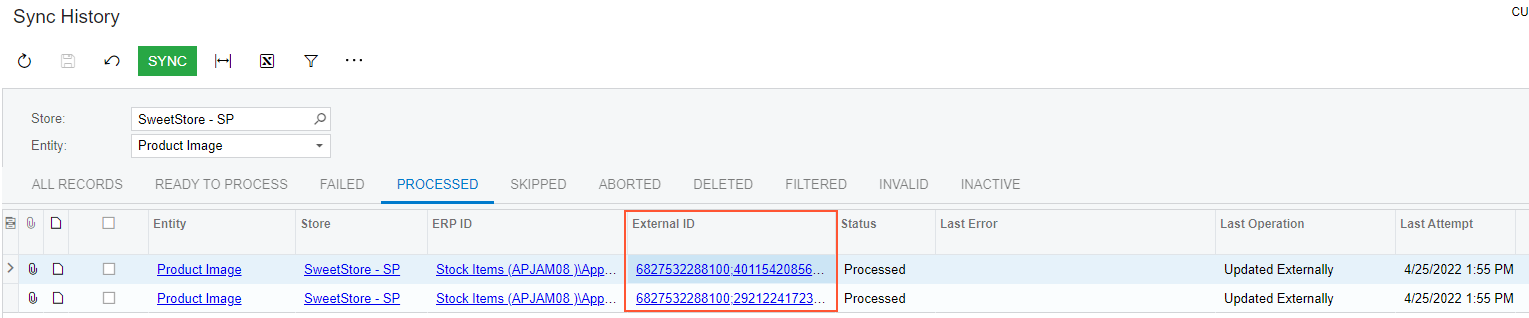
- In any row with the Apple jam 8 oz. external description, click the link
in the External ID column to review the item in the Shopify store. The product management page opens for the Apple jam 8 oz.
product.
Notice that the Media section now contains three images. The two images uploaded on the Attributes tab of the Stock Items form were exported as part of the synchronization of the Product Image entity. The main product image (which is the image that appears larger than other thumbnails) is the image that is visible in the Image area of the Attributes tab.
- In the upper right, click Preview, and review how the imported images are displayed on the product page on the storefront.
- At the top of the page, click Catalog. Locate the Apple jam 8 oz. product and review how the main product image is displayed on the product listing page.