
Data Synchronization: To Perform the First Synchronization
The following activity will walk you through the process of manually exporting items from MYOB Acumatica to the Shopify store. You will also perform the instructions to place a test order online in the Shopify store and then synchronize the order and the payment with MYOB Acumatica. Finally, you will create a shipment for the order in MYOB Acumatica and synchronize the created shipment with the Shopify store.
Story
Suppose that you are an implementation consultant helping the SweetLife Fruits & Jams company to set up an online store. You have completed the minimum initial configuration of the integration with Shopify and now want to explore how synchronization works. You will configure synchronization for and then synchronize a subset of stock items that are maintained in MYOB Acumatica (stock items of the Jam item class) with the Shopify store. You will then place a test order for one of the synchronized products and explore how the online order is processed in the Shopify store and in MYOB Acumatica.
Process Overview
In this activity, you will perform the following steps:
- On the Stock Items (IN202500) form of MYOB Acumatica, review the stock items that need to be exported to the Shopify store.
- On the Entities (BC202000) form, configure the filtering options for the Stock Item entity to include in the synchronization only the stock items of the Jam item class.
- On the Prepare Data (BC501000) form, start the data preparation for the Stock Item entity to prepare the stock item data for export.
- On the Sync History (BC301000) form, review the result of the data preparation process.
- On the Process Data (BC501500) form, start data processing for the Stock Item entity to save the synchronized product data in the Shopify store.
- On the Sync History form, review the results of the data processing.
- In the admin area of the Shopify store, review the products that have been imported from MYOB Acumatica.
- By using the admin area of the Shopify store, place an order for one of the products that have been imported from MYOB Acumatica.
- On the Prepare Data form of MYOB Acumatica, start the data preparation process for the Sales Order entity to prepare the order data for import; on the Process Data form, process the prepared sales order data.
- On the Sync History form, review the synchronization status of the imported order data.
- On the Sales Orders (SO301000) form, review the details of the imported sales order.
- On the Sales Orders form, create a shipment for the imported order.
- On the Shipments (SO302000) form, confirm the shipment.
- On the Prepare Data form, start the data preparation for the Shipment entity; on the Process Data form, start data processing for the shipment.
- In the admin area of the Shopify store, review the updated order details and the shipment exported from MYOB Acumatica.
System Preparation
Do the following:
- Make sure that the following prerequisites have been met:
- The Shopify store has been created and configured, as described in Initial Configuration: To Set Up a Shopify Store.
- The connection to the Shopify store has been established and the initial configuration has been performed, as described in Initial Configuration: To Configure the Store Connection.
- Launch the MYOB Acumatica website, and sign in as an administrator by using the following
credentials:
- Username: gibbs
- Password: 123
- Sign in to the admin area of the Shopify store as the store administrator in the same browser.
Step 1: Finding and Reviewing the Stock Items to Be Sold Online
To find and review the stock items that will be sold online, on the Stock Items (IN2025PL) form, filter the stock items to display only the items of the Jam item class as follows:
- In the Item Class column, click the column header.
- In the menu that opens, select the Equals filter condition.
- In the box at the bottom of the menu, type Jam.
- Click OK to apply the filter.
Now all stock items of the Jam item class are displayed. In the table footer, notice how many items are in the class; scan the list so you are familiar with the stock items that you need to export to the Shopify store.
Step 2: Configuring the Export of a Subset of Stock Items
To configure the Stock Item entity to export to the Shopify store only stock items of the Jam item class, do the following:
- On the Entities (BC202000) form, specify the following
settings in the Summary area:
- Store Name: SweetStore - SP
- Entity: Stock Item
Notice that the entity can only be exported to the Shopify store (that is, Sync Direction is set to Export).
- To create a filtering condition for the export of stock items, on the
Export Filtering tab, click Add
Row on the table toolbar, and specify the following settings in
the row:
- Active: Selected
- Field Name: Item Class
- Condition: Equals
- Value: Jam
- On the form toolbar, click Save to save your
changes.
Now when you synchronize the Stock Item entity, only the stock items of the Jam item class will be exported to the Shopify store.
Note:Filtering rules are not applied to data that has already been synchronized. For example, if you synchronize the Stock Item entity without filters (which will result in exporting all stock items to the online store), apply the filter described above, and prepare and process the Stock Item entity again, all previously synchronized stock items that no longer match the filtering conditions will remain synchronized.
Step 3: Preparing the Product Data for Synchronization
To prepare the stock item data that needs to be synchronized to the Shopify store, do the following:
- On Prepare Data (BC501000) form, specify the following
settings in the Summary area :
- Store: SweetStore - SP
- Prepare Mode: Incremental
This setting controls which data will be loaded. Incremental indicates that the system will load only the data that has been modified since the previous data synchronization. Because you start the data preparation process for the Stock Item for the first time, all stock item data will be prepared.
- In the table, select the check box in the unlabeled column in the row of the Stock Item entity.
- On the form toolbar, click Prepare.
- In the Processing dialog box, which opens, review the
results of the processing, and click Close to close the
dialog box.
In the table on the form, notice that the Ready to Process column shows the number of synchronization records that have been prepared and are ready to be processed. Notice that this number matches the total number of the items with the Jam class you reviewed in Step 1.
The Processed Records column shows the number of records that have been processed (that is, records that have been successfully synchronized and assigned the Processed status). This number is now 0 because you have not processed any record yet.
Tip:You can click the link in the Ready to Process column to open the Process Data (BC501500) form with the store and the entity selected; you can click the link in the Processed Records column to open the Sync History (BC301000) form with the store and the entity selected and the list of processed synchronization records (that is, records that have been successfully synchronized and assigned the Processed status) displayed on the Drilldown filter tab.
Step 4: Reviewing the Results of Data Preparation
To review the results of preparation of product data for synchronization, do the following:
- While you are still viewing the Prepare Data (BC501000) form,
click the link in the Total Records in the row of the
Stock Item entity.
The Sync History (BC301000) form opens in a new browser tab with the SweetStore - SP store and the Stock Item entity selected in the Summary area.
- On the Filtered tab, review the synchronization records.
Notice that all synchronization records on this tab have the Filtered status. These are the stock items that were excluded from synchronization based on the filtering conditions that you configured earlier.
- Go to the Ready to Process tab.
Notice that the table is displaying only synchronization records with the Prepared status, as shown in the screenshot below. This status means that these records have been prepared and are now ready to be processed.
For each of these items, the ERP ID column displays a link that you can click to open the item on the Stock Items (IN202500) form. Notice that the External ID column currently does not display any values because the stock items have not yet been exported to the Shopify store.
Figure 1. Data prepared for processing 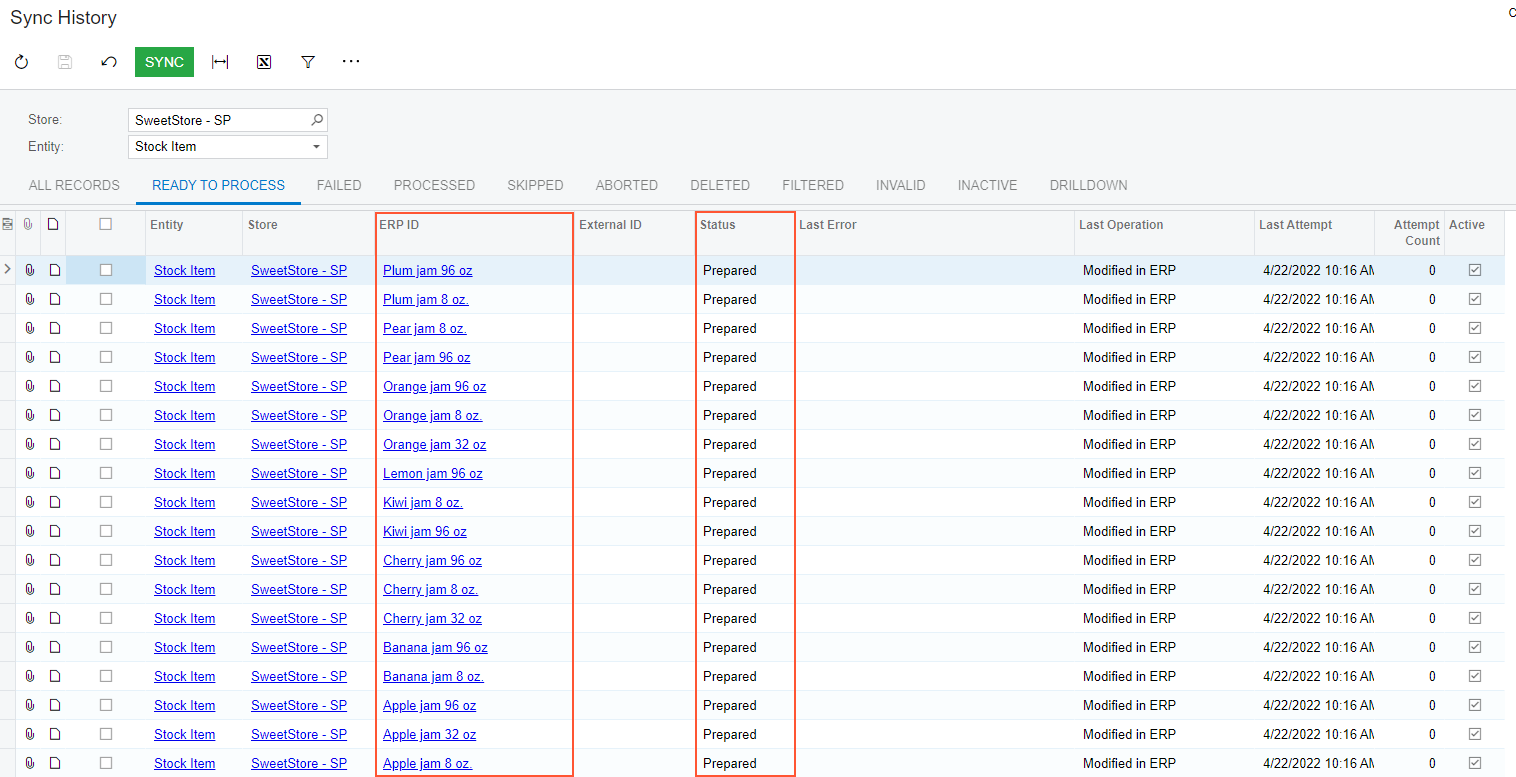
Step 5: Processing the Prepared Product Data
To process the prepared product data (that is, to synchronize it with the Shopify store), do the following:
- On the Process Data (BC501500) form, select the following
settings in the Summary area:
- Store: SweetStore - SP
- Entity: Stock Item
The table displays only the list of the items that you have prepared for synchronization (that is, the items with the Prepared status).
- On the form toolbar, click Process All to synchronize all
the records displayed in the table.
Wait until the processing finishes.
- In the Processing dialog box, which opens, click Close to close the dialog box.
Step 6: Reviewing the Synchronization Status of the Product Data
To again review the synchronization status of the product data, do the following:
- On the Sync History (BC301000) form, select the following
settings in the Summary area:
- Store: SweetStore - SP
- Entity: Stock Item
- Go to the Ready to Process tab.
Notice that the table contains no records because you have already processed all the prepared records.
- Go to the Processed tab.
The tab shows the list of items that have been processed—that is, synchronized with the Shopify store. For each item, there is now a product identifier in the External ID column. In the table, the Last Operation value has changed to Inserted Externally and the time stamp in the Last Attempt column has changed to the date and time when you ran data processing on the Process Data (BC501500) form.
Step 7: Viewing an Exported Product in the Shopify Store
To view the KIWIJAM96 stock item (which has the description Kiwi jam 96 oz) in the Shopify store, do the following:
- While you are still viewing the Sync History (BC301000) form,
click the link in the External ID column in the row of
the synchronization record for the Kiwi jam 96 oz item.
The product management page for the Kiwi jam 96 oz product (which is a page in the admin area of the Shopify store where you manage details of a particular product) opens in a new browser tab.
- Scan the product details that have been exported to the Shopify store.Notice that the following information has been imported for Kiwi jam 96 oz from MYOB Acumatica:
- The item description (Kiwi jam 96 oz) in the Title box
- The extended item description (Thick and sweet kiwi jam – goes great on toast or on pancakes.) in the Description box
- The product image in the Media section
- The default price (45.15) in the Price box (Pricing section)
- The item inventory ID (KIWIJAM96) in the SKU (Stock Keeping Unit) box (Inventory section)
- The item class (Jam) in the Type box (Product organization section)
Step 8: Placing an Order from the Admin Area
To create an order for five 96-ounce jars of kiwi jam from the admin area of your Shopify store, do the following:
- While you are still viewing the admin area of the Shopify store, in the left menu, click Orders.
- On the Orders page, which opens, click Create order.
- On the Create order page, which opens, in the Products section, start typing Kiwi jam in the search product box.
- In the list of search results, which are shown in a pop-up window, select the check box next to Kiwi jam 96 oz, and click Add in the lower right.
- In the row of the Kiwi jam 96 oz product, change the quantity to 5.
- In the Customer section, click in the search box and in the menu that opens, select Create a new customer.
- In the Create a new customer pop-up window, which opens,
fill in the boxes as follows:
- First name: Larry
- Last name: Coleman
- Email: larry@example.com
- Country/region: United States
- Address: 1970 Duncan Avenue
- City: New York
- State: New York
- ZIP code: 10016
- In the lower right, click Save.
- In the Payment section, click .
- In the Mark as paid dialog box, which appears, click
Create order.
The system closes the Mark as paid dialog box and creates the order. At the top of the page, notice that the system has assigned the order an order number, the Paid payment status, and the Unfulfilled fulfillment status.
Each order is also assigned a numeric identifier, which you can see in the URL of the Shopify order page.
On the Process Data (BC501500) and Sync History (BC301000) forms, the order identifier is displayed in the External ID column, and the order number is displayed in the External Description column.
Step 9: Importing the Sales Order Data to MYOB Acumatica
To import the order from the Shopify store to MYOB Acumatica, do the following:
- On the Prepare Data (BC501000) form, specify the following settings in the Summary area:
- Store: SweetStore - SP
- Prepare Mode: Incremental
- In the table, select the check box in the unlabeled column in the row of the Sales Order entity.
- On the form toolbar, click Prepare.
- In the Processing dialog box, which opens, click Close to close the dialog box.
- In the row of the Sales Order entity, click the link in the
Ready to Process column (which shows 1 because
you have created only one order in the Shopify store).
The Process Data (BC501500) form opens with the SweetStore - SP store and the Sales Order entity selected.
Notice that the order identifier and the order number assigned to the order in Shopify are displayed in the External ID and External Description columns, respectively.
- Select the unlabeled check box in the only row of the table, and on the form toolbar, click Process.
- In the Processing dialog box, which opens, click Close to close the dialog box.
Step 10: Reviewing the Synchronization Status of the Imported Data
To review the synchronization status of the order you imported in the previous step, on the Sync History (BC301000) form, specify the following settings in the Summary area:
- Store: SweetStore - SP
- Entity: Leave empty
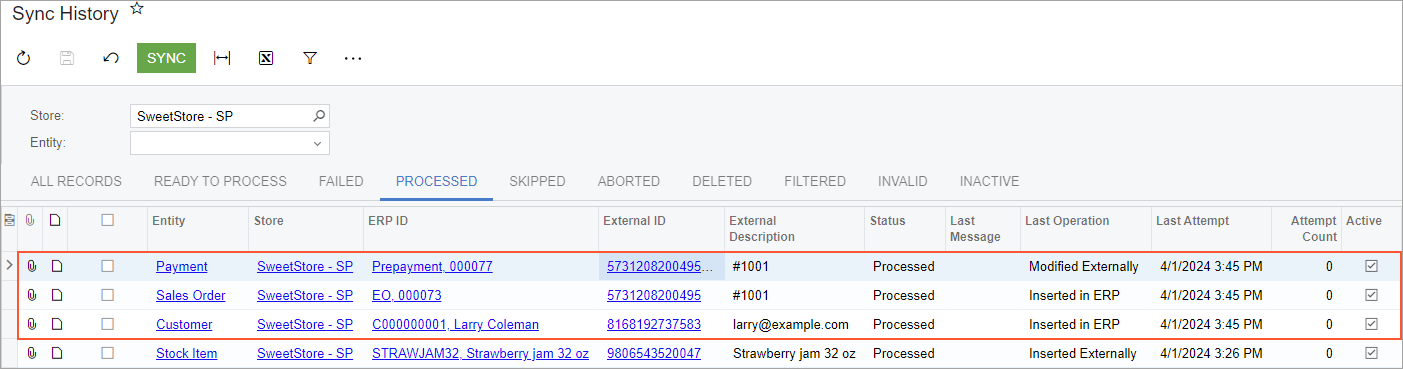
In the table of the Processed tab, notice that three synchronization records were created when the sales order was processed (see the screenshot below):
- Sales Order: The sales order that you placed in the Shopify store. The ERP ID column displays the order type (EO) and the order ID. The order type is based on the value selected in the Order Type for Import box on the Orders tab of the Shopify Stores (BC201010) form.
- Customer: The customer that you created in the Shopify store when placing the order. The ERP ID column displays the customer ID and the name of the customer. The customer ID was assigned to the customer record based on the numbering sequence specified in the Customer Numbering Sequence box on the Customers tab of the Shopify Stores form. The customer name was imported from the Shopify store.
- Payment: The payment used to pay the order in the Shopify store. The ERP ID column displays the payment type
(Prepayment) and the payment identifier.
The payment has been imported because the payment method you used to pay the order has been mapped to an MYOB Acumatica payment method and the mapping has been activated on the Payments tab of the Shopify Stores form.
Step 11: Reviewing the Imported Sales Order
To review the details of the imported sales order, do the following:
- While you are still viewing the synchronization results on the Sync History (BC301000) form, click the link in the ERP ID column for the sales order you imported.
- On the Sales Orders (SO301000) form, which opens in a pop-up
window, review the details of the order (which are shown in the following
screenshot).
Figure 3. The sales order imported from the Shopify store 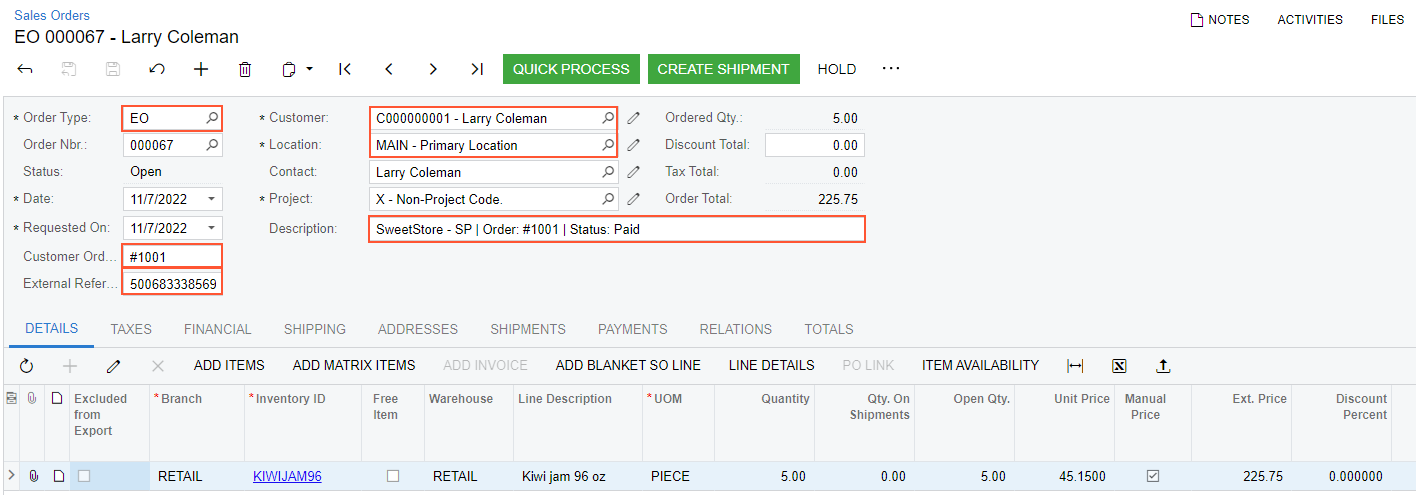
In the Summary area, notice the following:
- The imported order has the EO type (shown in the Order Type box), which is configured on the Shopify Stores (BC201010) form to be assigned to all sales orders imported from the SweetStore - SP store.
- In the Customer Order Nbr. box, the order number assigned to the order in the Shopify store is displayed.
- In the External Reference box, the order identifier assigned to the order in the Shopify store and the name of the store are displayed.
- The Date of the sales order is the same as the date on which the order was created in the Shopify store.
- In the Description box, the store name, the order number and the payment status of the order are displayed.
- The Customer and Location boxes display the information about the customer and customer location that were created in MYOB Acumatica during the import of the sales order; both were created during the order placement in the Shopify store.
On the Details tab, review the only line in the table. Notice the following:
- Branch is set to RETAIL, which is the default branch configured to appear on sales orders imported from the SweetStore - SP store on the Shopify Stores form.
- The inventory ID, quantity, unit price, and extended price of the item are exactly the same as the values on the order in the Shopify store.
On the Payments tab, notice that a prepayment in the order amount has been applied to the sales order.
Step 12: Creating and Confirming a Shipment
To process a shipment for the imported sales order, do the following:
- While you are still viewing the sales order on the Sales Orders (SO301000) form, on the form toolbar, click Create Shipment.
- In the Specify Shipment Parameters dialog box, which opens, make sure the current date and the RETAIL warehouse are selected, and click OK. The system creates a shipment and opens it on the Shipments (SO302000) form in the same pop-up window.
- On the form toolbar, click Confirm Shipment.
The shipment is assigned the Confirmed status; the sales order is assigned the Completed status.
- Close the pop-up window with the Shipments form.
Step 13: Synchronizing the Shipment with the Shopify Store
To export the shipment to the SweetStore - SP store, do the following:
- In the Summary area on the Prepare Data (BC501000) form,
select the following settings:
- Store: SweetStore - SP
- Prepare Mode: Incremental
- In the table, select the check box in the unlabeled column for the Shipment entity.
- On the form toolbar, click Prepare.
- In the Processing dialog box, which opens, click Close to close the dialog box.
- Click the link in the Ready to Process (which shows
1 because only one shipment has been created) in the row of the
Shipment entity.
The Process Data (BC501500) form opens with the SweetStore - SP store and the Shipment entity selected.
- Select the unlabeled check box for the only row in the table.
- On the form toolbar, and click Process.
- In the Processing dialog box, which opens, click Close to close the dialog box.
Step 15: Reviewing the Updated Order and Shipment in Shopify
To check whether the shipment and the updated sales order have been exported to the Shopify store correctly, do the following:
- On the Sync History (BC301000) form, specify the following
settings in the Summary area:
- Store: SweetStore - SP
- Entity: Shipment
- On the Processed tab, notice that the synchronization record of the shipment is displayed in the only row of the table. The External ID column displays the identifier of the shipment in Shopify, which consists of two parts—the identifier of the order and the identifier of the shipment.
- Click the link in the External ID column.
- On the order page of the Shopify store, which opens in a new browser tab, notice the following:
- The fulfillment status of the order has been changed to Fulfilled. Notice the fulfillment number next to the Fulfilled status above the fulfilled items.
- The order has been archived. By default, orders that have been fully
paid and fulfilled are automatically assigned the Archived
status. Tip:You can change the default behavior on the Checkout settings page in the admin area of the Shopify store.
- In the Tags section, two tags have been added to the order—ERP and a tag with the sales order number from MYOB Acumatica. Both tags were created during the order synchronization in Step 9.
You have now performed the first manual synchronization of products, sales orders, and shipments.