
Step 1: Creating a Custom Field
In MYOB Acumatica, a user can create a payment for an invoice by clicking the Pay button or command on the Invoices (SO303000) form. When the payment is created, it is opened on the Payments and Applications (AR302000) form.
The workflow for the Battery Replacement service involves one payment, which is made upon completion of the work. Conversely, the workflow for the Liquid Damage service involves both a prepayment before the repair work is assigned and a final payment after the work is complete.
For the creation of the prepayment, you now need to have the default prepayment percentage for the payment displayed on the Payments and Applications (AR302000) form to facilitate the entry of the prepayment amount, and to make it possible for a user to change that percentage for the current payment. To do that, you need to derive the value of the Prepayment Percent element on the Repair Work Order Preferences (RS101000) form and assign it to the corresponding custom field of the Payments and Applications (AR302000) form.
You will create the custom field in this step and derive the field value in the next step.
Adding a Custom Field to the Payments and Applications Form
To give users the ability to enter, view, and modify the prepayment percentage on the Payments and Applications (AR302000) form, you need to add the Prepayment Percent box to the form. Complete the following general tasks:
- By using the Element Inspector, learn the name of the DAC and graph that define the Summary area
of the Payments and Applications (AR302000) form. In this case,
the DAC is
ARPaymentand the graph isARPaymentEntry. You need the DAC name to know which database table and DAC to extend. You’ll need the graph name in the next step. - Add a column named
UsrPrepaymentPercentto theARPaymenttable with the same parameters as are specified for thePrepaymentPercentfield of theRSSVSetuptable. The data type of the column isdecimal(9, 6).Add the column on the Data Access page of the Customization Project Editor, generate the DAC extension from the added item, and move it to the extension library. The generated extension file has the ARRegisterExtensions.cs name, and the
UsrPrepaymentPercentfield is added to it.Tip:If you create a DAC extension by using the Customization Project Editor, it creates an extension of the base DAC. So in the case above, the system creates an extension of the ARRegister DAC because this DAC is the base DAC for the ARPayment DAC. - Modify the code of the generated DAC extension in the
ARRegisterExtensions.cs file so that the code in the file
is the same as the code shown
below.
using PX.Data; using PX.Objects.AR; using System; namespace PhoneRepairShop { // Acuminator disable once PX1016 ExtensionDoesNotDeclareIsActiveMethod extension // should be constantly active public sealed class ARRegisterExt : PXCacheExtension<ARRegister> { #region UsrPrepaymentPercent [PXDBDecimal()] [PXDefault(TypeCode.Decimal, "0.0", PersistingCheck = PXPersistingCheck.Nothing)] [PXUIField(DisplayName = "Prepayment Percent")] public Decimal? UsrPrepaymentPercent { get; set; } public abstract class usrPrepaymentPercent : PX.Data.BQL.BqlDecimal.Field<usrPrepaymentPercent> { } #endregion } } - Build the project in Visual Studio.
- Publish the customization project.
- Add a box for the custom
UsrPrepaymentPercentfield to the Summary area of the Payments and Applications (AR302000) form as follows:- Add the Payments and Applications form to the customization project.
- On the Modern UI Editor page for the Payments and Applications form, use the Add
Field button on the page toolbar to generate the TypeScript
extension for the custom field. Note that the data view that corresponds to
the Summary area is
Document. - Specify the location for the corresponding control of the custom field in
the HTML code and generate the HTML extension. The field should be placed
after the
PaymentMethodIDfield. On the HTML tab of the Modern UI Editor page, the location of the added field appears, as shown below.Figure 1. Prepayment Percent element 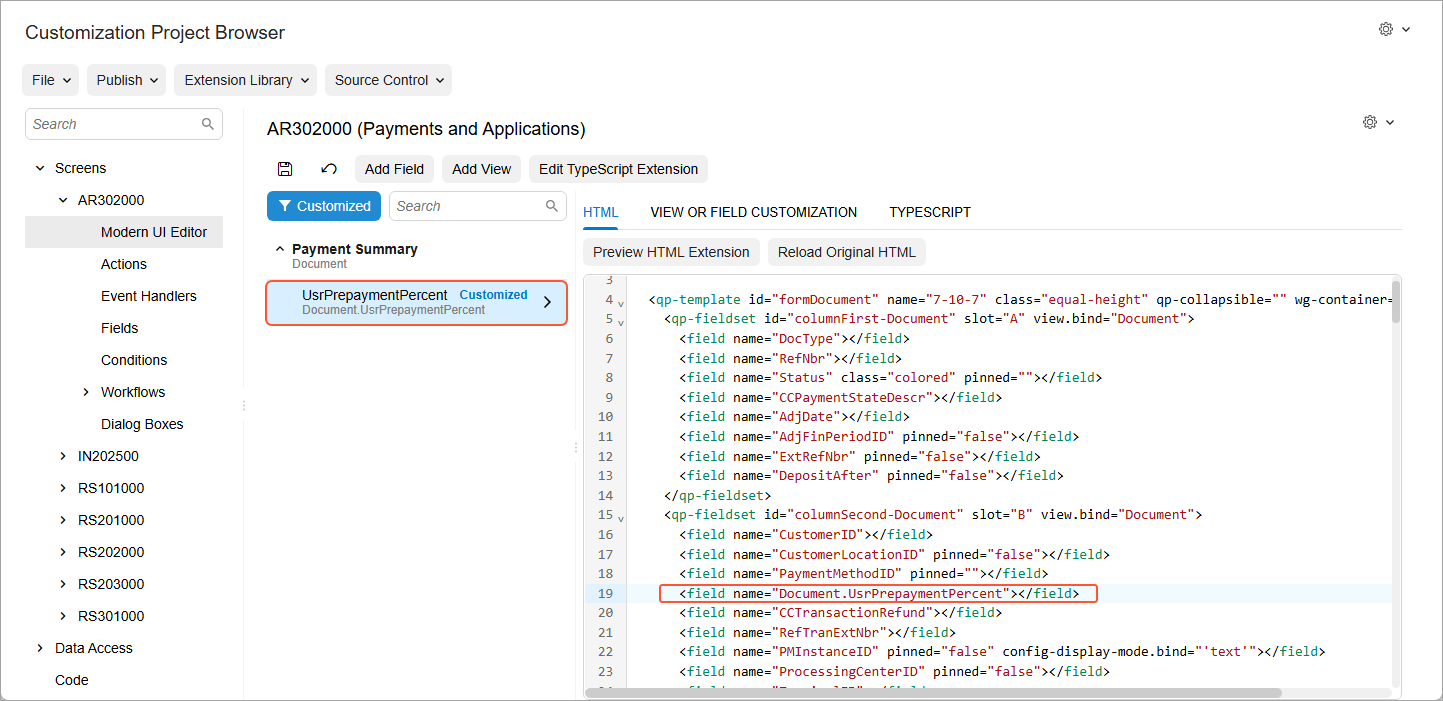
- Save your changes and publish the customization project.