
UI of a Setup Form: To Create the UI of a Setup Form
The following activity will walk you through the process of creating the UI of an MYOB Acumatica setup form.
Story
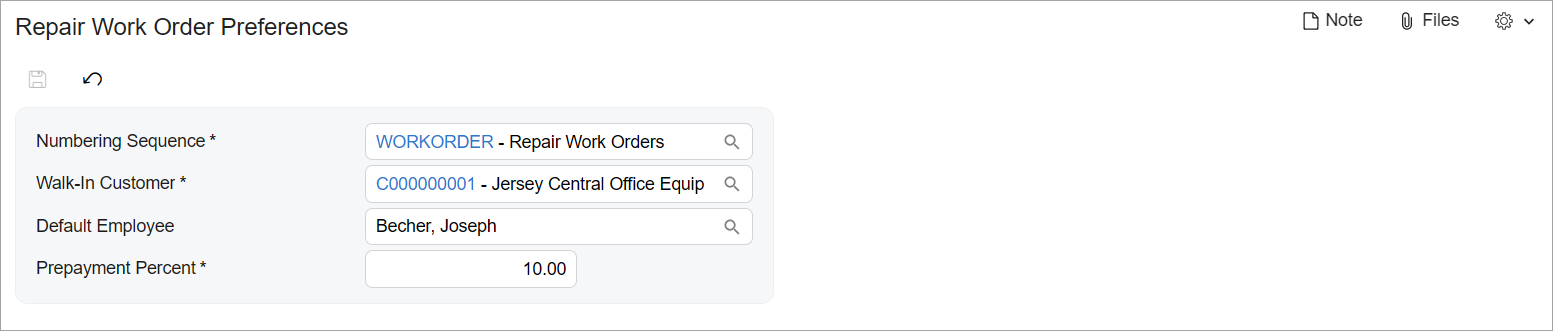
The Smart Fix company uses the Repair Work Orders (RS301000) data entry form to create and manage repair work orders. The Repair Work Order Preferences (RS101000) setup form, for which you will develop the Modern UI, will be used by an administrative user to specify the company's preferences for the repair work orders. The following screenshot shows what this form should look like.
You have already implemented the backend for the form, which includes the
RSSVSetup data access class (DAC) and the
RSSVSetupMaint graph. Also, you have added the
RSSVSetup table to the application database.
Process Overview
You will create TypeScript and HTML files for the Repair Work Order Preferences (RS101000) form. In the TypeScript file, you will define the screen class and view class for the form. In the HTML file, you will define the layout of the form.
System Preparation
Before you begin the creation of the UI of the Repair Work Order Preferences (RS101000) form, do the following:
- Complete the following prerequisite activity: Modern UI Development: To Deploy an Instance with Custom Forms and the Modern UI. Make sure that the
prepared instance contains the following items:
- The
RSSVSetupMaintgraph in the customization code - The
RSSVSetupDAC in the customization code - The
RSSVSetupdatabase table
- The
- To build the source code for the first time, make sure that you have completed the following prerequisite activity: Modern UI Development: To Build the Source Code of All MYOB Acumatica Forms for Modern UI Development.
Step 1: Creating Files for the Setup Form
To create the Modern UI for the Repair Work Order Preferences (RS101000) setup form, you need to create TypeScript and HTML files for the form. Create the files as follows:
- In the FrontendSources\screen\src\screens folder of your MYOB Acumatica instance, create a folder with the RS name if it has not been created yet. You will store the UI sources for all forms with the RS prefix in this folder.
- In the FrontendSources\screen\src\screens\RS folder, create a folder with the RS101000 name. You will store the UI sources for the Repair Work Order Preferences form in this folder.
- In the FrontendSources\screen\src\screens\RS\RS101000
folder, create the following files:
- RS101000.ts
- RS101000.html
Step 2: Defining the Screen Class in TypeScript
To define the view of the Repair Work Order Preferences (RS101000) setup form in TypeScript, you define a screen class and a property for the data view of the form. Do the following:
- In the RS101000.ts file, add the import
directives as follows.
import { PXScreen, createSingle, graphInfo, } from "client-controls"; - Define the screen class for the form as follows. The class name is the ID of the
form.
export class RS101000 extends PXScreen {} - For the screen class, add the graphInfo decorator, and
specify the graph and the primary view of the form in the decorator properties,
as shown in the following
code.
@graphInfo({ graphType: "PhoneRepairShop.RSSVSetupMaint", primaryView: "Setup", }) export class RS101000 extends PXScreen {} - Define the property for the data view of the form by using the following code.
Because the data view is used to display only a Summary area, you need to
initialize the property with the createSingle method. The
input parameter of this method is an instance of the view class that you will
define in the next
step.
export class RS101000 extends PXScreen {
	Setup = createSingle(RSSVSetup);
}
Step 3: Defining the View Class in TypeScript
You need to define a view class for the single data view of the Repair Work Order Preferences (RS101000) setup form. Proceed as follows:
- In the RS101000.ts file, update the list of
import directives, as the following code
shows.
import { PXScreen, createSingle, graphInfo, PXView, PXFieldState, controlConfig, } from "client-controls"; - Define the view class as
follows.
export class RSSVSetup extends PXView {} - In the view class, specify the properties for all data fields of the data view,
as shown below. You use the name of the data field as the property
name.
export class RSSVSetup extends PXView {
	@controlConfig({allowEdit: true, })
	NumberingID: PXFieldState;

	@controlConfig({allowEdit: true, })
	WalkInCustomerID: PXFieldState;

	DefaultEmployee: PXFieldState;
	PrepaymentPercent: PXFieldState;
}
You have used the controlConfig decorator to display the values in the Numbering Sequence and Walk-In Customer boxes as links to the records whose identifiers are displayed in the selector control.
- Save your changes.
Step 4: Defining the Layout in HTML
<template>
  <qp-template id="form-RepairWorkOrderPreferences" name="1-1"
    class="label-size-xm">
    <qp-fieldset id="fsPreferences-RepairWorkOrder" slot="A" view.bind="Setup">
      <field name="NumberingID"></field>
      <field name="WalkInCustomerID"></field>
      <field name="DefaultEmployee"></field>
      <field name="PrepaymentPercent"></field>
    </qp-fieldset>
  </qp-template>
</template>
You have specified an ID for the qp-fieldset control and bound the
control to the Setup view, which you have defined in the
RS101000.ts file.
- The 1-1 template for the form
- The label-size-xm class for the qp-template element
Step 5: Building and Viewing the Setup Form
To build the source files for the Repair Work Order Preferences (RS101000) setup form and view its Modern UI version, do the following:
- Run the following command in the FrontendSources\screen
folder of your
instance.
npm run build-dev --- --env screenIds=RS101000 - After the source files have been built successfully, launch your MYOB Acumatica instance, and open the Repair Work Order Preferences setup form.
- On the form title bar, click . The Modern UI version of the Repair Work Order Preferences setup form is displayed. The form should look similar to the form shown in the screenshot in the Story section of this activity.
- Click the link in the Numbering Sequence box and make sure the Numbering Sequences (CS201010) form opens with the WORKORDER record displayed.