
Inquiry Forms: To Create the UI of an Inquiry Form That Includes Only a Grid
The following activity will walk you through the process of developing the UI of an inquiry form.
Story
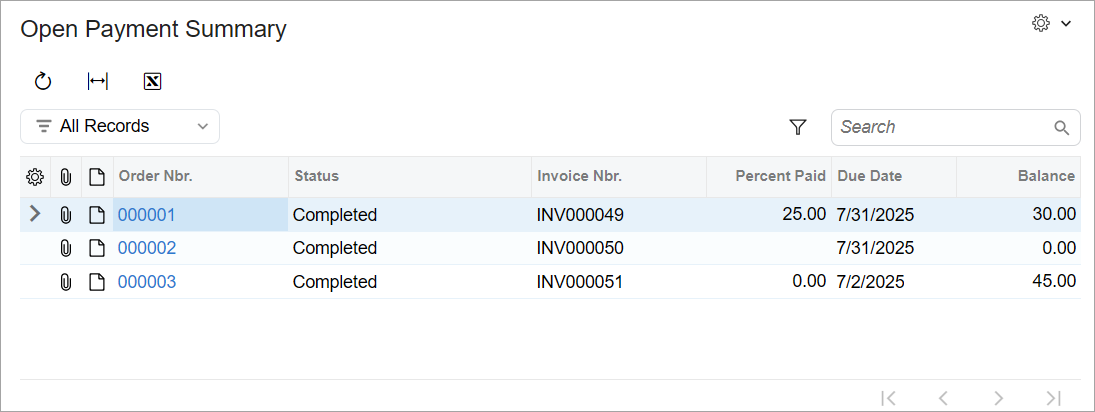
Suppose that you need to develop the Open Payment Summary (RS401000) form in the Modern UI. The form will have a table, as shown in the following screenshot.
You have already implemented the backend for the form, which includes the
RSSVPaymentPlanInq graph and the
RSSVWorkOrderToPay data access class (DAC).
Process Overview
You will create TypeScript and HTML files for the Open Payment Summary (RS401000) form.
In the TypeScript file, you will define the screen class and view class for the form.
You will also define the DetailsView view, which is bound to the
RSSVWorkOrderToPay DAC.
In the HTML file, you will define the layout of the form.
You will then test the form.
System Preparation
Before you begin creating the UI of the Open Payment Summary (RS401000) form, complete the following prerequisite activities:
To be able to create and pay invoices, you need to configure the deployed instance as follows:
- On the Enable/Disable Features (CS100000) form, enable the Advanced SO Invoices feature.
- On the Item Classes (IN201000) form, open the Stock item class. On the General tab (General Settings section), select the Allow Negative Quantity check box. On the form toolbar, click Save.
- On the Accounts Receivable Preferences (AR101000) form, on the General tab (Data Entry Settings section), clear the Validate Document Totals on Entry and Require Payment Reference on Entry boxes to simplify the process of releasing an invoice. On the form toolbar, click Save.
Step 1: Creating Files for the Form
To implement the UI of the Open Payment Summary (RS401000) form, you need to create the TypeScript and HTML files for the form. Create the files as follows:
- In the FrontendSources\screen\src\screens folder of your MYOB Acumatica instance, create a folder with the RS name if one has not been created yet. You will store the UI sources for all forms with the RS prefix in this folder.
- In the FrontendSources\screen\src\screens\RS folder, create a folder with the RS401000 name if it has not been created yet.
- In the FrontendSources\screen\src\screens\RS\RS401000
folder, create the following files:
- RS401000.ts
- RS401000.html
Step 2: Defining the Screen Class in TypeScript
To define the view of the Open Payment Summary (RS401000) form in the TypeScript file of the form, you define a screen class and a property for the data view of the form. Do the following:
- In the RS401000.ts file, add the import
directives as
follows.
import { createCollection, PXScreen, graphInfo, viewInfo, PXView, PXFieldState, gridConfig, PXFieldOptions, GridPreset } from "client-controls"; - Define the screen class for the form, as the following code shows. The class
name is the ID of the
form.
export class RS401000 extends PXScreen { } - For the screen class, add the graphInfo decorator, and
specify the graph and the primary view of the form in the decorator properties,
as the following code
shows.
@graphInfo({ graphType: "PhoneRepairShop.RSSVPaymentPlanInq", primaryView: "DetailsView", }) export class RS401000 extends PXScreen { } - Define the property for the data view of the form, as the following code shows.
For the data view that is used to display a table, you need to initialize the
property with the createCollection method. The method takes
as the input parameter an instance of the view class, which you will define in
the next
step.
export class RS401000 extends PXScreen {
    @viewInfo({containerName: "Work Orders with Open Payments"})
    DetailsView = createCollection(RSSVWorkOrderToPay);
}
In the viewInfo decorator, you have specified the name of the container for the table.
Step 3: Defining the View Class for the Table in TypeScript
In the TypeScript file of the form, you need to define a view class for the table on
the Open Payment Summary (RS401000) form, which is
RSSVWorkOrderToPay. Proceed as follows:
- Define the
RSSVWorkOrderview class as follows.export class RSSVWorkOrderToPay extends PXView { OrderNbr: PXFieldState; Status: PXFieldState; InvoiceNbr: PXFieldState; PercentPaid: PXFieldState; ARInvoice__DueDate: PXFieldState; ARInvoice__CuryDocBal: PXFieldState; }To add a joined field to the UI of the form, you have separated the name of the joined DAC and the field name in this DAC with two underscores.
- Add the gridConfig decorator to the
RSSVWorkOrderToPayview class, as the following code shows. In the gridConfig decorator, you must specify the preset property. Because the table is used on the inquiry form, you use the Inquiry preset. For details about presets, see Form Layout: Grid Presets.@gridConfig({ preset: GridPreset.Inquiry }) export class RSSVWorkOrderToPay extends PXView { ... }In the gridConfig decorator, you have used the 'ScreenToolbar' as the value of the mergeToolbarWith property to merge the table toolbar with the form toolbar.
- Save your changes.
Step 4: Defining the Layout in HTML
The Open Payment Summary (RS401000) form contains only a table. To define the layout of the form, do the following:
- Add the qp-grid tag and bind it to the
DetailsViewview, as the following code shows.<template> <qp-grid id="gridDetailsView" view.bind="DetailsView"></qp-grid> </template> - Save your changes.
Step 5: Preparing Data for Testing
In this step, you will add some repair work orders, invoices and payments to the database. To add these invoices and payments, do the following:
- On the Repair Work Orders (RS301000) form, remove all existing repair work orders from hold. Then assign the work orders, complete them, and create invoices for them.
- Open any work order with the
Completed status (for example, 000001), and do the
following:
- Open the invoice for the chosen work order: Note the invoice number in the Invoice Nbr. box and open this invoice on the Invoices (SO303000) form.
- On the form toolbar of the Invoices (SO303000) form, click Remove Hold, Release, and then Pay. The Payments and Applications (AR302000) form opens.
- On the Documents to Apply tab of the Payments and Applications form, in the Amount Paid column, type 10.
- On the form toolbar, click Remove Hold and then Release.
- Open another work order with the Completed status (for example, 000003), and do the following:
Step 6: Testing the Form
In this step, you will test the Open Payment Summary (RS401000) inquiry form with the added invoices and payments. Do the following:
- Open the Open Payment Summary (RS401000) inquiry form.
The form should look similar to the one shown in the following screenshot. Notice that the table has a toolbar with standard buttons and the Filter Settings button.
Figure 2. The basic Open Payment Summary form 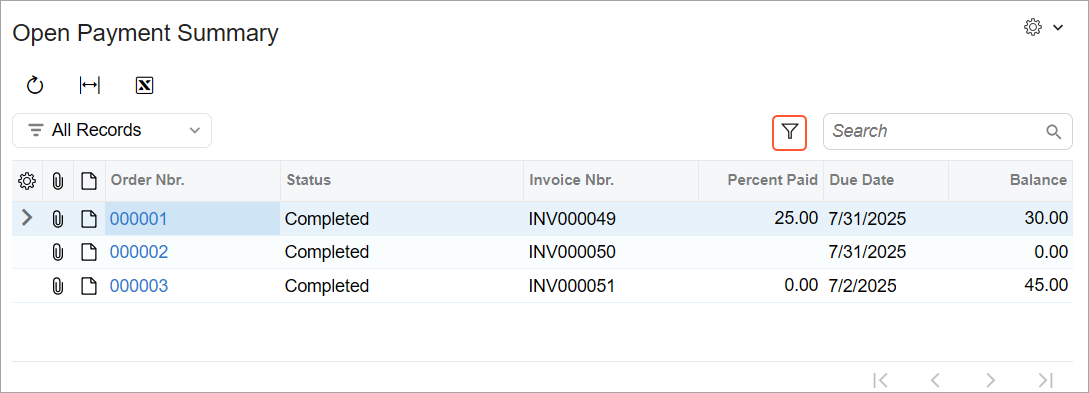
- Change the current business date to the day after tomorrow. For details about how to change the business date, see Your Working Environment: To Change the Business Date.
- On the table toolbar, click the Filter Settings button. The filtering area appears.
- In the filtering area, click the arrow button and click Due
Date (shown below). A Quick Filter button appears for the
Due Date column.
Figure 3. Adding quick filter for Due Date 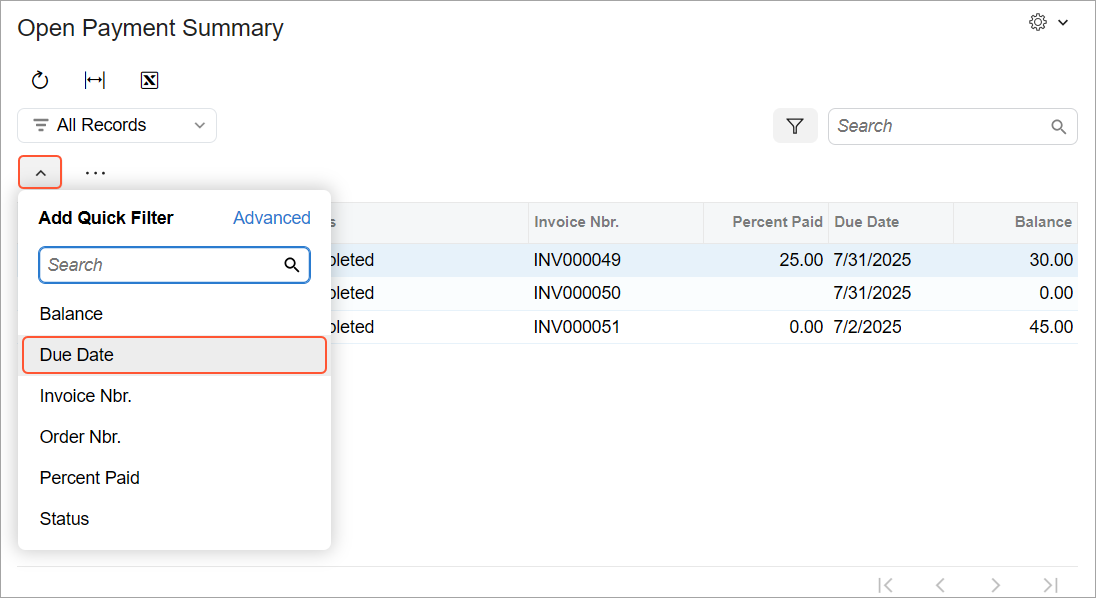
- Click the Quick Filter button for the Due Date column. The Quick Filter drop-down menu opens.
- In the Quick Filter drop-down menu, do the following:
- Click Is Less Than.
- Click the Calendar button in the Value box.
- In the Calendar dialog box, click @Today (see below).
Figure 4. Specifying quick filter parameters
- Click Apply.
-
With these filter settings, the form displays overdue payments. An example is shown in the following screenshot.
Figure 5. The Open Payment Summary form with overdue payments 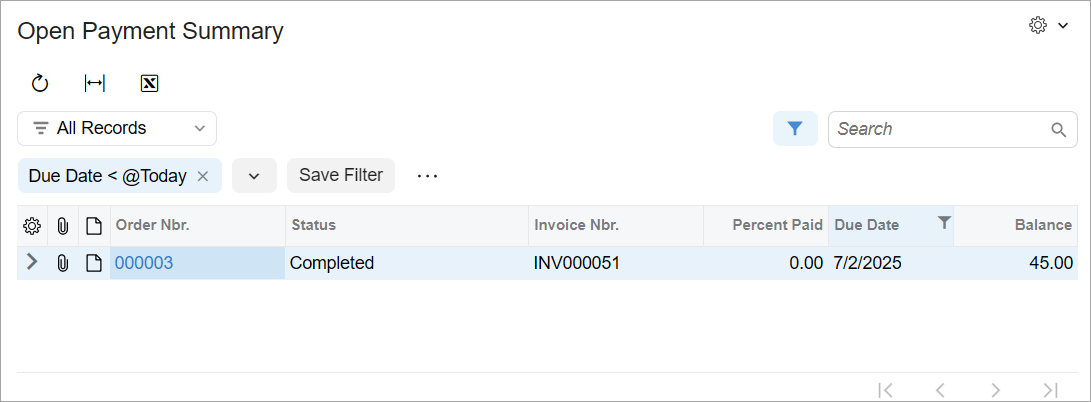
- To clear the filter, in the Quick Filter drop-down menu, click Clear Filter.
- Change the business date to the current date.