Filtering Parameters: To Add a Filter for a Processing Form
The following activity will walk you through the process of adding a filter for a processing form.
Story
The Smart Fix company needed a custom MYOB Acumatica form where the managers of the company will assign repair work orders to particular employees. Suppose that for this purpose, you’ve already implemented the custom Assign Work Orders (RS501000) processing form. Now you need to add filtering parameters to this form so that the managers can narrow the range of listed repair work orders before processing.
The Selection area of the form should contain the following UI elements:
- Priority: If a user selects a priority in this box, the form’s table displays only the repair work orders with this priority. If no priority is selected, repair work orders with all priority values can be displayed in the table.
- Minimum Number of Days Unassigned: If a user types a number in this box, the table displays only the repair work orders that have been unassigned for the specified number of days or longer.
- Service: If a user selects a service in this box, the table displays only the repair work orders in which this service is selected.
You need to create filtering parameters for these UI elements.
In addition, you’ll add the Number of Days Unassigned column to the table on the form. This value should not be stored in the database; you should instead use the PXDBCalced attribute to calculate the value from the date when the repair work order was created.
You also need to define the Assignee column of the table to be editable so that a user of the form can use this column to select an assignee for any listed repair work order.
Process Overview
You'll add filtering parameters to the Assign Work Orders (RS501000) processing form by performing the following steps:
- Extending the
RSSVWorkOrderDAC with the newTimeWithoutActionfield - Defining the filter DAC
- Defining the data views for the form
- Adjusting the TypeScript and HTML files of the form
Finally, you'll test the filter.
System Preparation
Before you begin performing the steps of this activity, do the following:
- Prepare an MYOB Acumatica instance by performing the Test Instance for Customization: To Deploy an Instance with a Custom Form that Implements a Workflow prerequisite activity.
- Create a processing form without filtering parameters by performing the Processing Operations: To Implement a Processing Operation by Using a Delegate prerequisite activity.
Step 1: Extending the DAC with a New Field (Using PXDBCalced)
TimeWithoutAction field, which holds
the number of days that have passed from the date when the repair work order was
created. In the RSSVWorkOrder.cs file, add the new field as
follows:- In the
RSSVWorkOrderclass, define theTimeWithoutActionfield, as shown in the following code.#region TimeWithoutAction [PXInt] [PXDBCalced( typeof(RSSVWorkOrder.dateCreated.Diff<Now>.Days), typeof(int))] [PXUIField(DisplayName = "Number of Days Unassigned")] public virtual int? TimeWithoutAction { get; set; } public abstract class timeWithoutAction : PX.Data.BQL.BqlInt.Field<timeWithoutAction> { } #endregionTo calculate the value of the
TimeWithoutActionfield, you’ve used the PXDBCalced attribute. The field’s value is calculated during the retrieval of eachRSSVWorkOrderrecord from the database. It’s calculated as the difference between the value of theRSSVWorkOrder.DateCreatedfield and the current date, for which you’ve used the Now BQL constant. For more information on the PXDBCalced attribute, see Ad Hoc SQL for Fields. - Build the project.
Step 2: Defining the Filter DAC
In this step, you'll define theRSSVWorkOrderToAssignFilter DAC, which will be used to display
filtering parameters on the Assign Work Orders (RS501000) form. The DAC will contain
three fields (ServiceID, TimeWithoutAction, and
Priority) that correspond to the filtering parameters. To define
the filter DAC, do the following:- In the
RSSVAssignProcessgraph, define theRSSVWorkOrderToAssignFilterdata access class as follows.[PXHidden] public class RSSVWorkOrderToAssignFilter : PXBqlTable, IBqlTable { #region Priority [PXString(1, IsFixed = true)] [PXUIField(DisplayName = "Priority")] [PXStringList( new string[] { WorkOrderPriorityConstants.High, WorkOrderPriorityConstants.Medium, WorkOrderPriorityConstants.Low }, new string[] { Messages.High, Messages.Medium, Messages.Low })] public virtual string? Priority { get; set; } public abstract class priority : PX.Data.BQL.BqlString.Field<priority> { } #endregion #region TimeWithoutAction [PXInt] [PXUnboundDefault(0)] [PXUIField(DisplayName = "Minimum Number of Days Unassigned")] public virtual int? TimeWithoutAction { get; set; } public abstract class timeWithoutAction : PX.Data.BQL.BqlInt.Field<timeWithoutAction> { } #endregion #region ServiceID [PXInt()] [PXUIField(DisplayName = "Service")] [PXSelector(typeof(Search<RSSVRepairService.serviceID>), typeof(RSSVRepairService.serviceCD), typeof(RSSVRepairService.description), SubstituteKey = typeof(RSSVRepairService.serviceCD), DescriptionField = typeof(RSSVRepairService.description))] public virtual int? ServiceID { get; set; } public abstract class serviceID : PX.Data.BQL.BqlInt.Field<serviceID> { } #endregion } - Build the project.
Step 3: Defining the Data Views (with PXFilter and ProcessingView.FilteredBy)
In this step, you’ll prepare the graph members that provide data for the form. Do the following:
- In the
RSSVAssignProcessgraph, define theFilterdata view of the PXFilter type (as shown below), which provides the filtering parameters for the processing form.public PXFilter<RSSVWorkOrderToAssignFilter> Filter = null!; - Replace the definition of the
Cancelaction so that the action uses the filter DAC.public PXCancel<RSSVWorkOrderToAssignFilter> Cancel = null!; - Replace the definition of the
WorkOrdersdata view with the following data view of the ProcessingView.FilteredBy<Table> type, which selects the repair work orders that match the values of the filtering parameters.public SelectFrom<RSSVWorkOrder>. Where<RSSVWorkOrder.status.IsEqual< RSSVWorkOrderEntry_Workflow.States.readyForAssignment>. And<RSSVWorkOrder.timeWithoutAction.IsGreaterEqual< RSSVWorkOrderToAssignFilter.timeWithoutAction. FromCurrent>. And<RSSVWorkOrder.priority.IsEqual< RSSVWorkOrderToAssignFilter.priority.FromCurrent>. Or<RSSVWorkOrderToAssignFilter.priority.FromCurrent. IsNull>>. And<RSSVWorkOrder.serviceID.IsEqual< RSSVWorkOrderToAssignFilter.serviceID.FromCurrent>. Or<RSSVWorkOrderToAssignFilter.serviceID.FromCurrent. IsNull>>>>. OrderBy<RSSVWorkOrder.timeWithoutAction.Desc, RSSVWorkOrder.priority.Desc>. ProcessingView. FilteredBy<RSSVWorkOrderToAssignFilter> WorkOrders = null!; - In the graph constructor, enable editing for the
Assigneedata field, as shown in the following code.PXUIFieldAttribute.SetEnabled<RSSVWorkOrder.assignee>( WorkOrders.Cache, null, true);Because you specified the Processing preset for the table in the TypeScript code (in Processing Form: To Create a Simple Processing Form), the columns of the table were not defined as being editable. In the graph constructor, you've made the values in the Assignee column of the table editable. You’ve enabled the editing of the column in the graph constructor (instead of in RowSelected event handler) because the column’s UI presentation logic doesn’t depend on the particular values of the data record.
- Override the IsDirty property of the graph, as the following
code
shows.
public override bool IsDirty => false;You have overridden the IsDirty property of the graph to make it always return false. You have multiple elements on the form that a user can modify, such as the filtering parameters on the form, the Assignee column, and the column with the unlabeled check box. That’s why you need to override the IsDirty property to omit the dialog box that confirms that the user wants to leave the form when it has been edited.
- Rebuild the project.
Step 4: Adjusting the TypeScript and HTML Code
- For the screen class in RS501000.ts, change the value of
the
primaryViewproperty in the graphInfo decorator to Filter. - Define the property for the data view of the Selection area of the form, as the
following code shows. To initialize the data view of the Selection area of the
form, use the createSingle method. It takes as the input
parameter an instance of the view class, which you’ll define in the next
step.
In the viewInfo decorator, you’ve specified the name of the container for the Selection area.@viewInfo({containerName: "Filter Parameters"}) Filter = createSingle(RSSVWorkOrderToAssignFilter); -
You need to define a view class for the data view of the Selection area of the Assign Work Orders form, which is
Filter.Proceed as follows:
- In the RS501000.ts file, add createSingle to the list of import directives.
- Define the
RSSVWorkOrderToAssignFilterclass as follows.export class RSSVWorkOrderToAssignFilter extends PXView {} - In the view class, specify the properties for all data fields of the
data view that should be displayed in the UI, as shown below. You use
the name of the data field as the property
name.
export class RSSVWorkOrderToAssignFilter extends PXView {
	Priority: PXFieldState<PXFieldOptions.CommitChanges>;
	TimeWithoutAction: PXFieldState<PXFieldOptions.CommitChanges>;
	ServiceID: PXFieldState<PXFieldOptions.CommitChanges>;
}
All fields of the view should be defined so that changes are committed to the server; therefore, you’ve used the PXFieldOptions.CommitChanges option for the property type.
- In the RS501000.html file, define the layout of the
Selection area by adding the qp-template tag with the
17-17-14 template within the template tag as follows:
- For the first two slots, define a fieldset, as shown in the following
code. To leave the third slot empty, do not specify any tags for
it.
  <qp-template
    id="form-Filter"
    name="17-17-14"
    class="equal-height"
  >
    <qp-fieldset
      id="fsColumnA-Filter"
      slot="A"
      view.bind="Filter"
      class="label-size-xm"
    >
                                    </qp-fieldset>
    <qp-fieldset id="fsColumnB-Filter" slot="B" view.bind="Filter">
                                    </qp-fieldset>
  </qp-template>
Each fieldset has been bound to the same
Filterview.For details about the qp-template tag and slots, see Form Layout: Predefined Templates.
- In each fieldset, add the field tags for the fields
that should be displayed in the corresponding fieldset, as the following
code
shows.
    <qp-fieldset
      id="fsColumnA-Filter"
      slot="A"
      view.bind="Filter"
      class="label-size-xm"
    >
      <field name="Priority"></field>
      <field name="TimeWithoutAction"></field>
    </qp-fieldset>
    <qp-fieldset id="fsColumnB-Filter" slot="B" view.bind="Filter">
      <field name="ServiceID"></field>
    </qp-fieldset>
In the first fieldset, you’ve also specified the width of the labels by using the label-size-xm class. For more details about CSS classes, see Form Layout: CSS Classes.
- Save your changes.
- For the first two slots, define a fieldset, as shown in the following
code. To leave the third slot empty, do not specify any tags for
it.
- In the RS501000.ts file, add the
TimeWithoutActionfield to theRSSVWorkOrderview class, as shown below, so that the corresponding column is displayed in the table of the Assign Work Orders form. Also, specify that the changes in theAssigneefield should be committed to the server by adding the PXFieldOptions.CommitChanges option for the property type.export class RSSVWorkOrder extends PXView { ... Assignee: PXFieldState<PXFieldOptions.CommitChanges>; TimeWithoutAction: PXFieldState; } - Save your changes.
- If you used the development folder to modify the TypeScript and HTML files in the preceding instructions, you need to update these files in the customization project. You do this by using the Detect Modified Files button on the Modern UI Files page.
- Publish the customization project.
Step 5: Testing the Filter
- On the Repair Work Orders (RS301000) form, create three repair work orders
with the settings specified in the following table. Save each order and then
click Remove Hold.
Work Order 1 Work Order 2 Work Order 3 Customer ID C000000001 C000000002 C000000001 Service Battery Replacement Screen Repair Battery Replacement Device Nokia 3310 Samsung Galaxy S4 Motorola RAZR V3 Assignee Beauvoir, Layla Empty Baker, Maxwell Priority High Medium Medium Description Test order Test order Test order The created work orders have the Ready for Assignment status.
- On the Assign Work Orders form, test the filtering parameters as follows:
- Make sure that the three work orders you have created are displayed on the form.
- In the Priority box in the Selection area,
select High. Make sure one of the created work orders is
displayed in the table, as shown below.
Figure 1. The work order with a priority of High 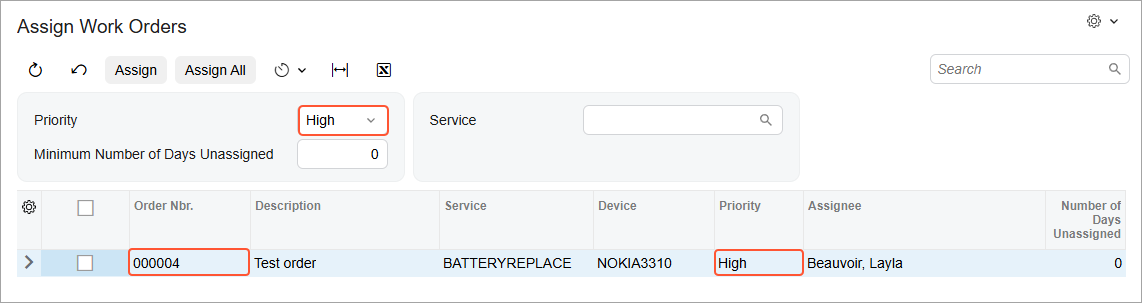
- Clear the filter by clicking Cancel on the form toolbar.
- In the Minimum Number of Days Unassigned box, type 1. No work orders are displayed in the table (as long as you haven’t created work orders outside of the instructions of the guide).
- Change the value in the Minimum Number of Days Unassigned box to 0. Three work orders are displayed.
- In the Service box, select Battery Replacement. Two of the created work orders are displayed in the table.
- In the Priority box, select Medium. Only one of the created work orders remains in the table.
- On the form toolbar, click Assign All. The
processing dialog box indicates that the work order has been
processed. Make sure it has the Assigned status and is
assigned to Baker, Maxwell (the employee you’ve selected
during creation), as shown below.
Figure 2. The assigned work order 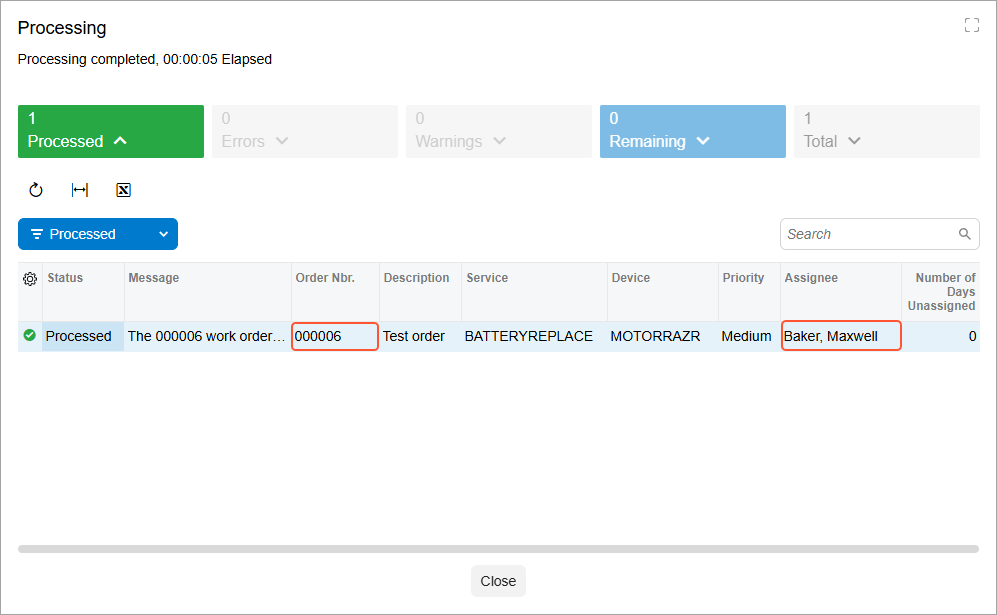
- Test the Assignee column on the Assign Work Orders
form as follows:
- Clear all the boxes in the Selection area. Two of the created repair work orders are displayed.
- For a work order with the default assignee (which is Becher, Joseph), in the Assignee column, select Beauvoir, Layla.
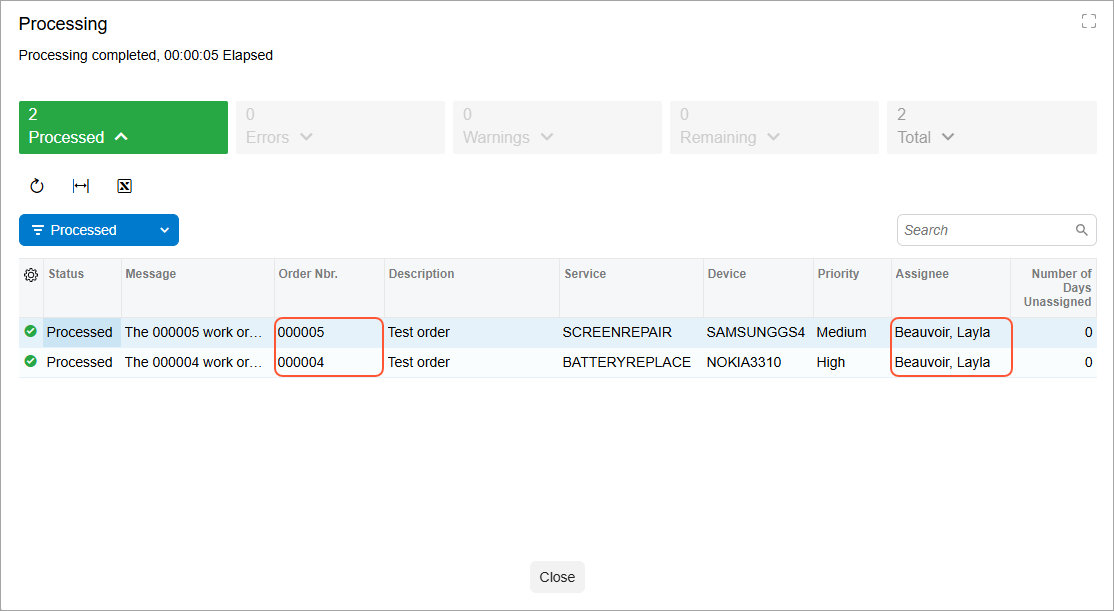
- On the form toolbar, click Assign All. The
processing dialog box shows that two repair work orders have been
processed. Make sure that Beauvoir, Layla is the assignee of
both orders, as shown below.
Figure 3. Two assigned work orders