
Data Entry Form: To Create the UI of a Data Entry Form
The following activity will walk you through the process of developing the UI of a data entry form.
Story
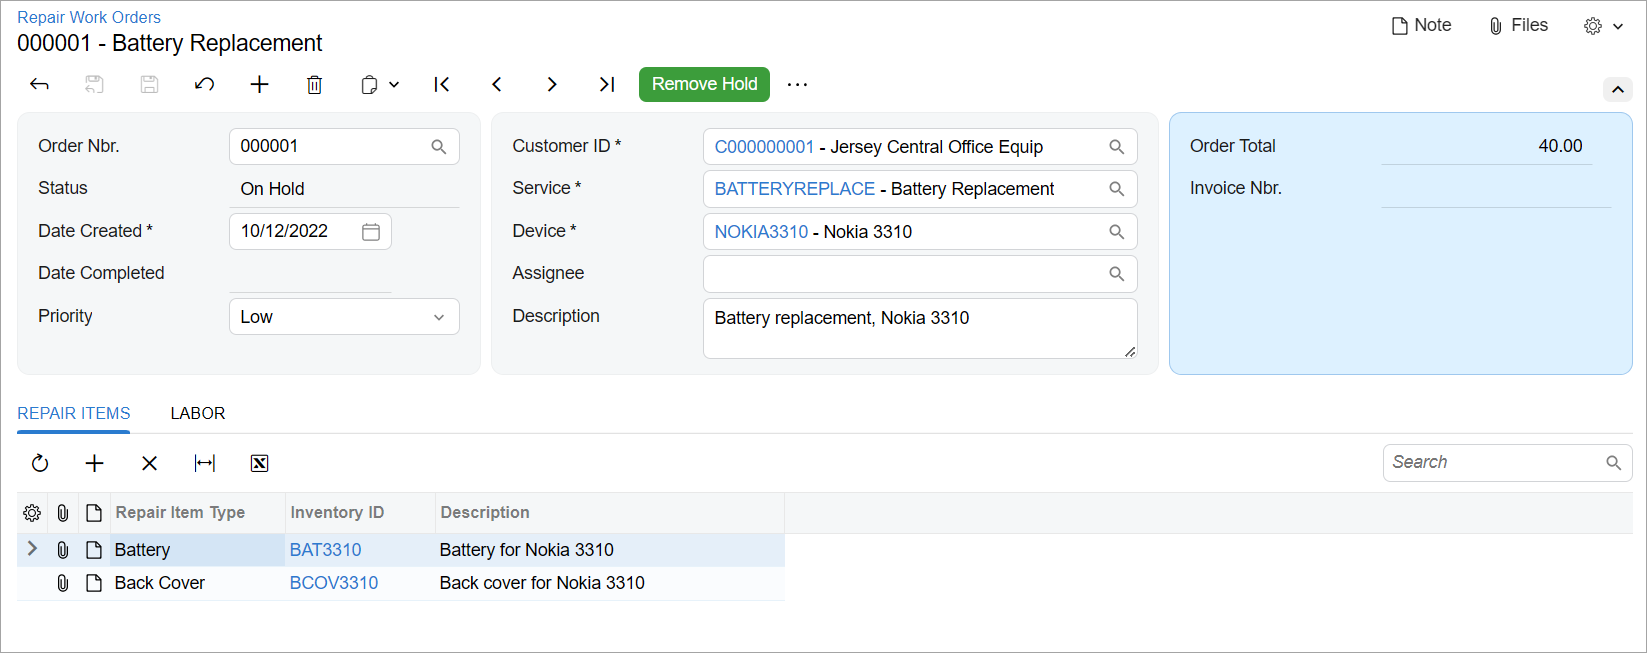
Suppose that you need to develop the Repair Work Orders (RS301000) form in the Modern UI. The form will have a Summary area and two tabs below the Summary area.
The following screenshot shows what the form should look like.
You have already implemented the backend for the form, which includes the
RSSVWorkOrderEntry graph and the
RSSVWorkOrder, RSSVWorkOrderItem, and
RSSVWorkOrderLabor data access classes (DACs). You have also
already added the corresponding tables to the application database.
Process Overview
You will create TypeScript and HTML files for the Repair Work Orders (RS301000) form. In the TypeScript file, you will define the screen class and view classes for the form. You will also define the following views:
WorkOrders, which is the primary view of the form and is bound to the Summary area of the formRepairItems, which is bound to the table on the Repair Items tab of the formLabor, which is bound to the table on the Labor tab of the form
In the HTML file, you will define the layout of the form.
System Preparation
Before you begin creating the UI of the Repair Work Orders (RS301000) form, do the following:
- Complete the following prerequisite activity: Modern UI Development: To Deploy an Instance with Custom Forms and the Modern UI. Make sure the
prepared instance contains the following items:
- The
RSSVWorkOrderEntrygraph in the customization code - The
RSSVWorkOrder,RSSVWorkOrderItem, andRSSVWorkOrderLaborDACs in the customization code - The
RSSVWorkOrder,RSSVWorkOrderItem, andRSSVWorkOrderLabordatabase tables
- The
- To take the prerequisite actions and build the source code for the first time, perform the following prerequisite activity: Modern UI Development: To Build the Source Code of All MYOB Acumatica Forms for Modern UI Development.
Step 1: Creating Files for the Form
To implement the Modern UI version of the Repair Work Orders (RS301000) form, you need to create the TypeScript and HTML files for the form. Create the files as follows:
- In the FrontendSources\screen\src\screens folder of your MYOB Acumatica instance, create a folder with the RS name if one has not been created yet. You will store the UI sources for all forms with the RS prefix in this folder.
- In the FrontendSources\screen\src\screens\RS folder, create a folder with the RS301000 name if it has not been created yet.
- In the FrontendSources\screen\src\screens\RS\RS301000
folder, create the following files:
- RS301000.ts
- RS301000.html
Step 2: Defining the Screen Class in TypeScript
To define the view of the Repair Work Orders (RS301000) form in TypeScript, you define a screen class and a property for the data views of the form. Do the following:
- In the RS301000.ts file, add the import
directives as
follows.
import { PXScreen, createCollection, graphInfo, viewInfo, createSingle, } from "client-controls"; - Define the screen class for the form, as the following code shows. The class
name is the ID of the
form.
export class RS301000 extends PXScreen {} - For the screen class, add the graphInfo decorator, and
specify the graph and the primary view of the form in the decorator properties,
as the following code
shows.
@graphInfo({ graphType: "PhoneRepairShop.RSSVWorkOrderEntry", primaryView: "WorkOrders" }) export class RS301000 extends PXScreen {} - Define the properties for the data views of the form, as the following code
shows. To initialize the data view of the Summary area of the form, you should
use the createSingle method. For the data view that is used
to display a table, you need to initialize the property with the
createCollection method. You will define the view classes
whose instances are used as input parameters of the methods in the next
step.Note:The names of the data view properties should be the same as those in the graph. For example, if the
WorkOrdersview is declared in theRSSVWorkOrderEntrygraph, the property with the same name should be declared in theRS301000screen class.export class RS301000 extends PXScreen { @viewInfo({ containerName: "Work Order" }) WorkOrders = createSingle(RSSVWorkOrder); @viewInfo({ containerName: "Repair Items" }) RepairItems = createCollection(RSSVWorkOrderItem); @viewInfo({ containerName: "Labor" }) Labor = createCollection(RSSVWorkOrderLabor); }In the viewInfo decorator, you have specified the names of the containers. These names are used as object names during the configuration of particular functionality, such as workflows and import and export scenarios. If this value is not specified, the system displays the name of the data view as the object name.
Step 3: Defining the Primary View Class in TypeScript
You need to define a view class for the primary data view of the Repair Work Orders
(RS30100) form, which is WorkOrders.
Proceed as follows:
- In the RS301000.ts file, update the list of import
directives, as the following code
shows.
import { PXScreen, createCollection, graphInfo, viewInfo, createSingle, PXView, PXFieldOptions, PXFieldState, controlConfig, } from "client-controls"; - Define the
RSSVRepairWorkOrderview class as follows.export class RSSVWorkOrder extends PXView {} - In the view class, specify the properties for all data fields of the data view
that should be displayed in the UI, as shown below. You use the name of the data
field as the property
name.
export class RSSVWorkOrder extends PXView {
	OrderNbr: PXFieldState;

	@controlConfig({allowEdit: true, })
	CustomerID: PXFieldState<PXFieldOptions.CommitChanges>;
	DateCreated: PXFieldState;
	DateCompleted: PXFieldState;
	Status: PXFieldState;

	@controlConfig({rows: 2})
	Description : PXFieldState<PXFieldOptions.Multiline>;

	@controlConfig({allowEdit: true, })
	ServiceID : PXFieldState<PXFieldOptions.CommitChanges>;

	@controlConfig({allowEdit: true, })
	DeviceID: PXFieldState<PXFieldOptions.CommitChanges>;
	OrderTotal: PXFieldState;
	Assignee: PXFieldState;
	Priority: PXFieldState<PXFieldOptions.CommitChanges>;
	InvoiceNbr: PXFieldState;
}
For the
CustomerID,ServiceID,DeviceID, andPriorityfields, changes should be committed to the server; therefore, you have used the PXFieldOptions.CommitChanges option for the property type.You have defined the links in the selector controls for the
CustomerID,ServiceID, andDeviceIDfields by specifyingallowEdit: truein the controlConfig decorator.You have used the controlConfig decorator with the specified rows property and the
Descriptionfield with the PXFieldOptions.Multiline option to define a multiline text box with two text lines.
Step 4: Defining the View Classes for Tables in TypeScript
In the TypeScript file of the form, you need to define view classes for the views
that are bound to tables on the Repair Items and
Labor tabs of the Repair Work Orders (RS301000) form:
RSSVWorkOrderItem and RSSVWorkOrderLabor.
Proceed as follows:
- In the RS301000.ts file, add gridConfig and GridPreset to the list of import directives.
- Define the
RSSVWorkOrderItemview class as follows.export class RSSVWorkOrderItem extends PXView { RepairItemType: PXFieldState; InventoryID: PXFieldState<PXFieldOptions.CommitChanges>; InventoryID_description: PXFieldState; BasePrice: PXFieldState; }For the
InventoryIDfield, changes should be committed to the server; therefore, you have used the PXFieldOptions.CommitChanges option for the property type. - Add the gridConfig decorator to the
RSSVWorkOrderItemview class, as the following code shows. In the gridConfig decorator, you must specify the preset property. Because the table is used on one of the tabs of the data entry form, you use the Details preset. For information about presets, see Form Layout: Grid Presets.@gridConfig({ preset: GridPreset.Details }) export class RSSVWorkOrderItem extends PXView { RepairItemType: PXFieldState; InventoryID: PXFieldState<PXFieldOptions.CommitChanges>; InventoryID_description: PXFieldState; BasePrice: PXFieldState; } - Define the
RSSVWorkOrderLaborview class similarly to the way you defined theRSSVWorkOrderItemview class. The resulting class should be defined as follows.@gridConfig({ preset: GridPreset.Details }) export class RSSVWorkOrderLabor extends PXView { InventoryID: PXFieldState; InventoryID_description: PXFieldState; DefaultPrice: PXFieldState; Quantity: PXFieldState<PXFieldOptions.CommitChanges>; ExtPrice: PXFieldState; } - Save your changes.
Step 5: Defining the Layout in HTML
The Repair Work Orders (RS301000) form contains the Summary area and two tabs below it. The Summary area has three columns, which you can arrange by using the 7-10-7 template. Each tab contains a table. To define the layout of the form, do the following:
- Define the Summary area of the form by adding the qp-template
tag with the 7-10-7 template. For each slot, define a fieldset, as shown in the
following code. For the third fieldset, specify
class="highlights-section", which makes the fieldset have blue background.<template> <qp-template id="form-Order" name="7-10-7" class="equal-height" qp-collapsible > <qp-fieldset id="fsColumnA-Order" slot="A" view.bind="WorkOrders"> </qp-fieldset> <qp-fieldset id="fsColumnB-Order" slot="B" view.bind="WorkOrders"> </qp-fieldset> <qp-fieldset id="fsColumnC-Order" slot="C" view.bind="WorkOrders" class="highlights-section"> </qp-fieldset> </qp-template> </template>Each fieldset has been bound to the same
WorkOrdersproperty.For details about the qp-template tag and slots, see Form Layout: Predefined Templates.
- In each fieldset, add the field tags for the fields that
should be displayed in corresponding fieldset, as the following code
shows.
<qp-fieldset id="fsColumnA-Order" slot="A" view.bind="WorkOrders"> <field name="OrderNbr"></field> <field name="Status"></field> <field name="DateCreated"></field> <field name="DateCompleted"></field> <field name="Priority"></field> </qp-fieldset> <qp-fieldset id="fsColumnB-Order" slot="B" view.bind="WorkOrders"> <field name="CustomerID"></field> <field name="ServiceID"></field> <field name="DeviceID"></field> <field name="Assignee"></field> <field name="Description"></field> </qp-fieldset> <qp-fieldset id="fsColumnC-Order" slot="C" view.bind="WorkOrders" class="highlights-section"> <field name="OrderTotal"></field> <field name="InvoiceNbr"></field> </qp-fieldset> - Define the Repair Items tab:
- After the qp-template tag, add the
qp-tabbar tag with a nested
qp-tab tag, as the following code shows. In the
qp-tab tab, specify the name of the tab in the
caption
attribute.
<qp-tabbar id="tabbar"> <qp-tab id="tab-RepairItems" caption="Repair Items"> </qp-tab> </qp-tabbar> - Define the table that should be displayed on the Repair
Items tab: In the qp-tab tag, add the
qp-grid tag, which is bound to the
RepairItemsview, as the following code shows.<qp-tabbar id="tabbar"> <qp-tab id="tab-RepairItems" caption="Repair Items"> <qp-grid id="grid-RepairItems" view.bind="RepairItems"></qp-grid> </qp-tab> </qp-tabbar>
- After the qp-template tag, add the
qp-tabbar tag with a nested
qp-tab tag, as the following code shows. In the
qp-tab tab, specify the name of the tab in the
caption
attribute.
- Define the Labor tab similarly to the way you defined the
Repair Items tab: In the qp-tabbar
tag, add the qp-tab tag after the qp-tab
tag that was defined in the previous instruction. In the new
qp-tab tag, add the qp-grid tag, and
bind it to the
Laborview, as the following code shows.<qp-tab id="tab-Labor" caption="Labor"> <qp-grid id="grid-Labor" view.bind="Labor"></qp-grid> </qp-tab> - Save your changes.
Step 6: Building and Viewing the Form
To build the source files for the Repair Work Orders (RS301000) form and view its Modern UI version, do the following:
- Run the following command in the FrontendSources\screen
folder of your
instance.
npm run build-dev --- --env screenIds=RS301000 - After the source files have been built successfully, launch your MYOB Acumatica instance, and open the Repair Work Orders form for the 000001 work order.
- On the form title bar, click . The Modern UI version of the Repair Work Orders form is displayed. The form should look
similar to the form shown in the screenshot in the Story section of this
activity.Note:If you see multiple actions of the form toolbar and no More menu after you switch to the Modern UI, open the Apply Updates (SM203510) form, and in the More menu, click Reset Caches.
- Click the link in the Customer ID box and make sure the Customers (AR303000) form opens with the C000000001 record displayed. Close the Customers form.
- On the Repair Work Orders form, make sure the Description box is multiline.
- On the form toolbar, click Remove Hold. Notice that the status of the repair work order has changed to Ready for Assignment.