Customization Projects: To Publish Projects
The following activity will walk you through the process of publishing customization projects.
Story
Suppose that the SweetLife Fruits & Jams company has decided to investigate new business opportunities. For this purpose, the company has received the PhoneRepairShop and Yogifon customization projects from a third-party vendor for a trial run. Acting as the system administrator, you need to apply these customizations to a sandbox (an instance of MYOB Advanced that has no production tenants).
The customization projects will introduce the following functionality.
| Customization Project | Website Changes | Metadata |
|---|---|---|
| Yogifon |
Adds a predefined field (Type) to the General tab (Account Address section) of the Customers (AR303000) form. |
|
| PhoneRepairShop | Adds two forms: Repair Services (RS201000) and Serviced Devices (RS202000). The company will use these forms to manage the lists of repair services that are provided and devices that can be serviced, respectively. |
|
Process Overview
You will import the deployment packages (each of which is a file with the contents of a customization project) and then publish the customization projects by using the Customization Projects (SM204505) form. Then you will review how the applied customization projects have affected the system.
By using the same form, you will unpublish all the projects. Then you will restore the user interface of the tenant to its previous state as follows:
- On the Site Map (SM200520) form, you will clear the check boxes in the Workspaces column for the forms and inquiries that were introduced by the customization projects.
- You will remove the Phone Repair Shop menu item, which was used to open the workspace of the same name, from the main menu.
System Preparation
Before you start publishing customization projects, you should do the following:
- Request the PhoneRepairShop and Yogifon deployment packages by emailing to training@acumatica.com.
- Launch the MYOB Advanced website with the U100 dataset preloaded, and sign in to the system as
system administrator Kimberly Gibbs by using the following credentials:
- Username: gibbs
- Password: 123
Step 1: Uploading Deployment Packages
To upload the PhoneRepairShop and Yogifon deployment packages, do the following:
- Open the Customization Projects (SM204505) form.
- On the form toolbar, click Import.
- In the Open Package dialog box, which opens, click Choose File, and select the PhoneRepairShop.zip deployment package.
- Click Upload.
The system adds a new record to the table with the imported PhoneRepairShop customization project.
- On the form toolbar, click Import.
- In the Open Package dialog box, which opens, click Choose File and select the Yogifon.zip deployment package.
- Click Upload.
The system adds a new record to the table with the imported Yogifon customization project.
Step 2: Publishing the Customization Projects
To publish the customization projects, do the following:
- While you are still on the Customization Projects (SM204505) form, select the unlabeled check boxes in the PhoneRepairShop and Yogifon rows, and click Publish on the form toolbar.
- In the Compilation dialog box, which opens, wait for the validation to finish successfully, and click Publish.
- When the system displays the Website updated message in the
Compilation dialog box (shown in the following
screenshot), close the dialog box.
Figure 1. The Compilation dialog box 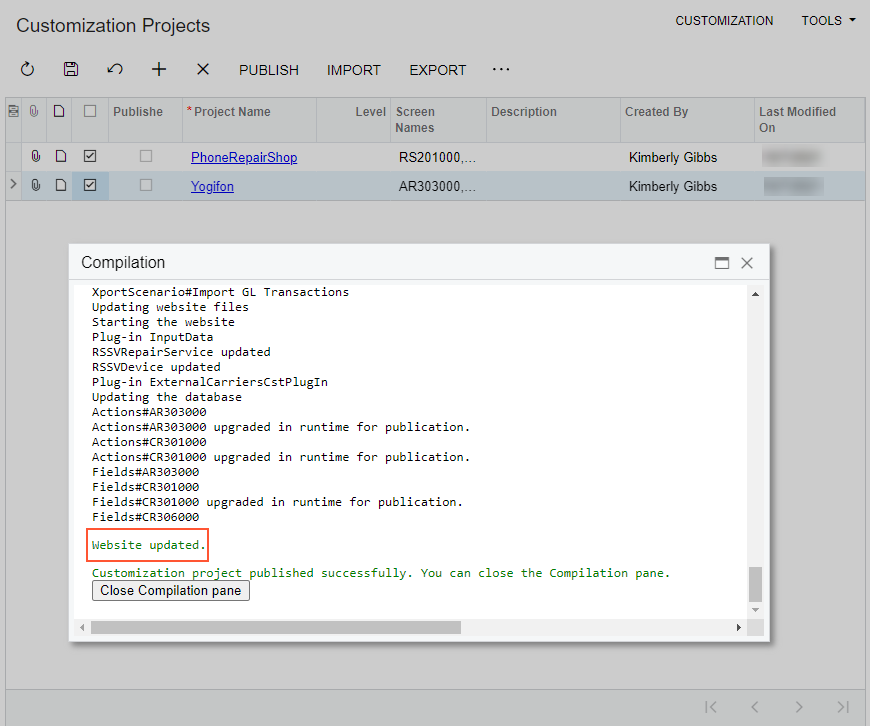
The system applies the packages and reloads the website. Notice that the Published check box is now selected for both customization projects in the table.
Step 3: Reviewing the Changes Introduced by the Customization Projects
To review the changes that have been introduced by the publication of the customization projects, do the following:
- Open the Customers (AR3030PL) form.
- In the Customer ID column, click ABAKERY.
- On the Customers (AR303000) form, notice the
following changes, which have appeared on the form as a result of the
Yogifon customization project being published:
- The User-Defined Fields tab has appeared in the Summary area and contains the Network Type box (see Item 1 in the following screenshot).
- The new Type box can be seen in the Account Address section of the General tab of the form (Item 2).
- The SO Open by Customer command appears on the More menu (Item 3).
Figure 2. The changes introduced by the Yogifon customization project on the Customers form 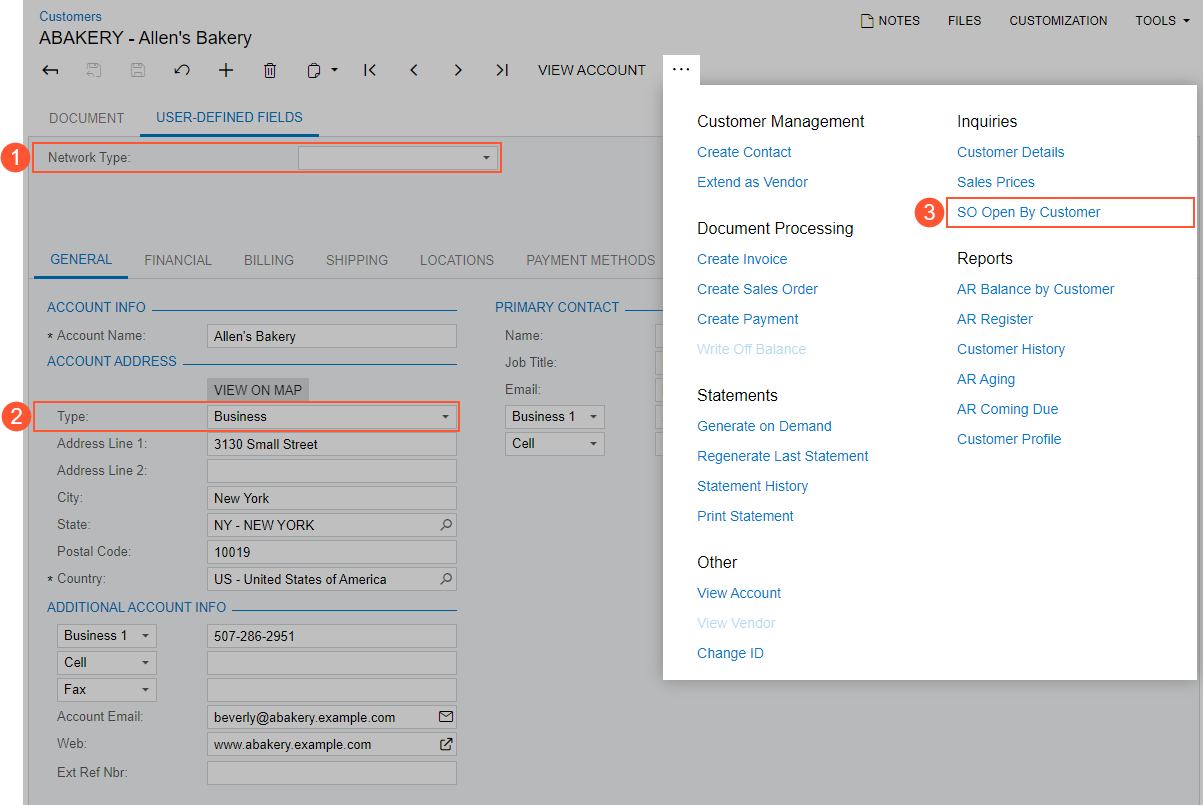
- To review the changes introduced by the PhoneRepairShop customization
project, on the main menu, click the new Phone Repair
Shop menu item to open the workspace, which has been added. The
workspace includes two forms from the customization project, as the following
screenshot demonstrates.
Figure 3. The new Phone Repair Shop workspace 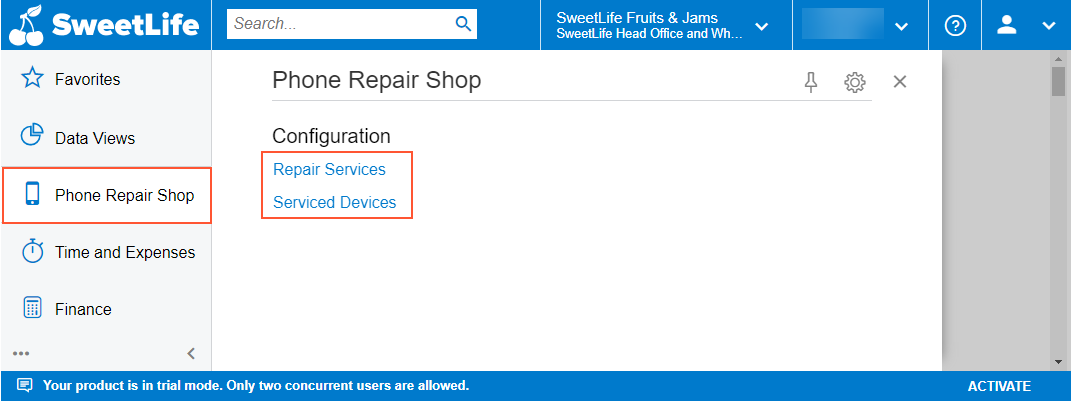
- Open the Repair Services (RS201000) form. The system opens the form with the
list of services defined in the test data, as shown in the following
screenshot.
Figure 4. The new Repair Services form with the test data 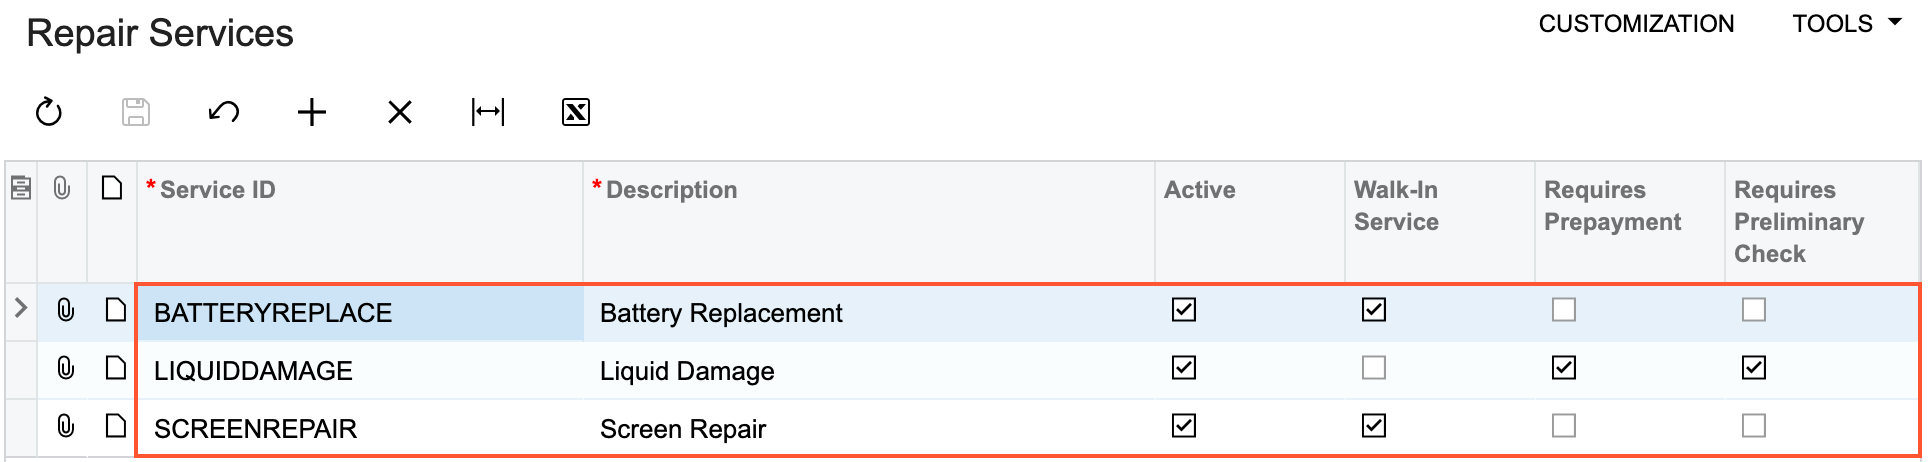
- In the Phone Repair Shop workspace, click the Serviced Devices link. Notice that the system opens the Serviced Devices (RS2020PL) generic inquiry form, which is configured as the entry form for the Serviced Devices (RS202000) form.
- Click IPHONE6 in the Device Code column to see the settings of this device on the Serviced Devices (RS202000) form.
Step 4: Unpublishing the Customization Projects
To unpublish the customization projects, do the following:
- Open the Customization Projects (SM204505) form.
- On the form toolbar, click Unpublish All. Wait for the
system to complete the operation.
Notice that the Published check box is cleared for all customization projects in the table (as shown in the following screenshot).
Figure 5. Unpublished customization packages 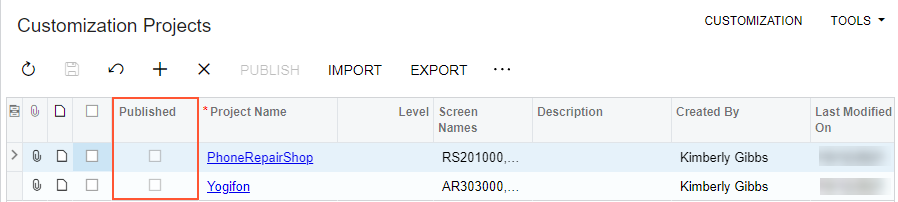
Step 5: Restoring the Initial User Interface
To remove the changes to the user interface that the system could not revert while unpublishing the customization projects, do the following:
- Open the Site Map (SM200520) form.
- In the Workspaces column, clear the selected check boxes
in the rows with the following identifiers in the Screen
ID column (see the following screenshot):Tip: To quickly find the needed forms, type RS.20 in the Search box on the form toolbar.
- RS.20.10.00
- RS.20.20.00
- RS.20.20.PL
Figure 6. The forms for which you have cleared the check boxes in the Workspaces column 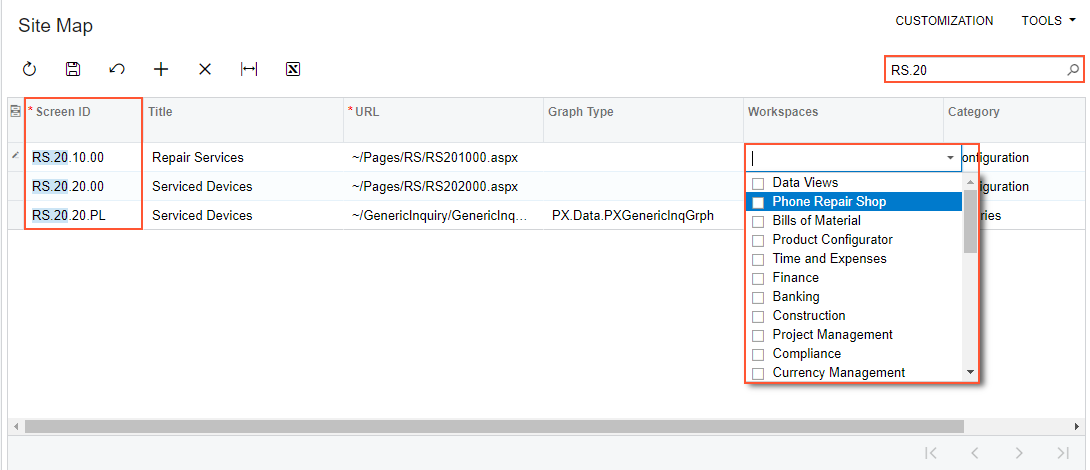
- On the form toolbar, click Save.
- In the lower left corner of the screen, click the Open Configuration Menu button, and then click Edit Menu.
- On the main menu, point at the Phone Repair Shop menu
item, and on the pop-up toolbar, click Delete Workspace,
as the following screenshot demonstrates.
Figure 7. Deletion of a workspace 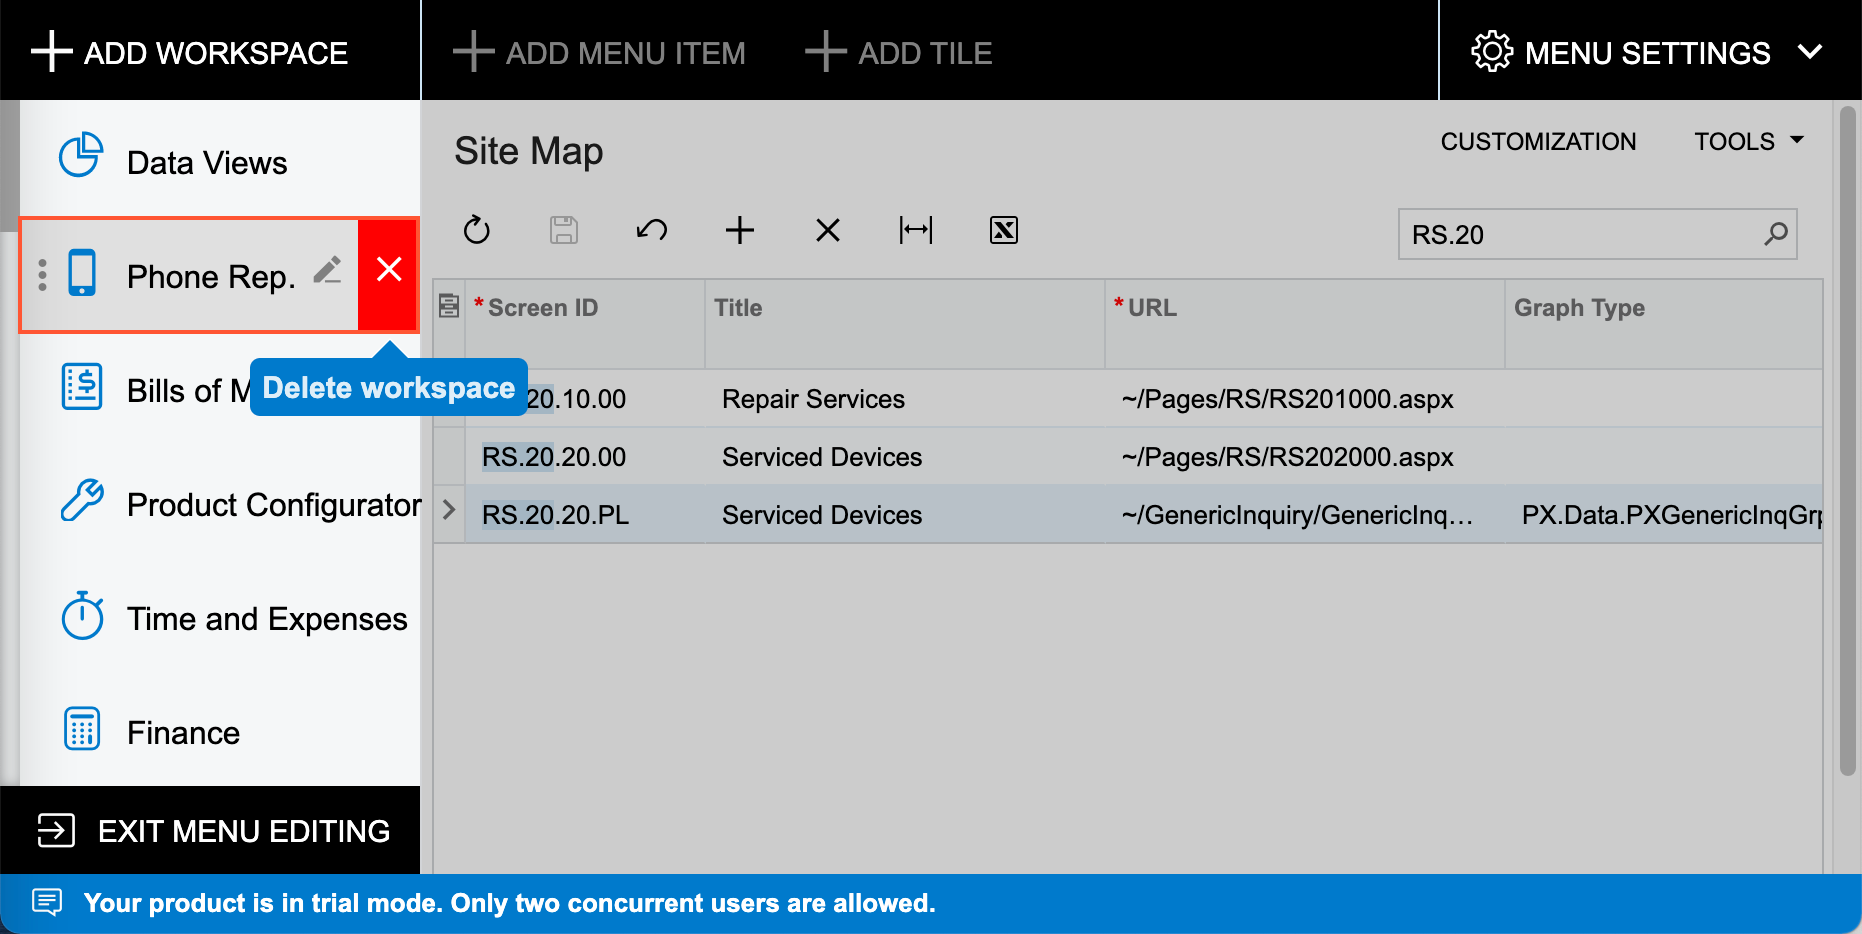
- Click OK in the warning dialog box.
- Click Exit Menu Editing.
You applied the Yogifon and PhoneRepairShop customization projects to a tenant on your instance. Then you reviewed how the publication of the projects affected the tenants. You have unpublished the customization projects and cleaned up the user interface.