Filtering and Sorting in Acumatica ERP: General Information
In the following sections, you will find information about filtering and sorting of data in Acumatica ERP.
Learning Objectives
In this chapter, you will learn how to do the following:
- Identify the basic elements of the filtering area
- Recognize the types of filters
- Create a simple filter
- Construct filter conditions
- Recall the details of the sorting capabilities
- Clear a simple filter
- Create a quick filter
- Make a quick filter your default filter
- Delete a quick filter
- Create an advanced filter
- Create ad hoc filter
Applicable Scenarios
You use filters in either of the following cases:
- You need to quickly select data according to particular criteria.
- You need to work on a regular basis with data that is selected according to particular criteria.
Basic Elements of the Filtering Area
The filtering area of an Acumatica ERP form has a group of UI elements that you can use to set up and apply filters.
The following screenshot shows the basic elements of the filtering area.
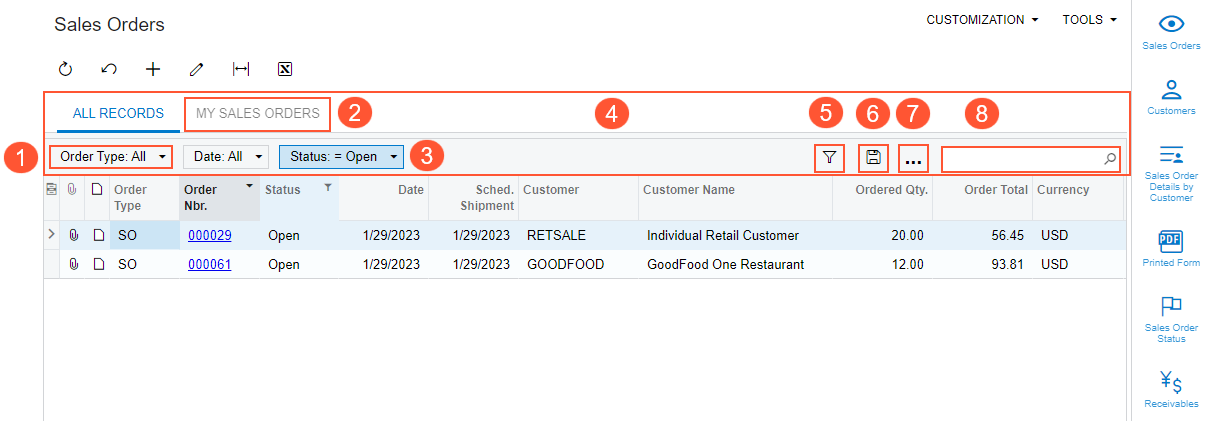
- A Quick Filter button for a predefined quick filter, which you can click to open the Sorting and Filtering Settings dialog box. You can use this dialog box to specify conditions for the column.
- A filter tab.
- A Quick Filter button for a user-defined quick filter, which you can click to open the Sorting and Filtering Settings dialog box. You can use this dialog box to specify conditions for the column.
- The filtering area. This area contains the filter tabs, buttons you can click, and a Search box.
- The Filter Settings button, which you click to open the dialog box of the same name. In this dialog box, you have configured the filter settings in the filtering area, saved the filter and specify the name of the filter.
- The Save button. When you click this button, the Filter Settings dialog box opens. In this dialog box, you specify the name of the new filter and save the filter.
- The More button, which you can click to execute menu commands (Save As, Save As Pivot, and Remove) to act upon filters.
- The Search box of the form. By default, the maximum length of the search string
is 100 symbols and the system uses the Contains condition when performs
the search query.Tip: For the Search box, a user with administrative access rights can specify the condition the system uses by default in the search query and the maximum length of the search string on the Site Preferences (SM200505) form.
Filters in Acumatica ERP
When you work with large amounts of data, filtering is a crucial capability of the system that you can use to view and process the data. In Acumatica ERP, you can create and save filters that meet your needs.
You can set up filters for various forms and reports. For details on using filters in reports, see Working with Reports. All Acumatica ERP filters are form-specific, which means that if a filter is set up for one form, you cannot apply it to another form.
Acumatica ERP provides the following types of filters (which are described in the remaining sections of this topic):
- Simple filter
- Quick filter
- Advanced filter
- Ad hoc filter
A shared filter is one that is available to all users of the system. A user that has access to the Filters (CS209010) form can make an advanced filter and define it to be shared with other users.
For details on applying filters, see Filtering and Sorting in MYOB Advanced: Process Activity.
Simple Filters
A simple filter is a filter that you can quickly apply to data in a table, and the filter remains applied while you are on the form. You can also sort data in a table column and turn column sorting on and off. To apply a simple filter, you click the header of the table column to open the Sorting and Filtering Settings dialog box.
In this dialog box, you can do any of the following:
- Specify the filter condition for the column. You can select one of the
following:
- Equals: Displays records for which the value of the specified column is equal to the value in the Value box or in the lookup box.
- Does Not Equal: Displays records for which the value of the specified column is not equal to the value in the Value box or in the lookup box.
- Contains: Displays records for which the value of the specified column contains the value in the lookup box.
- Starts With: Displays records for which the value of the specified column contains at the beginning of the value in the lookup box.
- Is Empty: Displays records for which the value of the specified column is empty (null).
- Is Not Empty: Displays records for which the value of the specified column is not empty (not null).
- Is Greater Than: Displays records for which the value of the specified column is greater than the value in the Value box.
- Is Greater Than or Equal To: Displays records for which the value of the specified column is greater than or equal to the value in the Value box.
- Is Less Than: Displays records for which the value of the specified column is less than the value in the Value box.
- Is Less Than or Equal To: Displays records for which the value of the specified column is less than or equal to the value in the Value box.
- Is Between: Displays records for which the value of the specified column is between the values in the From and To boxes.
- Today (for values of the date type): Displays records for which the value of the specified column is equal to the current business date.
- This Month (for values of the date type): Displays records for which the value of the specified column is within the current month. (The current month is the month that contains the current business date.)
- Sort the data in the column
- Cancel the sorting in the column
- Cancel the filtering in the column
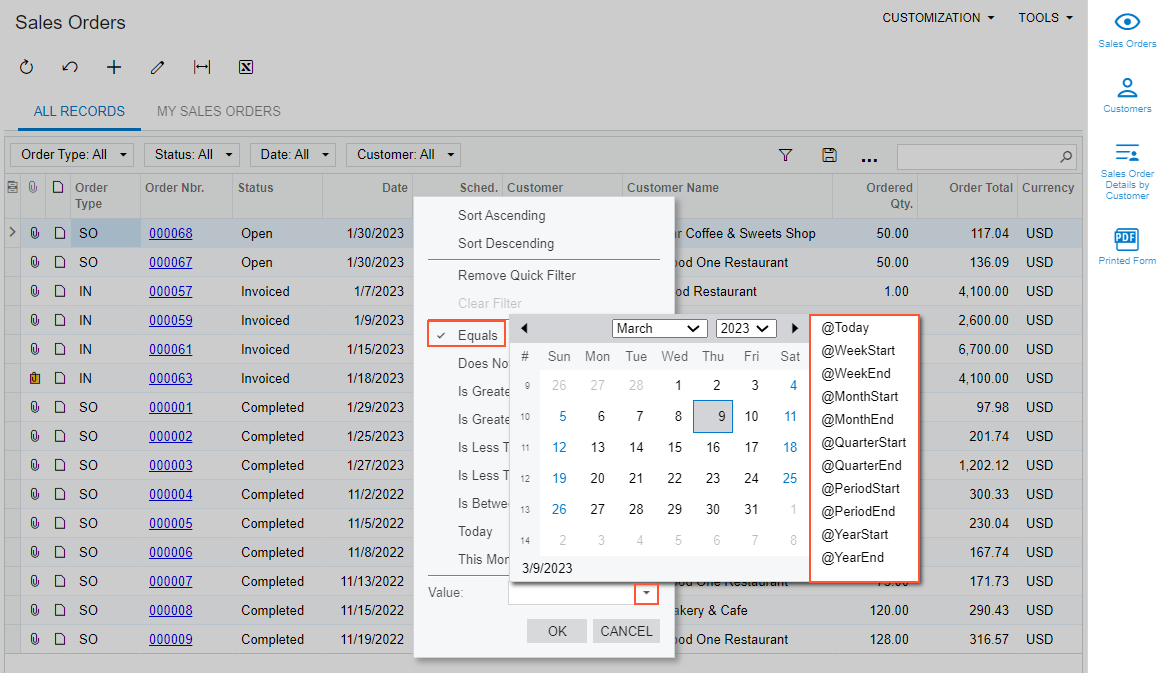
To make date conditions more flexible, you can use date-relative parameters—parameters that are relative to the current date—in the Value box of the Sorting and Filtering Settings dialog box. You can use the following date-relative parameters:
@Today: The current date. You can modify this parameter by adding or subtracting days.- Attention: If the data field contains a value that consists of a date and time, only records for which both the date is equal to the current date and the time is 00:00:00 match this parameter.
@WeekStart: The start of the current week. You can modify this parameter by adding or subtracting weeks.Tip: The start and end of the week are determined based on the default system locale or the locale that you selected when you signed in to MYOB Advanced. The system locales are specified and configured on the System Locales (SM200550) form.@WeekEnd: The end of the current week. You can modify this parameter by adding or subtracting weeks.Tip: The start and end of the week are determined based on the default system locale or the locale that you selected when you signed in to MYOB Advanced. The system locales are specified and configured on the System Locales (SM200550) form.@MonthStart: The start of the current month.@MonthEnd: The end of the current month.@QuarterStart: The start of the current quarter.@QuarterEnd: The end of the current quarter.@PeriodStart: The start of the current financial period.@PeriodEnd: The end of the current financial period; the financial periods in your system are defined on the Financial Year (GL101000) form.@YearStart: The start of the current calendar year.@YearEnd: The end of the current calendar year.
To add a filter condition with a date-relative parameter, you select the parameter from the list. (See the following screenshot.)
Once you specify the simple filter condition (see Item 1 in the following screenshot) and click OK to close the dialog box, the table shows only the table rows (Item 2) that meet the sorting and filtering conditions that you have specified, as shown in the screenshot below.
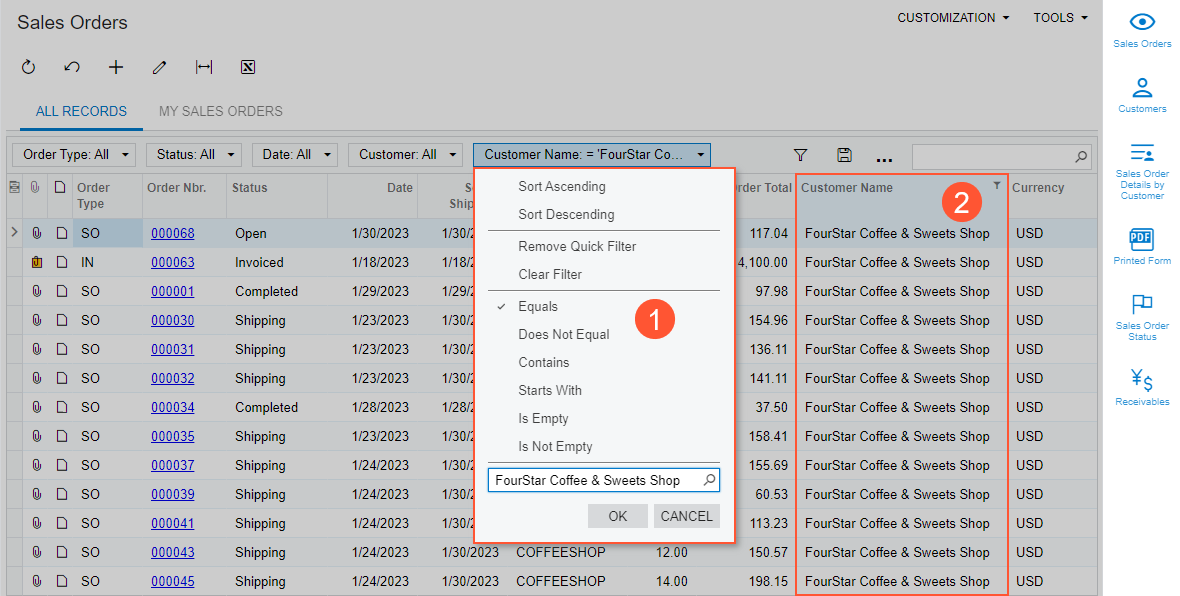
To clear a simple filter, click Clear Filter in the Sorting and Filtering Settings dialog box.
You can save a simple filter (Item 1 in the following screenshot) as a quick filter, which can be used in future sign-ins. In this case, the system adds to the form a tab with the filter applied (Item 2). For details, see the following section.
Quick Filters
A quick filter is a reusable filter that you can apply to data in the table of an Acumatica ERP form of any of the following types (For details, see Entering Records into the System: General Information.):
- A generic inquiry form (such as a list of records)
- An inquiry form
- A mass processing form
You can apply one quick filter or multiple quick filters to the data in the table.
To apply a quick filter based on the data in a table column, you do either of the following:
- Drag the header of the column to the filtering area, which causes the system to create a Quick Filter button. You then click the Quick Filter button there and specify conditions for the column in the Sorting and Filtering Settings dialog box, which opens.
- Click the header of the column, and in the Sorting and Filtering Settings dialog box, which opens, specify conditions for the column.
- The values of the quick filter if the column has a fixed set of options
- The filter condition of the quick filter if the column has an unlimited number of values.
To remove a quick filter, drag it out of the filtering area or click Remove Quick Filter in the Sorting and Filtering Settings dialog box.
You can save quick filters for future use. When you save a filter, the system adds to the form a tab with the filter applied. The tab will be shown on the form when you open the form in the future. The tab has the name that you specify during saving of the filter. You can create quick filters for your personal use or share them with other users.
A saved quick filter was shown in the screenshot in the previous section.
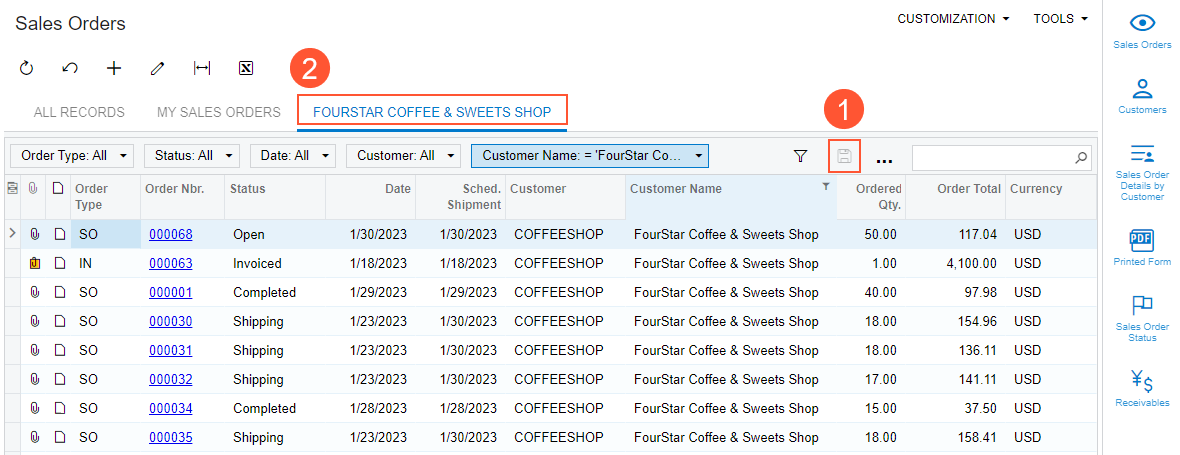
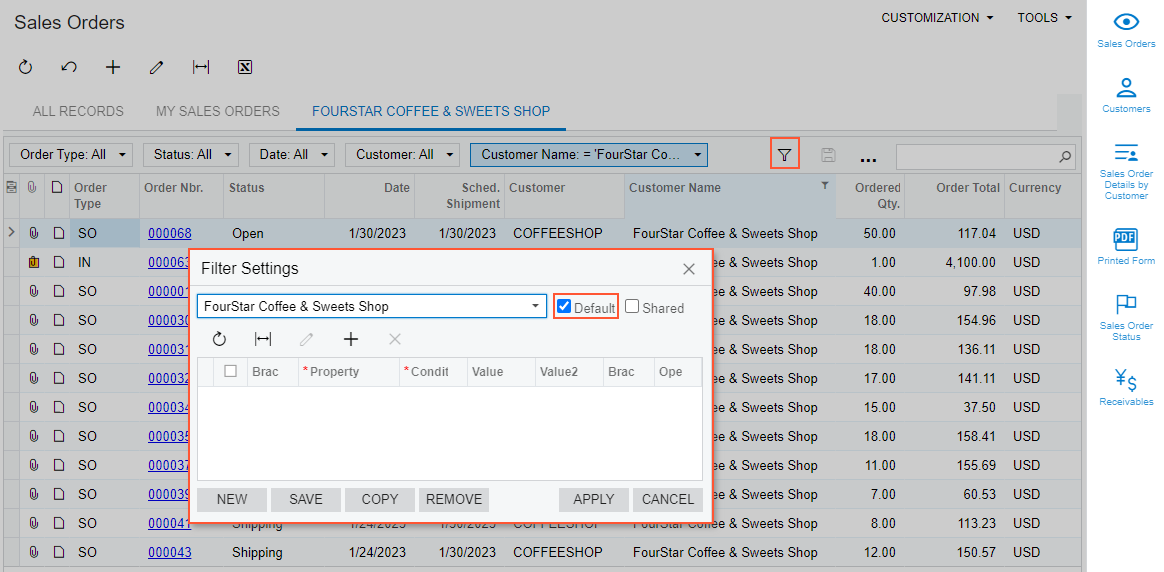
You can define a saved quick filter as a default filter by selecting the Default check box in the Filter Settings dialog box (as shown in the following screenshot), which means that each time you open the form, the filter tab is automatically opened.
To remove a saved quick filter, click Remove on the More button of the filtering area.
Advanced Filters
An advanced filter is a shared filter that a system administrator defines on the Filters (CS209010) form for a mass processing or inquiry form. The system administrator can configure complex conditions for the advanced filter and apply the filter by default for users. If an advanced filter has been defined for a form, you can apply it anytime. For details, see Managing Advanced Filters.
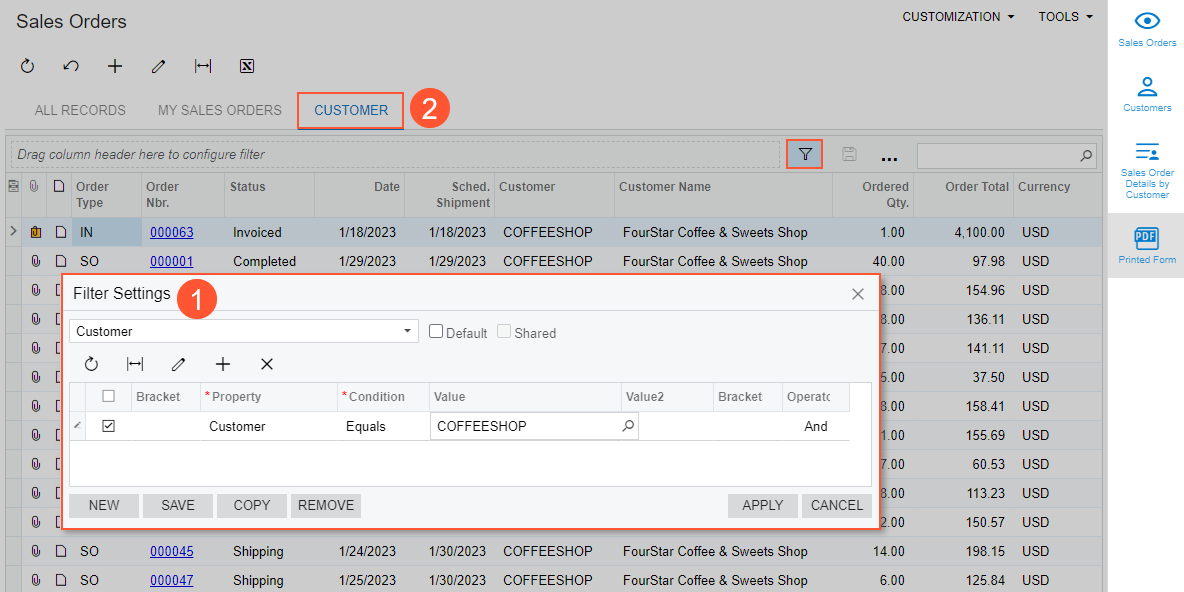
You can also use the Filter Settings dialog box to add an advanced filter to a form (see item 1 in the following screenshot). When you save the filter, the system adds to the form a tab (item 2) with the filter applied; the tab will be shown on the form when you open the form in the future. You can create advanced filters for your personal use or share them with other users.
Ad Hoc Filters
You configure ad hoc filters on the Additional Sort and Filters tab (Advanced Filtering Conditions section) of report forms (see the following screenshot) to fine-tune the basic report parameters. These filters cannot be saved directly to be reused at a later time. However, you can set up and save report templates that contain the filtering and sorting settings you use for an ad hoc filter.
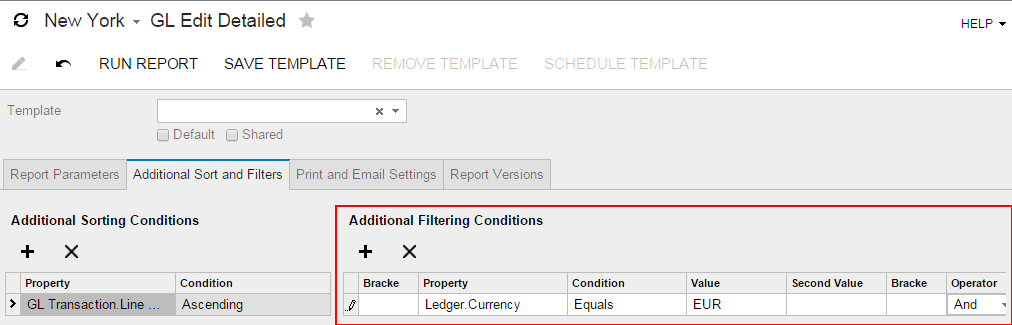
For more information about using ad hoc filters, see Reports.