
Payments and Deductions
Overview
Payments are used to calculate your employees’ pay. How they are set up will determine not only the payment but also how they are taxed and how they relate to the calculation of holiday pay.
Deductions affect your employees’ take-home pay. How they are calculated is determined when they are initially set up. They can also be designed to be included in your regular back file.
Unless absolutely necessary any new payments or deductions should not reference any individual employee information. This allows the same payment and/or deduction to be used by multiple employees. Any information specific to the employee can be entered on their Permanent Tab.
Payments
IMS Payroll comes with a number of standard payments set up but anything unique to your company will need to be created.
To create a new payment click on the Company tab then the Payment tab. Now click on the New Record Icon at the top left of the screen. All red fields must be filled in.
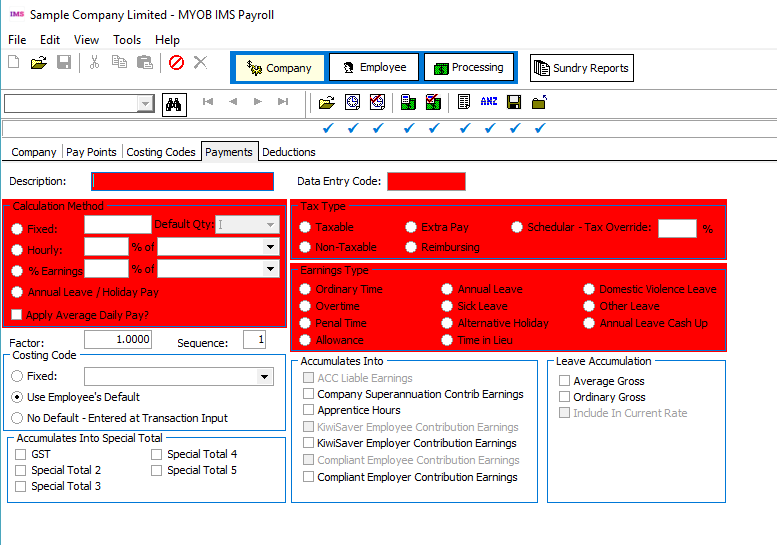
Description: The name of the payment. This is what will appear on employee payslips. People viewing it should be able to understand what the payment is.
Data Entry Code: This will auto populate but you can change it if you wish. The Data Entry Code is used to link payments from a third party time sheeting system to IMS. As such the Data Entry Code for IMS Payroll standard payments should not be changed
Calculation Method: This determines how the payment is calculated:
-
Fixed: ticking this box will pay a standard amount each pay period. If the amount changes person by person or each time it is paid (such as backpay) this can be entered as 0.
-
Default Qty: this will default to I which stands for input value. This means that the Fixed Amount will be multiplied by the Quantity entered on the employee’s timesheet. In the example below the employee will be paid 3 meal allowances at a Fixed Rate of $8.50
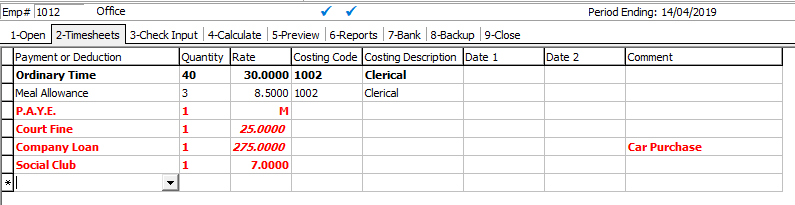
There are other Default Quantity options that will allow more complex calculations to be undertaken—consult with IMS Support to review options.
-
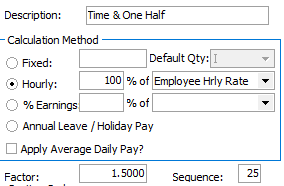
Hourly: this enables calculations based on the employee’s hourly, daily or per pay rate to be undertaken. A good example of this it is an overtime payment. In the example below the Hourly box has been ticked and it will pay 100% of the employee’s hourly rate. However it has a factor of 1.5 so will pay the hourly rate multiplied by 1.5, hence T1.5.
-
% Earnings: Allows a percentage loading based on various earnings types such as superable or taxable earnings to be undertaken. Special Totals based on a calculation unique to you can also be calculated. Please consult with IMS Support to review options
-
Annual Leave / Holiday Pay: this is used in conjunction with Annual Leave related types outlined under the Holidays Act and is linked to standard annual leave related payments. Should you have a need to create an additional leave type that pays the same way as Annual Leave please consult IMS Support.
-
Apply Average Daily Pay?: this is used in conjunction with Sick Leave, Bereavement leave, Alternative Days, Public Holidays and Violence Leave and is linked to these payments. Should you have a need to create an additional leave type that pays the same way as these leave types please consult IMS Support.
Costing Code: This determines where the payment will be charged to. This will default to Use Employee’s default but you have the option of entering a Fixed Costing Code or having the code manually entered on the Timesheet each time it is used.
Accumulates into Special Totals: Special Totals based on a calculation unique to you can be calculated. This area allows the payment created to be linked to the Special Total selected. Consult IMS Support if you need to use Special Totals.
Tax Type: this determines how the payment is taxed
-
Taxable: this payment is part of the employee’s standard pay and will be taxed in line with IRD tax tables.
-
Extra Pay: this payment is a lump sum payment such as a bonus or back-pay and will be taxed at a flat rate of either 10.5, 17.5, 30 or 33% (plus ACC levy if appropriate)
-
Schedular – Tax Override: with use with Contractor payments where the WT tax code is used.
-
Non-Taxable: this payment is a non-taxable payment. It will not appear in any reporting to the IRD.
-
Reimbursing: this payment is to reimburse the employee for expenses. It will not appear in any reporting to the IRD.
Below is a link to the weekly and fortnightly tax tables for the 2019/20 tax year. This will provide additional information on PAYE including how Extra Pay is calculated
When you select either the Taxable or Extra Pay options additional boxes will be ticked in the Accumulates Into and Leave Accumulation areas. The Accumulates Into control how the payment will accumulate for ACC and KiwiSaver. The Leave Accumulations area determine how the payment will be treated for holiday pay purposes.
Earnings Type: This determines the type of payment and will affect how holiday pay is calculated.
-
Ordinary Time: should be selected for any standard hour’s paid.
-
Overtime: should be selected for any hours in excess of the employee’s standard hours
-
Penal time: should be selected for penalty payments paid on top of standard hours (i.e. night shift payment).
-
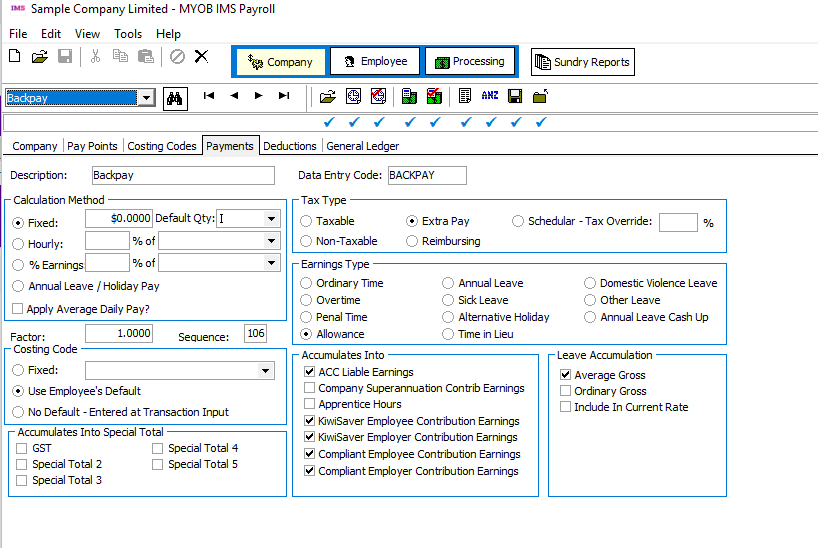
Allowance: should be selected for any lump sum payments made. There are no hours attached to allowances. Bonuses and backpay would have an earnings type of allowance.
-
Annual Leave: should be used with paid Annual Leave taken
-
Sick Leave: should be used with paid Sick Leave taken
-
Alternative Holiday: should be used with paid Alternative Holidays
-
Time in Lieu: should be used with paid Time in Lieu taken
-
Violence Leave: should be used with paid Violence Leave taken
-
Other Leave: should be used with any other leave types
-
Annual Leave Cash Up: should be used with Annual Leave Cash Ups
IMS Payroll comes with pre-created leave types. Should you have a need to create an additional leave type, consult IMS Support.
Accumulates Into: This area determines how the payment will interact with various items such as ACC and Kiwisaver.
-
ACC Liable Earnings, KiwiSaver Employee and Employer, Compliant Employee and Employer: Most taxable payments accumulate for ACC and KiwiSaver / KiwiSaver Compliant Funds so these are automatically ticked when the Tax Type of Taxable or Extra Pay are ticked. If you feel the payment you are creating should not accumulate untick the appropriate box. Please seek appropriate legal advice before taking this step.
-
Company Superannuation Contrib Earnings: Tick this box if you have a company superannuation scheme and you want this payment to be superable.
-
Apprentice Hours: If you want to keep track of Apprentice hours please tick this box if this is an hours based payment. These are likely to be any payments with an Earnings Type of either Ordinary Time or Overtime.
Leave Accumulation: This determines how the payment will accumulate for holiday pay purposes. The Holidays Act says that an employee should be paid the higher of their Ordinary Weekly pay or the average of their last fifty two weeks earnings. If the employer cannot determine what the ordinary weekly earnings are a four week average may be used.
-
Average Gross: is a fifty two average. With the exception of an unexpected payment most taxable payments are holiday payable.
-
Ordinary Gross: is a four week average. Payments that are not paid regularly should NOT be ticked for Ordinary Gross.
-
Include In Current rate: This option only applies to payments with the “Allowance” Earnings Type selected. Tick this option if you want the value of the allowance to be included in the calculation of the used when determining the hourly or daily rate for Annual Leave transactions.
The allowance must be present on the employee's screen with a non-zero quantity and rate in order to be included in the Current Leave Rate calculation.
For the Annual Leave Cash Up type, payments all of the above Leave Accumulation indicators should not be selected.
Should you need to, seek legal advice about how holiday pay should accumulate in your organisation.
Unpaid Leave (LWOP): This option is available if the Earnings Type is set to “Ordinary Time”, “Annual Leave”, “Sick Leave”, “Alternative Holiday”, “Time in Lieu” or “Other Leave”. If selected, the payment cannot be associated with a rate. The unpaid units entered for a payment with an Earnings Type of “Annual Leave”, “Sick Leave”, “Alternative Holiday” or “Time in Lieu” will reflect the Unit type (Hours or Days) the leave is recorded in for the employee. For “Other Leave”, the unit type will be based on what units the Annual Leave is recorded in.
Unpaid Leave or Leave Without Pay (LWOP) of more than one week affects the employee's Average Weekly Earnings (AWE). In this case, either move the employee's Annual Leave Due Date back the appropriate number of weeks, or reduce the AWE divisor by one for each week of LWOP taken beyond the first (e.g. two weeks of LWOP means the divisor should be reduced by one week, so gross earnings are divided by 51 weeks instead of the usual 52). When entering Leave Without Pay on the step, you will be prompted to enter the number of weeks to reduce the divisor by (or enter nothing and update the Annual Leave Due Date instead.
In order to record Unpaid Leave units so that they are included in the calculation of Annual Leave entitlements (e.g. Annual Leave related hours x 8% for a Variable Hours employee), the Earnings Type must be “Ordinary Time”. This could be applicable when recording ordinary hours for a Variable Hours employee on Parental Leave whose unpaid leave hours are to be accumulated and used in the calculation of their Annual Leave entitlement. See the “Parental Leave” document on the .
 To save your payment, click the Save icon at the top left of the screen ( ). Below is an example of a standard backpay payment:
Deductions
IMS Payroll comes with a number of standard payments set up but anything unique to your company will need to be created.
To create a new payment click on the Company Tab then the Payment Tab. Now click on the New Record icon at the top left of the screen. All red fields must be filled in.
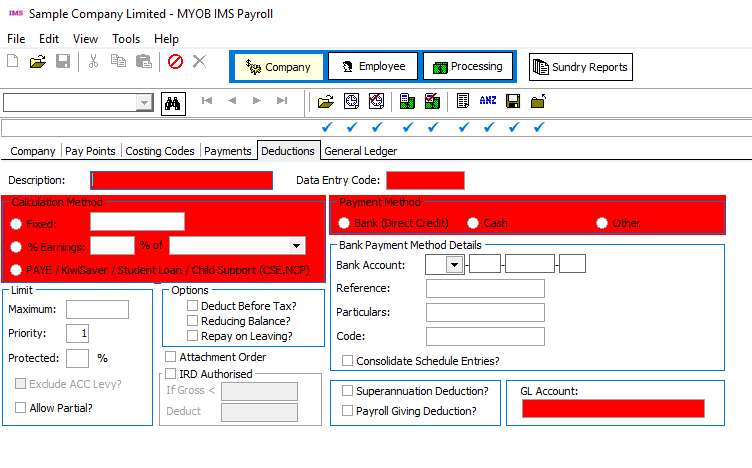
Description: The name of the deduction. This is what will appear on employee payslips. People viewing it should be able to understand what the deduction is.
Data Entry Code: This will auto populate but you can change it if you wish. Data Entry Codes for standard deductions should not be changed
-
Calculation Method: This will determine how the deduction is calculated
-
Fixed: Ticking this box will deduct a standard amount each pay period. If the amount changes person by person or each time it is paid (such as backpay) this can be entered as 0.
-
% Earnings: Allows a percentage loading based on various earnings types such as superable or taxable earnings to be undertaken. Special Totals based on a calculation unique to you can also be calculated. Please consult with IMS Support to review options
-
PAYE / KiwiSaver / Student Loan / Child Support (CSE,NCP)?: This is used in conjunction with standard deductions such as P.A.Y.E and KiwiSaver It is not expected you would have a need to create any new deductions using this.
Limits: Determine additional limits on the deduction
-
Maximum: If an amount is entered here this is the maximum amount that can be deducted. You can also set a Maximum against an employee on the Permanent Tab or at Step 2 – Timesheets.
-
Allow Partial: Tick this box if some money will still be deducted even if the employee doesn't have enough money in their pay to make the whole deduction.
-
Priority: Select a Priority (1 to 8) for this deduction. Deductions are made in order of their priority (1 first) and if an employee does not have enough money in their pay lower priority deductions will not be made.
The following priorities are recommended:
-
0 - Reserved for Tax Deductions (e.g. PAYE, SLRD, Child Support, KiwiSaver, SLBOR, SLCIR, Attachment Orders)
-
3 - Superannuation and Company Related
-
5 - 3rd Party Deductions
-
7 - Employee secondary bank deductions
-
Protected Percent: Enter the protected earnings percentage for the deduction here. Most Attachment Orders have Protected Earnings of 60%.
Note: If you are entering a protected percentage it is usual to check the 'Allow Partial' option too.
Exclude ACC Levy?: Determines whether the ACC Earners’ Levy component of the tax calculation should be excluded when calculating protected net earnings. Select this option if the Protected Percent is to be applied to an attachment order.
Options: Determine additional controls on the deduction:
-
Deduct Before Tax: Check this box if this deduction is to be deducted before tax is calculated, i.e. the employee's taxable earnings will be reduced by the amount deducted. While this is an option it is not recommended.
-
Reducing Balance: Check this box if this deduction has an outstanding balance to be repaid. When adding or changing a reducing balance deduction for an employee, you will be prompted to enter the total amount to recover in the Outstanding Balance field on the employee’s Permanent Tab. The deduction will automatically stop when they are fully repaid (i.e. when the outstanding balance equals zero). Note: Reducing Balance deductions should have the 'Allow Partial' option checked, as it is common for the final deduction to be partial amount.
-
Repay on Leaving: Check this box if this reducing balance deduction is to be repaid in full when an employee leaves. If this option is checked, the pay calculation will attempt to recover the entire outstanding balance when an employee leaves.
Attachment Order: Tick this box if the deduction is authorised by Inland Revenue, WINZ or Courts, e.g. tax arrears, parentage test costs, social security debts, court fines, etc. Ticking this box will ensure the deduction is calculated after Child Support and before Student Loan Repayments and KiwiSaver if these deductions are present.
IRD Authorised: This deduction is authorised by Inland Revenue (normally for tax arrears repayment). An amount and deduction method will be declared on the Authorisation Notice.
-
If Gross <: Specified a minimum gross amount which will trigger the deduction as declared in the Deduct field.
-
Deduct: Enter the amount to deduct if gross taxable earnings are less than the amount specified in the If Gross < field.
Payment Method: Tells how the deduction will be paid to the recipient:
-
Bank Account, References, Particulars and Code: Enter the Bank Account details of the recipient.
-
Consolidate Schedule Entries: Tick this box if deductions from individual employees to the same account are consolidated into one entry on the direct credit schedule. (e.g. Union fees are usually consolidated into a single entry and a printed schedule itemising the individual deductions from each employee is sent later). This should not be ticked if deductions from individual employees to the same account are to be itemised separately on the direct credit schedule (e.g. Inland Revenue, WINZ or Courts deductions).
Superannuation Deduction?: Tick this box for Super Deductions so that they consolidate into a Year-To-Date figure on the Payslip.
Payroll Giving Deduction?: Tick this box if the deduction being made is for an IRD approved Payroll Giving donee. By selecting this option, a tax credit will be calculated based on the amount of the Payroll Giving deduction. This field is only available if you have ticked the “Payroll Giving?” option on the Company page.
GL Account: Enter the Account code (from your General Ledger) that deduction amounts for this deduction are to be posted to. This field is only available if you have ticked the General Ledger? option on the Company page.