- Contents
- Index
- Search

Show results that include all search words
Entering Time Costs
Note: Video-based Help is available for this topic on the Exo Business Education Centre.
There are two modes of entering the actual time amount on both the Job Management and Direct Time Entry windows.
- Hours Only
- Hours Calculated from Start and End Times
This setting is controlled by the Calculate 'Hours' from 'Start' and 'End' times in timesheet entry user-level profile setting. If this setting is not enabled, the amount of time can be entered directly. In this case, the start and end dates and times must be entered, and the amount of time is calculated from these. The hours can still be edited and do not have to agree. If you want to enter date and end dates and times, then you will need to make these fields visible on time entry grids in the appropriate column order.
Note: The Start date is the equivalent of Transaction date on the Cost tab.
Select the Timesheets tab:
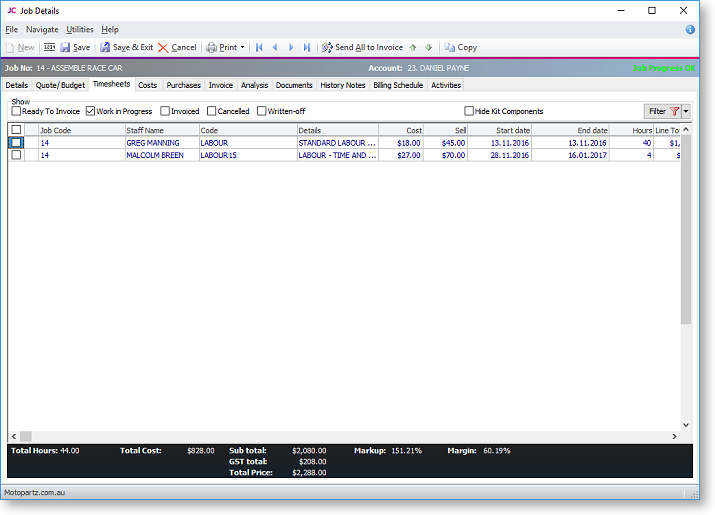
There are various filter checkboxes at the top of the screen:
- Ready to Invoice
- Work in Progress
- Invoiced
- Cancelled
- Written-off
- Hide Kit Components
Only the Work in Progress filter is enabled by default.
|
Field |
Description |
|
Group select |
The first column contains a checkbox that allows you to select the line as part of a group of lines to perform actions on using the right-click menu. |
|
Narrative |
The second column displays the A narrative can only be added/edited after the line has been saved, using Save or Save & Exit. |
|
Staff Name |
An employee name. If unknown type ? and press TAB to search for the employee. Double-click on the correct name. |
|
Code |
A code for the type of labour. |
|
Details |
The description recorded in the stock records will be the default entry here. It can be over written with a more detailed description of the job. |
|
Cost |
The cost of the labour. This uses the cost as entered in the stock records. It can be overwritten. |
|
Sell |
The selling price of the labour. This uses the selling price of the product as entered in the stock records. It can be overwritten. |
|
Sell in GST |
The selling price of the labour including GST |
|
Start date |
The date the work was started. Enter as ddmmyy e.g. 210800. The entry is automatically changed to 21.08.2000. |
|
Start time |
The time the work was started. |
|
End date |
The date the work was completed. Enter as ddmmyy e.g. 210800. The entry is automatically changed to 21.08.2000. |
|
End time |
The time the work was completed. |
|
Hours |
The number of hours worked. Part hours are entered in decimals not minutes e.g. 2½ hours = 2.5 not 2.30. (Automatically calculated if start and end times are enabled.) |
|
Total |
This value is automatically calculated. |
|
GST |
GST value per unit. |
|
GST Total |
Total line value of GST. |
|
Total Inc GST |
Line total including GST |
|
Mark up % |
This value is automatically calculated, but can be modified by line – this adjusts the selling price accordingly. A default markup can be applied for direct purchases via the Cost Types. This can be overwritten but deals well with one-off purchases or subcontracted services where the cost price and charge-out vary each time. |
|
Status |
The status of this line. Will be one of:
|
|
Cost Type |
Enter a Cost Type, if types are used. Type ? and press TAB to select from cost types available. |
|
Cost Group |
Enter a Cost Group, if groups are used. Type ? and press TAB to select from cost groups available. Cost group will auto populate if the cost type is entered first, but can be overridden. |
|
GST No |
Select the GST number from the predefined list of GST entries. This automatically sets the GST rate. |
|
Disc (%) |
Discount applied to the line. |
|
Gross Margin % |
Display field only – cannot be used to work-back the selling price on this line. |
|
Analysis codes 1 and 2 |
Can be used as another coding for posting to the General Ledger. |
|
Source Ref |
An optional reference number. |
|
Invoice Date |
|
|
Line # |
Line number. This can be edited and used with the ExoGrid sorting capabilities (or Clarity reporting) to re-sequence the lines from their original entry sequence. |
|
Showline |
Contains a Y or N to indicate if the line should appear on an invoice. This applies to kit component lines where the component lines may be hidden (set on BOM header). |
|
Spread |
Defaults to Y but can be changed to
N. Indicates if the line will be taken into account
when using the spread function |
|
Schedule # |
Billing schedule number when using progress invoicing. |
|
Allowance |
This allows a unit labour allowance to be specified associated with a product. |
Click Save to save data or Cancel to lose all entries made.
Timesheet Workflow
The natural flow of statuses for transactions is:
-
C - Committed
-
R - Ready to invoice
-
I - Invoiced
Committed transactions represent work in progress.
Ready to Invoice transactions are those that have been "pushed" onto the invoice tab but have not yet been invoiced. These are also work in progress.
Invoiced transactions are no longer editable. They have either appeared as a line on a Debtors Invoice, or have been part the cost of a product re-introduced into stock on hand.
To move a line to another status, right click on the line and select
the appropriate action. You can click the Send
All to Invoice button to send all lines to the Invoice
tab.
You may action multiple lines by ticking then and using the Marked Lines
entry from the right-click menu.
Narratives
Any transaction line can have notes attached. These will be taken through and can be printed on the invoice as required. Right-click on the line and select Add Narrative to attach a narrative to a line. To remove a narrative, delete the existing text.