- Contents
- Index
- Search

Show results that include all search words
Completing an Invoice
There several workflows that may be used for invoicing:
- Lines can be flagged as ready for invoice and then pending lines of a job invoiced.
- Cost lines can be sent directly to the invoice tab for invoicing.
- Optionally, progress billing may be activated and lines sent to a billing schedule within the job. Multiple schedules may exist within a job.
Select the Invoice tab. The following screen is displayed:

By default the filters on the Invoice tab are set to show only "Ready for Invoice" lines. The lines must be flagged with this status for them to appear. If the job is a master job, an Include Sub Job Lines filter is available to display lines from the job's sub jobs.
Note: If changes or additions are made in the Exo Business Invoices screen they will not be reflected on the job invoice. Ensure everything to be associated with the job is added via the Job Costing module.
|
Field |
Description |
|
Group select |
The first column contains a checkbox that allows you to select the line as part of a group of lines to perform actions on using the right-click menu. |
|
Narrative |
The second column displays the A narrative can only be added/edited after the line has been saved, using Save or Save & Exit. |
|
Code |
These values are carried forward to this tab from the tab they were created on. However, values can be over-written and any changes will be reflected on the original tab. |
|
Total cost |
This value is automatically calculated, and updates to reflect any changes made in other fields. |
|
Total |
This value is automatically calculated, and updates to reflect any changes made in other fields. |
|
Disc (%) |
Discount applied to the selling price of this line. |
|
Mark up |
This value is automatically calculated, but can be edited. On starting to type new entry a small screen pops up. Enter the number for the new markup, ignoring the % sign e.g. 112.5, click OK to confirm or Cancel to return to screen without making a change. |
|
Status |
The status of this line. Will be one of:
|
|
Invoiced |
Shows previously invoiced amounts. |
|
Start Date |
These values are read-only. |
|
GST No |
These values are copied from the Quote tab. |
|
Batch Code |
An optional code to group batches of transactions. |
|
Schedule # |
Billing schedule number when using progress invoicing. |
|
Supplied |
Displays either "Y" or "N" to indicate whether the line item has been supplied. Can be altered by right-clicking on the line and selecting Toggle Supplied Flag. |
|
Analysis Codes |
Analysis Codes are arbitrary codes that can be assigned to transactions, allowing you to group them together in various ways for sorting and reporting. They do not perform any function themselves; they are simply a customisable way of grouping related transactions together. |
Changing the Invoice Total Amount
The Change Invoice Total button
( ![]() ) can be used to make the invoice total equal what the customer is expecting.
This will effectively spread the additional markup (or markdown) across
all of the lines on the invoice, proportionally by value. The advantage
of this approach is that you get a truer representation of actual profitability
by line, than by using an additional markup/markdown line on the invoice.
) can be used to make the invoice total equal what the customer is expecting.
This will effectively spread the additional markup (or markdown) across
all of the lines on the invoice, proportionally by value. The advantage
of this approach is that you get a truer representation of actual profitability
by line, than by using an additional markup/markdown line on the invoice.
This feature can also be useful where the Job is to be billed at a contract rate that may be in no-way related to the actual sum of transactions being invoiced.
Invoicing the Job
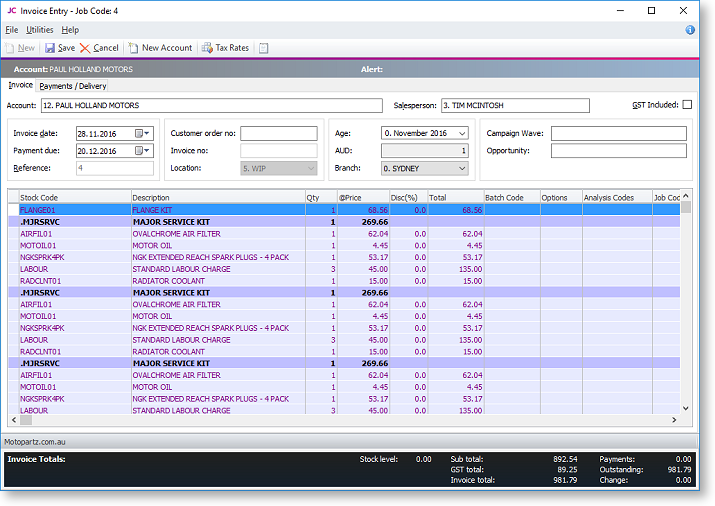
Invoicing the job is the final step. After checking that all entries are correct, click the Invoice Job button in the main toolbar.
Note: The Invoice Job button dropdown includes an option to Check Alerts, which displays a window detailing any problems that will prevent the job from being invoiced.
The system passes the invoice data to the Invoice Entry window, using the pricing information from the job.
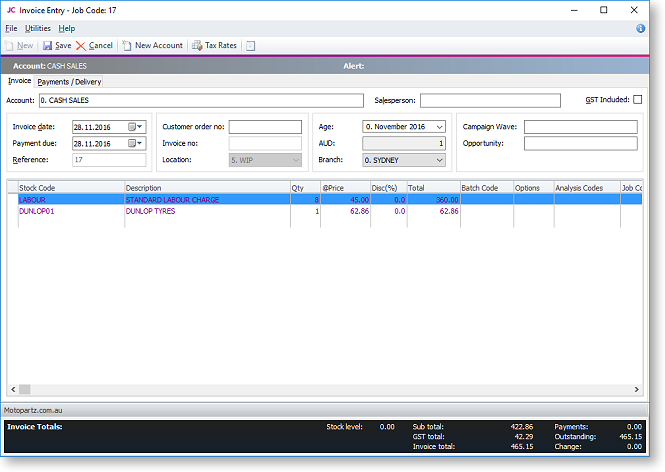
Click Save to save the data, or Cancel to lose all entries made.
Invoicing Sub Jobs from a Master Job
If the selected job is a master job, the Invoice Job button includes an Invoice Job with Sub Jobs option:
-
Clicking Invoice Job generates an invoice for the master job only.
-
Clicking Invoice Job with Sub Jobs generates a single consolidated invoice for the master job and all of its sub jobs.
Note: In order for this menu option to be available, the Allow invoicing of sub jobs from master jobs Company-level profile setting must be enabled.
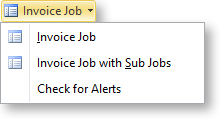
When Invoice Job with Sub Jobs is clicked, a list of all sub jobs is displayed:
Any jobs that cannot be invoiced are highlighted in red. Jobs that have their Invoice via Master Job option unticked are greyed out. When a highlighted job is selected, the reasons why it cannot be invoiced are displayed at the bottom of the window.
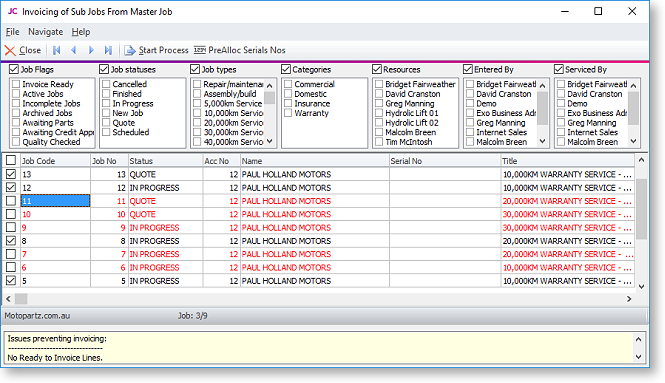
Click Start Process to generate the consolidated invoice. The details of the master job are displayed in the header:
The Job Code column indicates which sub job each line applies to.
Completing and Closing a Job
A job can continue indefinitely and generate any number of invoices. However many people choose to "close" a job after an invoice has been generated and all outstanding lines have been resolved by having been invoiced, converted into an asset, written-off or cancelled as appropriate. There is no COMPLETE status by default. You define one or a number of complete statuses of your own naming. A complete status is one that has the Jobs are complete option ticked.