- Contents
- Index
- Search

Display results with all search words
Grouping Data
Grouping is added to a report so that summary information can be extracted from specific subsets of data. Grouping works for fields where a significant number of records have the same value, e.g. grouping transactions on ACCNO lets you report on all transactions for each account. A field like TRANSDATE would not work well for grouping, since each transaction is likely to have a unique date and time.
Note: You should also sort the report by any field that you are grouping by, e.g. if you are grouping by ACCNO, sort by ACCNO in addition to any other fields you want to sort on. Sorting is set up on the Data tab.
Grouping can be useful for arranging data so that the report is easier to read, e.g. grouping transactions by Debtor instead of showing all transactions in one long list. It can also save you time when you need to send out common documents to many recipients, e.g. Debtor statements - instead of printing the same report many times, changing the recipient each time, you can create one report, group it by recipient and ensure that each group appears on a separate page, which can then be sent out individually. Settings are available to start each group on a new page and restart page numbering for each group - you can even direct the report to create an entirely separate output file for each group (see below).
Note: This is different from the grouping that can be performed in the Query Designer, which is done when using calculated fields (set up on the Calcs tab) to aggregate data in the data source.
You can set up groups on the Design tab by selecting Groups from the Report menu. This opens the Groups window:
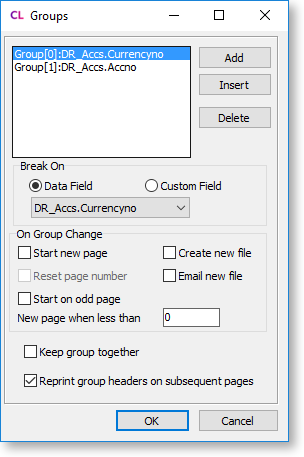
To add a new grouping, click Add. A new group record appears in the area at the top of the window. To set the field that the data will be grouped by, select a field from the dropdown in the Break On section. You can choose to group by a data field from the report's primary data source, or a custom field on the report.
The rest of the settings on the Groups window determine how the report should behave with respect to the selected group - you can have different settings for each group.
|
Name |
Description |
|
Start new page |
If this option is ticked, each group will start on a new page. |
|
Reset page number |
If Start new page is ticked, this option determines whether or not to reset the page number to 1 at the start of each group. |
|
Start on odd page |
If this option is ticked, each group will start on a new page. This is useful for generating duplexed reports. |
|
New page when less than |
This option is available when Start new page is unticked. Set it to a value greater than zero to prevent "orphaned" headers, i.e. headers at the bottom of a page with all their detail lines on the next page. If there is not enough room for the number of detail lines you specify here, the group will be moved to a new page. |
|
Create new file |
If this option is ticked, a separate output file will be created for each group. |
|
Email new file |
If this option is ticked, a separate file will be created and emailed for each group. This allows you to send each group to a separate email recipient. Note: To send emails to different addresses for each group, you will need to add code to the group's OnGetEmailSettings event to set up the Report.EmailSettings object each time a group is emailed. |
|
Keep group together |
This option controls how the component should behave it the group does not fit on one page. If it is disabled, the group is printed to the bottom of the available space, then continues on the next page. If it is enabled, the entire group will be moved to the next page. |
|
Reprint group header on subsequent pages |
If this option is disabled, the group's header will appear once in the report; if it is enabled, the group header will appear at the top of every page. |
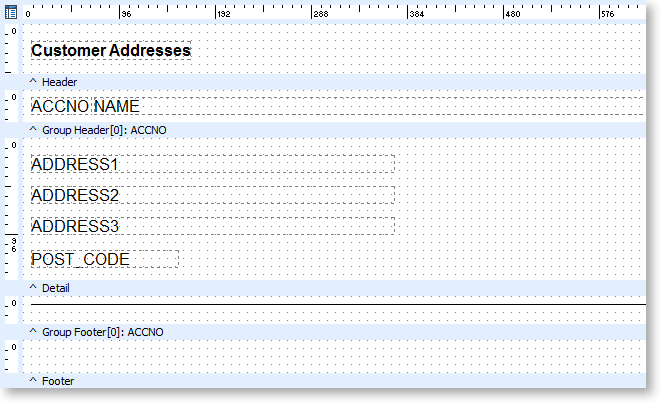
Groups on the Design Tab
When a report contains groups, extra report bands appear on the Design tab. A Group Header band and Group Footer band is added for each group: