- Contents
- Index
- Search

Display results with all search words
Dashboards
Dashboards are customisable displays showing one or more "widgets". Widgets are small, self-contained information panes; in many cases they are summary reports, making the Dashboard an at-a-glance overview of the entire MYOB Exo Business system.
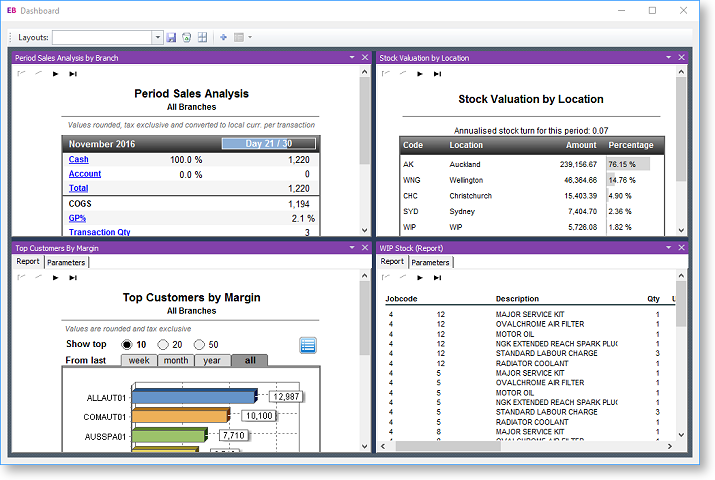
Dashboard widgets can display several kinds of content, including web pages and data from an SQL query, but most commonly they display an Exo Clarity report.
To display a report on a dashboard, create the report in Exo Clarity as normal, then create a dashboard widget to contain it in Exo Business Config.
Creating a Report for a Dashboard Widget
Exo Clarity reports that appear in dashboard widgets are created and set up in the same way as any other report; however, several points specific to dashboard widget should be taken into consideration:
- Dashboard widgets are displayed in a relatively small frame - make sure that the report is not too large; otherwise it will either not fit in the widget pane without scrolling, or will need to be zoomed out to the point that the text becomes hard to read.
- Dashboard widgets generally display summary data - space constraints mean that detailed reports are usually not suitable for a dashboard widget.
- Dashboard widgets are intended to provide information at a glance - large text, use of colour and, depending on the data, use of charts is recommended.
- Report parameters can be set on a separate Parameters tab in the widget. If it is necessary for users to set parameters before the report is displayed, use the /A=Y runtime parameter to make the Parameters tab appear by default when the widget first opens.
The standard dashboard reports supplied with Exo Business should give you some ideas for how to set up your own reports for use in dashboards.
Setting up a Dashboard Widget
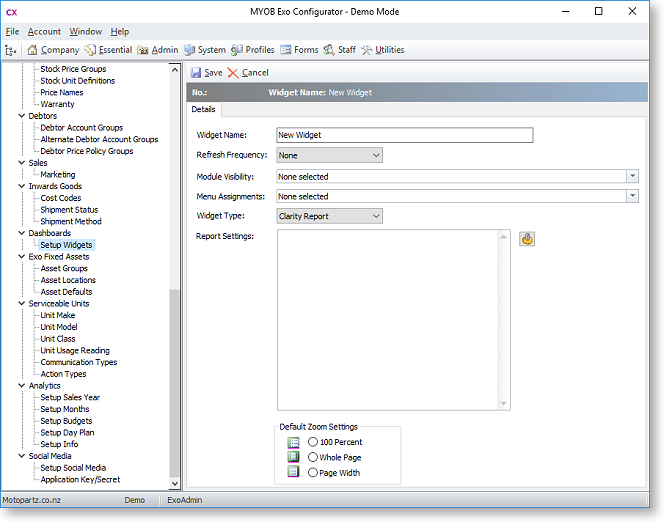
Once a report has been created and saved, you must create the dashboard widget that will contain it, using Exo Business Config. Widgets are set up in the Admin section at Dashboards > Setup Widgets.
This section displays all widgets that currently exist in the system. Click New to create a new widget.
To set up the widget:
-
Enter a name for the widget.
-
Select the Refresh Frequency, which determines how often the data in report is automatically refreshed.
-
Select which Exo Business module(s) this widget should be available for. Choose from:
-
<All>
-
Exo Clarity
-
Exo Job Costing
-
Exo Business Analytics
-
Exo Business CRM
-
Exo Acountant's Assistant
-
-
Widgets are not available to users until they have been added to their dropdown menus. You can add the widget to users' menus automatically by selecting one or more from the Menu Assignments dropdown. Widgets can be manually added to menus later in the Staff > Menus > Dropdown Menu section of Exo Business Config.
-
Select "Clarity Report" for the Widget Type.
Note: Once a widget is saved, its Widget Type cannot be changed.
-
Click the
 button to select the
report file to display. Once a report is selected, this button opens
the Clarity Report Parameters window
- the parameters you select here become the default parameters when
the widget first appears. These defaults appear in the Report
Settings field. You can also edit the Report Settings field
directly to enter any other runtime
parameters that may be required.
button to select the
report file to display. Once a report is selected, this button opens
the Clarity Report Parameters window
- the parameters you select here become the default parameters when
the widget first appears. These defaults appear in the Report
Settings field. You can also edit the Report Settings field
directly to enter any other runtime
parameters that may be required. -
Select Default Zoom Settings, which determine how large the report appears inside its frame.
-
Click Save.
Note: Some errors are suppressed in the dashboard, and it could be irritating to have messages or parameter windows popping up each time the dashboard refreshes - when designing dashboard reports, rather than giving an error if the correct parameters are not supplied it is smarter to use some sensible default values and continue running the report.
The widget can then be added to dashboards from the Exo Business module(s) it is available in.