Printing Reports
Selecting Print Reports from the Reports menu or clicking the Print Reports button on the toolbar or Incident Cycle opens the Select Report window.

This screen shows the list of reports you can print information from, arranged into tabs. This also shows you what each report is used for.
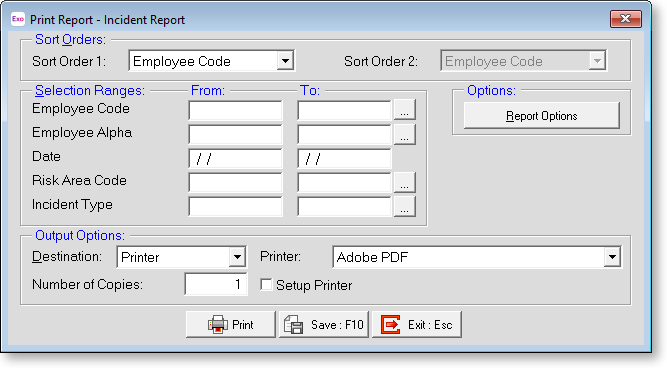
Double-click on the report that you want to print or highlight it and click Select. This opens the Print Report options screen:

Reports can be printed in a variety of ways, depending on the options selected here.
Sort Orders
Sort Order 1 If a choice of primary sort order is available for a particular report, the first choice will be highlighted. The options in the list could include:
- Employee Code
- Employee Alpha
- Risk Area Codes
Sort Order 2 If a secondary sort order is available, the first choice will be highlighted. This means that the Sort Order 2 option will only be available if you have something other than Employee Code or Alpha highlighted in Sort Order 1, e.g. Department. The options in the list could include:
- Employee Code
- Employee Alpha
Selection Ranges
Employee Code/Employee Alpha Enter values here if you want a report for a particular employee or range of employees. These fields validate that you have entered a correct code. To look up a list of employee codes, enter zero here.
Date Enter start and end dates in dd/mm/yyyy format if you want to restrict the report to a particular date range.
Risk Area Code Enter values here if you want a report for a particular risk area or range of risk areas. These fields validate that you have entered a correct code. To look up a list of risk area codes, enter zero here.
Incident Type Enter values here if you want a report for a particular incident type or range of incident types. These fields validate that you have entered a correct code. To look up a list of incident type codes, enter zero here.
Options
If the report has other options specific to that report, these can be accessed by clicking the Report Options button.
Output Options
Destination Select where the report should be directed to. Choose from:
- Printer
- Screen
- File (PDF)
- CSV Output
- Excel Output (XLSX)
Printer This displays the name of the printer that you are printing to. Select the Setup Print option to display printing options before the report is printed; otherwise the report will be sent directly to the printer using the default options.
File Name This displays the name of the file that will be created when "File" or "CSV Output" are selected.
Number of copies The default number of copies is 1. Enter the number of copies you require.
