- Contents
- Index
- Search

Show results that include all search words
Rapid Load Pay
The Rapid Load Pay module is an alternative to batch loading, which allows you to enter employee hours, allowance and leave transactions in one window. All entries can be done using the numeric keypad.
Rapid is also useful for capturing Job Costing information. It is also possible to create batches without having to open a Current Pay first, so that batches can be pre-processed in advance while still being able to make changes to the Standard Pay.
Accessing Rapid Load
Rapid Data Entry must have been activated from the Special Options Setup window in the Payroll Setup before you can access the Rapid Menu.
Once Rapid Load Pay is enabled, the Rapid Load Pay option in the Pay menu becomes available. Selecting this option opens the Rapid Batch Selection window:
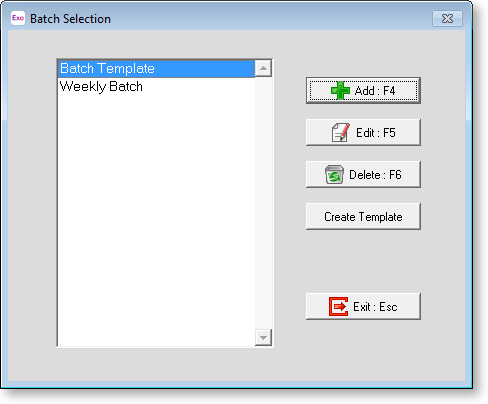
This window displays a list of the current unposted batches along with the Batch Template (which can be used as a Standard Batch much like the Standard Pay is used as the default in Payroll). At this stage you can either create a new batch or access an existing batch.
Adding a Batch
To add a batch, press F4 or click the Add button. You will be presented with the Batch Description window:
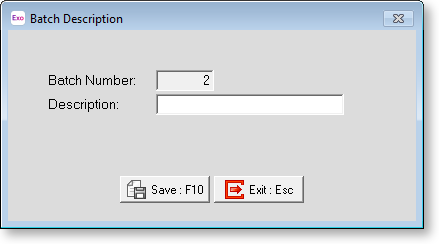
The batch number is automatically created by the system. Enter a name for the Batch, e.g. “Week Ending 01/05/09” or a name that will make it obvious to you what data/transactions the Batch contains. The name entered here is displayed on the Batch Selection window.
The Rapid Data Entry Window
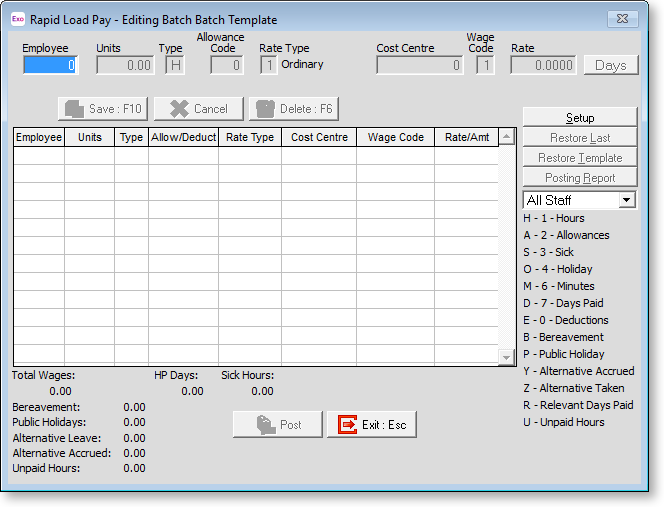
Select a batch on the Batch Selection window and click Edit or press F5. You will be presented with the following window:
Rapid Load Pay Setup
Before you start using the MYOB Rapid Load Pay there are a couple of options you need to consider in the Batch Setup window. Select the Setup button on the right of the window.
This window allows you to change some basic settings that will make the use of the program easier for you.
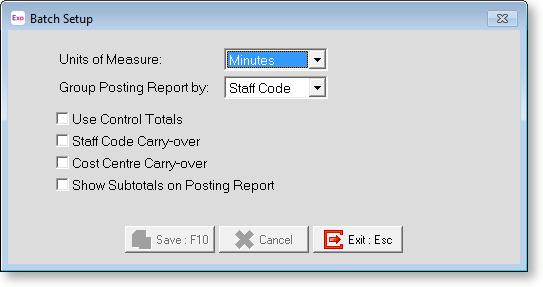
Units of Measure Allows you to set the default unit of measure to Minutes or Hours. The default and most common is Hours.
Group Posting Report by This option allows you to decide the sort order for the Posting Report.
Use Control Totals In some cases it may be appropriate to compare your Batch transaction totals to a “Control Total” i.e. you may want to add the total hours off your timesheets and then compare these to your batch totals. If this is the case select this option with your mouse.
Staff Code Carry-over For those of you who are using Rapid for Timesheet or Job Costing data capture, this option means the Employee Code field in the data entry window will always default to the last Employee code entered.
Cost Centre Carry-Over For those of you who are using Rapid for Timesheet or Job Costing data capture, this option means the Cost Centre Code field in the data entry window will always default to the last Cost Centre code entered.
Show Subtotals on Posting Report This will make the posting report show transaction totals for each employee rather than just a grand total of transactions at the end of the report.
Click Save or press F10 to save your changes and return to the date entry window. You are now ready to start data entry.
Data Entry
The data entry window contains two sections:
- The data entry fields, where all transactions are added
- The data grid, where entered transactions are displayed
Employee Number Enter the employee code of the person you want to start with. If you do not know the employee's code, you can press F9 to bring up a list of employees and then select them from the list.
NOTE: You can only enter transactions for employees whose Rapid employee option is ticked on the Other tab of the Employee Maintenance window.
Units Enter the number of units you want to pay, dependent upon the type selected.
Type The type of transaction that is being entered. Depending on whether you want to use the alpha or numeric section of your keyboard you can use either the number or letter below:
- H or 1 for Hours
- A or 2 for Allowances
- S or 3 for Sick Leave
- O or 4 for Annual Leave
- L or 5 for Lieu Time
- M or 6 for Minutes
- D or 7 for Days Paid
- E or 0 for Deductions
- B for Bereavement Leave
- P for Public Holidays
- Y for Alternative Leave Accrued
- Z for Alternative Leave Taken
- R for Relevant Days Paid (the number of days paid for the purposes of valuing a relevant daily rate)
- U for Unpaid Leave
Allowance Code If you are paying an allowance, enter in the corresponding allowance code here. If you do not know the Allowance code, you can press F9 to pop up a lookup list of Allowances and then select them from the list.
Rate This is the pay rate indicator that will be used i.e. 1 =ordinary, 2= time and a half etc. This is based on the Rate Types set up on the Payroll Setup Page 2 window.
Type Displays the name of the pay rate type being used.
Cost Centre Allows you to enter a cost centre code against the payment, leave as zero to use the employees default cost centre. If you do not know the Cost Centre code, you can press F9 to pop up a lookup list of Cost Centre and then select them from the list. This field would be used for the Job Numbers if you are doing Job Costing.
Wage Code Enter a code here for the Hourly Rate required if you are using multiple hourly rates.
Rate Allows you to enter an alternate pay rate for this transaction or leave as zero to use the employees default rate.
To move between fields you can use the enter or the tab key. You do not need to move through all fields if you are not changing them i.e. you can just enter an Employee Code and some Hours if that is all that is needed.
NOTE: All fields are validated, i.e. you can only enter a valid Employee Code, Allowance, Cost Centre etc. If you want to see a list of any of these codes, press F9 at any time.
As you key and save transactions you will see them build in a list in the data grid section of the window.
Editing Transactions
Once an item has been entered in the Transaction fields it can still be edited in the Data Grid section of the window. To do this, simply click on the line and tab to the field you want to change. You can then arrow to the line you want to edit.
The Batch Template and Restore Template Button
If your staff are generally fairly static in the number of hours, allowances etc that they receive, you are able to set up a Template Batch, which is similar to the Standard Pay in payroll. This can then be used to create the basic data for your other batches.
This option provides you with a way of quickly creating batches where you only have a few small changes to make each pay period. Edit the Batch Template and enter any "standard" transactions i.e. 40 hours etc for each employee.
When it comes time to create a new batch you are able to copy your Template into the new batch by selecting the Restore Template button at the right of the data entry window.
Restore Last
In some circumstances it may be necessary to restor the last posted batch i.e. the posting file is corrupted in some way. This option restores the last set of posted data; if for example it was posted before some information was entered it could be brought back, changed and then posted to the payroll again.
NOTE: Selecting this option after having entered data into a batch will result in the loss of that data.
Posting Report
Sends a report to the printer, which shows all the details of what will be posted to the payroll system.
Staff Selection list
This option lets you determine how staff are displayed in the browse window. Choose from:
- All staff - Shows all staff to be posted
- Specific staff - Shows only the employee being worked on
Post Select this to save the details for the employee you are entering. You can also save a transaction by pressing F10 key or the + (plus) key.