
Routes: To Create Routes
In MYOB Acumatica, a route contains common settings for multiple route executions performed by your company. These settings include the starting and ending locations of the route, the schedule when it can be performed, and the employees (drivers) who can be assigned to execute the route. Each route execution is tied to a particular day, a particular driver, a specific vehicle, and particular appointments and services. The route, conversely, is a template with only the settings that will be common to all executions of a route.
Story
Suppose that the SweetLife Service and Equipment Sales Center plans to provide services on two routes, each of which has its own schedule. Acting as an administrative user, you will create two routes. The first route (ROUTE) can be executed on any working day by either of two drivers in your company. The second route (TU-ROUTE) can be executed only on Tuesdays, starting no earlier than 01:00 PM.
Process Overview
On the Routes (FS203700) form, you will create two routes with distinct settings.
System Preparation
Before you start creating routes, do the following:
- On the MYOB Acumatica website, sign in to a company with the U100 dataset preloaded as a system administrator by using the gibbs username and the 123 password.
- On the Company and Branch Selection menu on the top pane of the MYOB Acumatica screen, select the SWEETEQUIP - Service and Equipment Sales Center branch.
Step: Creating Two Routes
Perform the following instructions:
- On the Company and Branch Selection menu on the top pane of the MYOB Acumatica screen, ensure that the SWEETEQUIP - Service and Equipment Sales Center branch is selected.
- On the Routes (FS203700) form, create a
new route and specify the following settings:
- Route ID: R-ROUTE
- Description: Regular route
- Under Start Location, in the Branch Location box, select WEST BRIGHTON.
- Under End Location, in the Branch Location box, select WEST BRIGHTON.
- On the Execution tab, select the Monday, Tuesday, Wednesday, Thursday, and Friday check boxes, and leave the other check boxes cleared, as shown in the following screenshot.
- In the Start Time column for all the selected days of the
week, select 9:00 AM, which is also shown in the following
screenshot.
Figure 1. Creation of the route 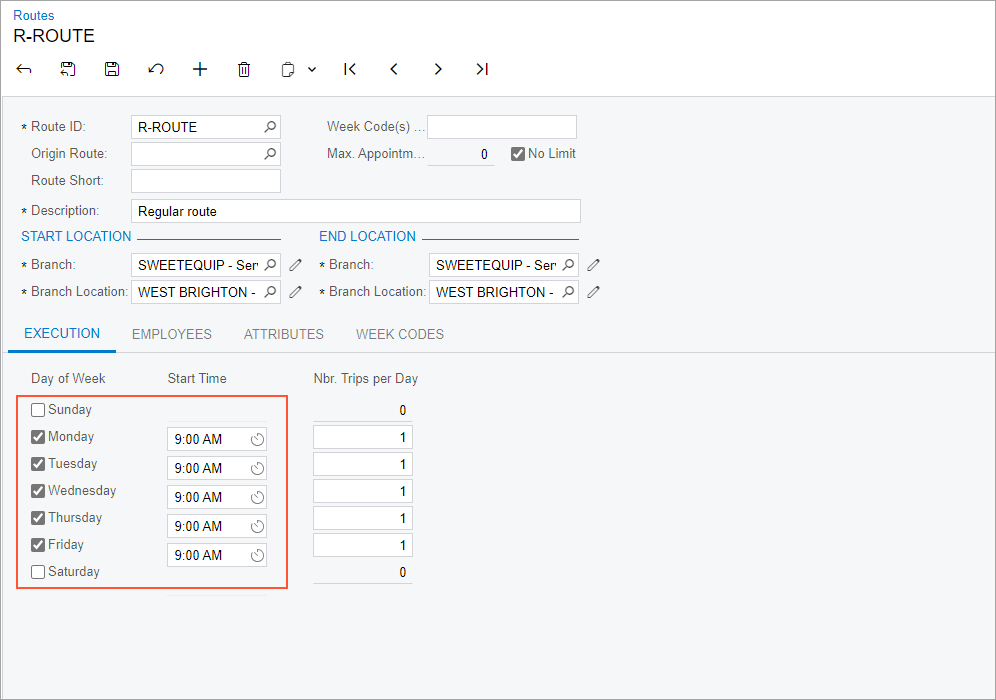
- On the Employees tab, add two rows with the following
employees selected in the Employee ID column:
- EP00000005 (Peter Lai)
- EP00000045 (Luke Cole)
Notice that only the staff members with the Driver skill can be selected on this tab. Also notice that the priority of each of the employees is 1.
- In the Priority Preference column, change the priority of Luke Cole to 2.
- Save your changes.
- On the form toolbar, click Add New Record and specify the
following settings for the second route:
- Route ID: TU-ROUTE
- Description: Tuesday route
- Under Start Location, in the Branch Location box, select WEST BRIGHTON.
- Under End Location, in the Branch Location box, select WEST BRIGHTON.
- On the Execution tab, select the Tuesday check box and leave the other check boxes cleared.
- In the Start Time box of the selected day of week, select 1:00 PM.
- On the Employees tab, add two rows with the following
settings in the Employee ID column:
- EP00000005 (Peter Lai)
- EP00000045 (Luke Cole)
- Save your changes.
You have created two routes in the system. Now you can create route executions and select these routes, and the system will fill in the appropriate settings.