Data Sorting and Grouping: To Specify Sorting Conditions
In the following activity, you will specify the sort order for the data in a report.
Story
Suppose that you are a technical specialist in your company who is working on customizations. An accountant of your company has requested a report that displays the AP batch register. You have offered the predefined AP Batch Register Detailed (AP621000) report, but the sales manager has requested that the data be sorted by batch number in descending order and by debit amount in ascending order.
Process Overview
In the Report Designer, you will open the AP6210C1.RPX report, which is a copy of the AR Batch Register Detailed (AP621000) report. Then you will find the sections of
the data for sorting. You will add the sorting condition for the data in the
detailSection1 section and change the sort order in the
existing group1 group. In the Schema Builder, on the
Sorting and Grouping tab, you will review the changes
that you have made on the Properties tab of the Properties
pane.
System Preparation
Before you perform the steps of this activity, make sure that the following tasks have been performed:
- You have installed the MYOB Acumatica Report Designer, as described in Report Designer: To Install the MYOB Acumatica Report Designer.
- You have installed an MYOB Acumatica instance with the U100 dataset, or a system administrator has performed this task for you.
- You have signed in to MYOB Acumatica as the system administrator by using the gibbs username and the
123 password.Tip:The gibbs user is assigned the Administrator role and the Report Designer role. Thus, this user has sufficient access rights to manage system configuration and to preview, save, and publish reports.
Also, to prepare for use the file that is intended for this activity, do the following:
- Download the AP6210C1.rpx file.
- Open the downloaded file in the Report Designer.
- On the Report Designer menu bar, select , which opens the Save Report on Server dialog box.
- In the dialog box, specify the connection string and sign-in credentials of your
MYOB Acumatica instance, type AP6210C1 as the report name, and click
OK.
The report is saved on the server.
Step 1 (Optional): Looking for the Report Sections of the Data for Sorting
This step is not required if you understand in which sections the data for sorting is located.
To find the sections in which the needed data—that is, the batch number and stock item description—is placed, do the following:
- In the Report Designer, make sure that the AP6210C1 report (which you have saved to the server) is open.
- Select
groupHeaderSection1 (Header of group1), and in the property, select the light green color. - Repeat the action described in the previous instruction and select the light
yellow color for
detailSection1.Tip:For each section, you can use any color that you prefer. The only requirement is that the color for each section must be different. - In the Report Designer window toolbar, select Save.
The report is saved on the server.
- In MYOB Acumatica, open the S150 AP Batch Register Detailed (AP6210C1) report form by searching
for its identifier.Tip:This report, which you have modified in this activity, has been published in the U100 dataset. That is, it has been added to the Site Map (SM200520) form, and you can access it in MYOB Acumatica.
- On the Report Parameters tab, in the From Period box, select 01-2024, and in the To Period box, select 12-2024. In other boxes, leave the default values.
- On the report form toolbar, click Run Report.
Notice that different sections of the report have different colors. The stock item description has a yellow background because it is located in
detailSection1. The batch number has a green background because it is located ingroup1. Based on this information, you can make a conclusion about the sections in which you need to sort data. You will need to sort data in thegroup1group by batch number (the Batch.BatchNbr field) and in thedetailSection1section by debit amount (GLTran.DebitAmt field).
Step 2: Specifying the Sort Order for the Data Group
To specify the sort order for the group1 data group, do the
following:
- While you are viewing the AP6210C1 report in the Report Designer, in the top left corner of the Design pane, click the
icon.
- In the Properties pane, to the right of the property, click the More button.
- In the Group Collection Editor, which opens with the only
group1group selected in the Members pane, in the right pane (group1 properties), to the right of the property, click the More button. - In the GroupExp Collection Editor, which opens, in the Members pane, select the second member (its property is Batch.BatchNbr). In the property, select Descending.
- Click OK to save your changes and close the GroupExp Collection Editor.
- Click OK to close the Group Collection Editor.
Step 3: Specifying the Sort Order for the Report Data
To specify the sort order for the data in the report, while you are still working with the AP6210C1 report in the Report Designer, do the following:
- In the top left corner of the Design pane, click the
icon to select the report.
- In the Properties pane, to the right of the property, click the More button.
- In the SortExp Collection Editor, which opens, click the Add button to add the new criteria for sorting.
- In the right pane of the SortExp Collection Editor, in the property, select GLTran.DebitAmt. This field will be used to sort the data in the report.
- In the property, make sure that the Ascending option is selected (this is the default value).
- Click OK to save your changes and close the SortExp Collection Editor.
- In the Report Designer window toolbar, click Save.
Step 4: Reviewing the Sorting and Grouping Settings in the Schema Builder
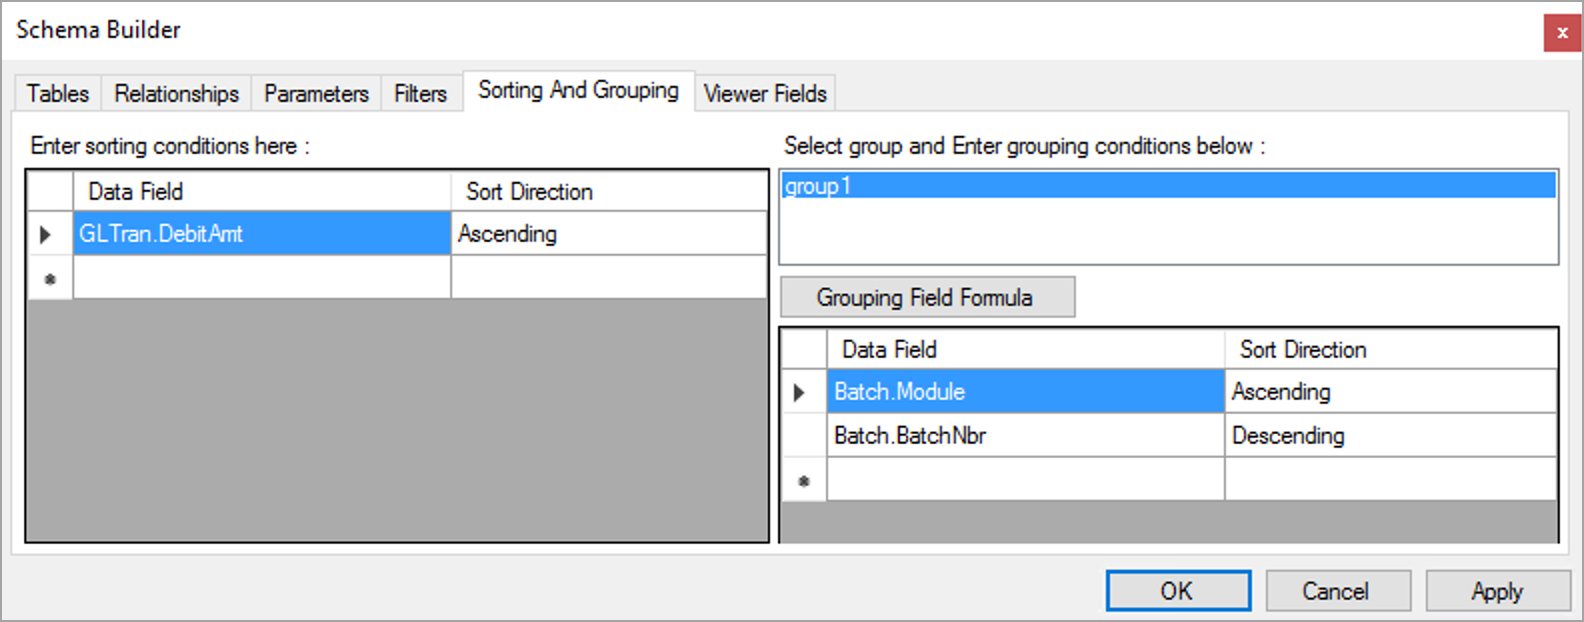
While you are still working with the AP6210C1 report in the Report Designer, click . In the Schema Builder, which opens, open the Sorting And Grouping tab. Make sure that the settings on this tab are the same as those that you have specified in the Properties pane of Report Designer. The settings in the Schema Builder are shown in the following screenshot.

Step 5: Viewing the Report
To view the report, do the following:
- In MYOB Acumatica, open the S150 AP Batch Register Detailed (AP6210C1) report form by searching
for its identifier.Tip:The report that you have modified in this activity has been published in the U100 dataset. That is, it has been added to the Site Map (SM200520) form, and you can access it in MYOB Acumatica.
- On the Report Parameters tab, in the From Period box, select 01-2025, and in the To Period box, select 12-2025. In other boxes, leave the default values.
- On the report form toolbar, click Run Report.
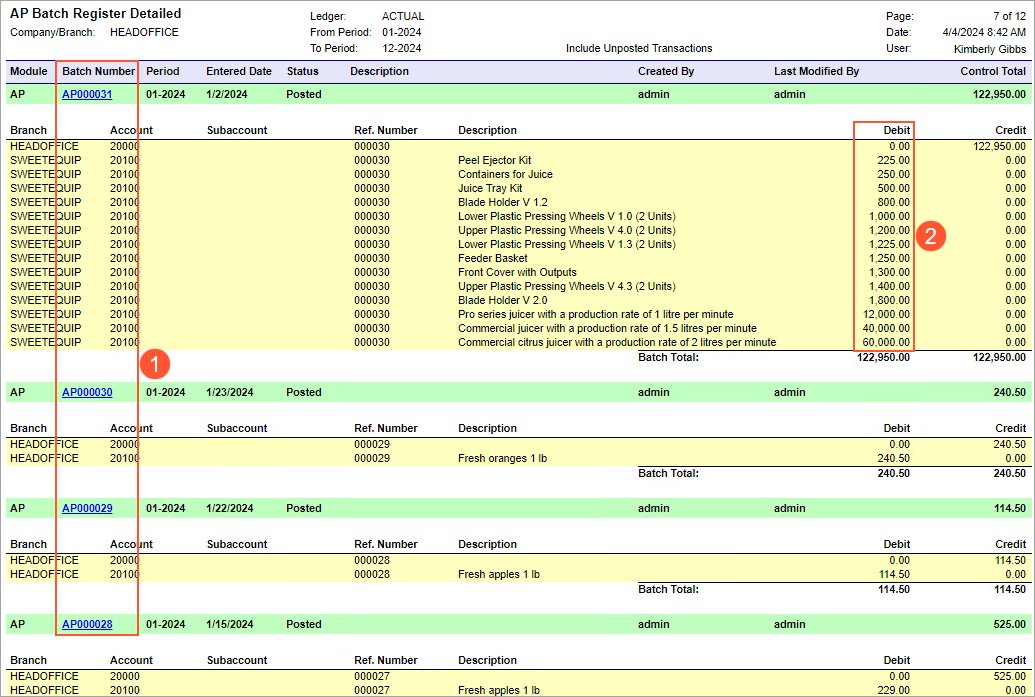
Make sure that the report is sorted by batch number in descending order (see Item 1 in the following screenshot), and by debit amount in each batch in ascending order (Item 2). The following screenshot displays one of the report pages.

