Report Style: To Create and Apply a Style Template
In the following activity, you will learn how to create a style template and apply it to a report.
Story
Suppose that you are a technical specialist in your company who is working on simple customizations. An accountant has asked you to implement the following new company standards for the reports in the Payables workspace:
- Reports must have a light-blue background.
- For report titles, the following font must be used:
- Type: Bold
- Style: Times New Roman
- Size: 12 px
- Color: Blue
- For report parameters, the following font must be used:
- Type: Italic
- Style: Arial
- Size: 10 px
- Color: Black
You have decided to create a style template based on the new standards. Then you can apply this style template to the reports in the Payables workspace.
Process Overview
In the Report Designer, you will create a style template. In a new report, in the property, you will create a collection of styles in line with the accountant's requirements. You will save the new report as TemplateForPayables.rpx. Then you will apply this style template to the AP6325C1.RPX report, which is a copy of the AP Balance by Vendor (AP632500) report.
System Preparation
Before you perform the steps of this activity, make sure that the following tasks have been performed:
- You have installed the MYOB Acumatica Report Designer, as described in Report Designer: To Install the MYOB Acumatica Report Designer.
- You have installed an MYOB Acumatica instance with the U100 dataset, or a system administrator has performed this task for you.
- You have signed in to MYOB Acumatica as the system administrator by using the gibbs username and the
123 password.Tip:The gibbs user is assigned the Administrator role and the Report Designer role. Thus, this user has sufficient access rights to manage system configuration and to preview, save, and publish reports.
Also, to prepare the file that is intended for this activity, do the following:
- Download the AP6325C1.rpx file.
- Open the downloaded file in the Report Designer.
- On the Report Designer menu bar, select , which opens the Save Report on Server dialog box.
- In the dialog box, specify the connection string and sign-in credentials of your
MYOB Acumatica instance, type AP6325C1 as the report name, and click
OK.
The report is saved on the server.
Step 1: Creating a Style Template
To create a style template, do the following:
- In the Report Designer, click to create a file.
- In the Properties pane, to the right of the property, click the More button.
- In the StyleRule Collection Editor, which opens, click
Add.
A new member,
PX.Reports.Drawing.StyleRule, is added to the Members pane. - In the right pane, specify the properties of the new added member as follows:
- Name: Type ReportTitle.
- Style: Click the More button to open the Style
Builder, click Text on the left, and specify the
following settings:
- Name: Times New Roman
- Size: 12 px
- Color: Blue
- Bold: Selected
Click OK to close the Style Builder.
- By repeating the actions of Instructions 3 and 4, add two more members in the
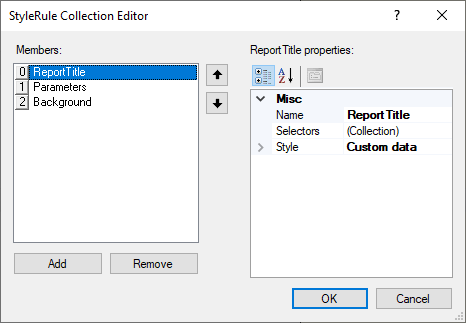
StyleRule Collection Editor (see the screenshot below).
For the member named
Parameters, in the Style Builder, click Text on the left, and specify the following style settings:- Name: Arial
- Size: 10 px
- Color: Black
- Italic: Selected
For the member named
Background, in the Style Builder, click Background on the left, and type #EAF4F4 in the Color box.Figure 1. The list of styles specified in the StyleRule Collection Editor 
- Click OK to close the StyleRule Collection Editor.
- Click to save the new style template on the server.
- In the Save Report on Server dialog box, which opens,
specify the connection string and sign-in credentials of your MYOB Acumatica instance, enter TemplateForPayables.rpx name as the
report name, and click OK.
The report is saved on the server.
Step 2: Applying the Style Template to the Report
To apply the customized template to the AP6325C1 report, do the following:
- In the Report Designer, open the AP6325C1 report. (You have saved this report to the server earlier.)
- In the top left corner of the Design pane, click the
icon to select the report.
- On the Properties tab of the Properties pane, in the property, type TemplateForPayables.rpx.
- Click the text box with the report title (in the upper left of the report), and in the property of the Properties pane, select ReportTitle, which is the name of the style that you have defined in the TemplateForPayables template.
- Select two text boxes below the box with the report title
(Company/Branch: and =[@OrgBAccountID]) and three text boxes
to the right of the report title (=Report.ExtToUI('Batch.FinPeriodID',
@PeriodID), =[@VendorID], Include Applications), and in
the property of the Properties tab, select
Parameters. This is the name of the style that you have defined in
the TemplateForPayables template.Tip:To select multiple text boxes, you first click one text box; you then press and hold the Ctrl key and click the rest of the text boxes.
- In the top left corner of the Design pane of Report Designer, click the
icon to select the report. On the Properties tab of the Properties pane, in the property, select Background, the name of the style that you have defined in the TemplateForPayables style template.
- On the Report Designer window toolbar, click Save.
Step 3: Viewing the Report
To view the report, do the following:
- In MYOB Acumatica, open the S150 Balance by Vendor (AP6325C1) report form by searching for its
identifier.Tip:This report, which you have modified in this activity, has been published in the U100 dataset. That is, it has been added to the Site Map (SM200520) form, and you can access it in MYOB Acumatica.
- In the Financial Period box of the Report Parameters tab, leave the default value or select 12-2024.
- Click Run Report.
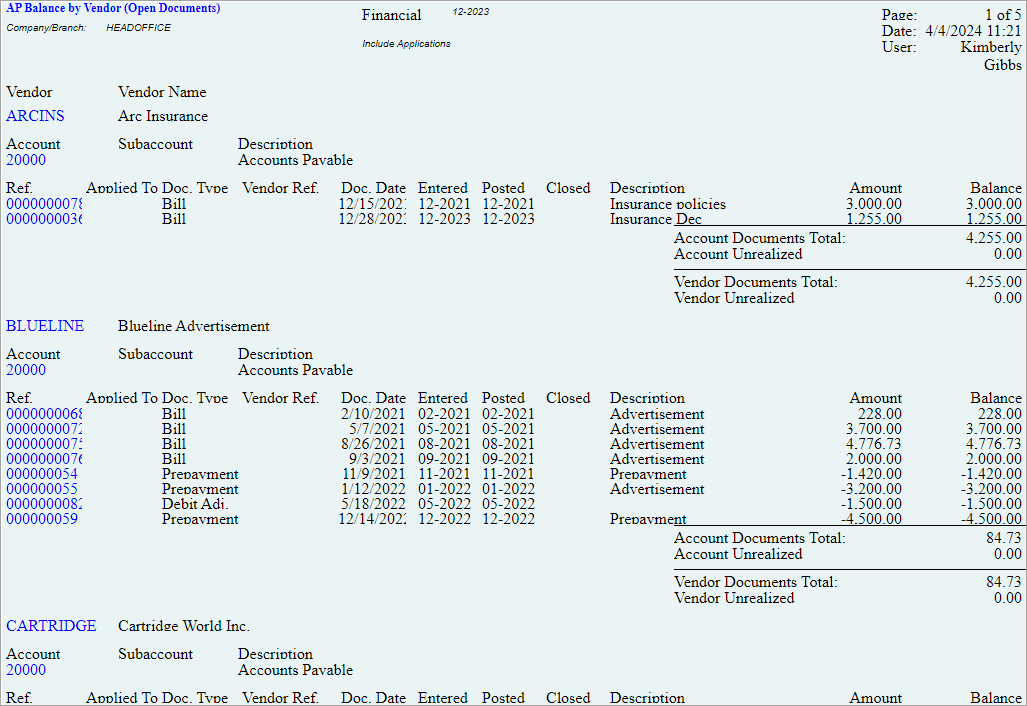
Make sure that the report has a light-blue background, the title has the Times New Roman blue bold font (with a size of 12 pixels), and the report parameters have the Arial black italic font (with a size of 10 pixels). Notice that elements in the report may overlap because you have not selected styles from the applied style template for all elements of the report. The following screenshot shows the report with the applied TemplateForPayables style template.

