Report Content: To Add QR Codes to a Report
In the following activity, you will learn how to add QR codes to reports.
Story
Suppose that you are a technical specialist in your company who is working on simple customizations. A sales manager has requested a report that displays the details of a particular invoice or memo, including the QR codes of the included items. You have decided to use the predefined Invoice/Memo (AR641000) report as a base and modify it by adding the QR code of each item.
Process Overview
In the Report Designer, you will open the AR6410C2.RPX report, which is a copy of the Invoice/Memo (AR641000) report, and add the PictureBox element to the report layout. You will specify the properties of this element to display a QR code for each item in the report.
System Preparation
Before you perform the steps of this activity, make sure that the following tasks have been performed:
- You have installed the MYOB Acumatica Report Designer, as described in Report Designer: To Install the MYOB Acumatica Report Designer.
- You have installed an MYOB Acumatica instance with the U100 dataset, or a system administrator has performed this task for you.
- You have signed in to MYOB Acumatica as the system administrator by using the gibbs username and the
123 password.Tip:The gibbs user is assigned the Administrator role and the Report Designer role. Thus, this user has sufficient access rights to manage system configuration and to preview, save, and publish reports.
Also, to prepare for use the file that you will need for this activity, do the following:
- Download the AR6410C2.rpx file.
- Open the downloaded file in the Report Designer.
- On the Report Designer menu bar, select , which opens the Save Report on Server dialog box.
- In the dialog box, specify the connection string and sign-in credentials of your
MYOB Acumatica instance, type AR6410C2 as the report name, and click
OK.
The report is saved on the server.
Step 1: Adding the QR Code of Each Item
To add the QR code of each item in the AR6410C2 report, do the following:
- In the Report Designer, make sure that the AR6410C2 report (which you have saved to the server) is open.
- Select the
detailSection1section and specify the 3.5cm value for the property to increase the height of the section. - In the Tools pane, drag the PictureBox element to the left side of the
detailSection1section, below the text boxes. - To show the QR code of the item, while the PictureBox
element is selected, specify the following properties in the
Properties pane:
- : Barcode.
- : QRCode.
This value indicates that the image will be a QR code.
- : ='http://<URL of Your
Instance>/Main?ScreenId=AR301000&InventoryCD='+[ARTran.InventoryID]
For example, can be ='http://my-server.acumatica.com/InstanceName/Main?ScreenId=AR301000&InventoryCD='+[ARTran.InventoryID]. Based on this value, each item will contain the QR code that is linked to the appropriate item. Notice that the link contains the application URL explicitly.
- : 64.
The default CodeSize of any QR code image is 50. If the length of the string you have specified as the Value is too long, the QR code will disappear from the image preview on the report layout. If the user runs this report, the QR code will be invisible too. The larger the string whose value you have specified for the barcode, the larger the CodeSize you should specify to make the image visible.
- : 64px; 64px.
- On the Report Designer window toolbar, click Save.
Step 2: Viewing the Report
To view the report, do the following:
- In MYOB Acumatica, open the S150 Invoice/Memo (AR6410C2) report form by searching for its
identifier.Tip:This report, which you have modified in this activity, has been published in the U100 dataset. That is, it has been added to the Site Map (SM200520) form, and you can access it in MYOB Acumatica.
- On the Report Parameters tab, in the Document Type box, make sure Invoice (the default value) is selected.
- In the Reference Number box, select 000058.
- On the report form toolbar, click Run Report.
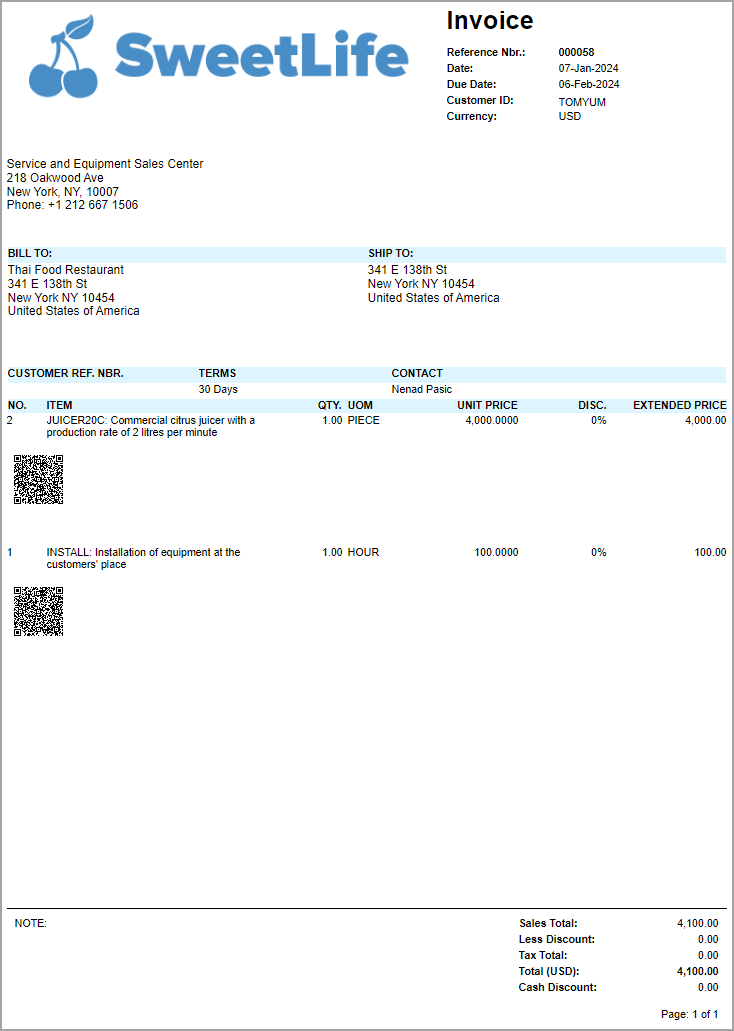
Make sure that QR code is displayed for each item in the invoice, as shown in the following screenshot.

