
Report Creation: Modification of an Existing Report
In the MYOB Acumatica Report Designer, you can create a report by copying an existing report and modifying this copy. You can also create versions of an existing report and customize the versions.
Predefined, Custom, and Customized Reports in MYOB Acumatica
MYOB Acumatica provides a number of predefined reports for each area of the system's functionality. By using the MYOB Acumatica Report Designer, you can expand the set of reports that meet your company's needs by creating custom (new) reports and by customizing copies of existing ones.
In the MYOB Acumatica interface, you can view reports published in the system. In most workspaces, predefined reports are listed in the Reports category. You can add reports that you develop with the Report Designer to this category of any workspace.
Storing of Reports
Reports in the MYOB Acumatica Report Designer are XML files with the .rpx extension.
Predefined reports are stored on the MYOB Acumatica server. You can store reports that you develop by using the Report Designer either locally or on the MYOB Acumatica server.
We recommend that you save your reports in one of the following locations:
- The server
- The /Site/ReportsDefault/ folder
When you open a report in the Report Designer, the application searches for the report in these locations in the listed order.
The Report Designer saves all reports in the UserReports table of the MYOB Acumatica database.
Copy of a Report
To copy a report, you open this report in the Report Designer by using the sign-in credentials of a user who has the Report Designer role, and you save a copy of the report with the name different from the name of the original report.
To save a new report, you can use the following commands on the Report Designer menu bar:
- : You use this command if you want to save your report to the MYOB Acumatica server.
In the Save Report on Server dialog box, which opens, you specify the following:
- The connection settings to the server—that is, the connection string and the
sign-in credentials.
You specify the connection string (see Item 1 in the screenshot below) in the following format: http://<URL>, where <URL> is the URL of your MYOB Acumatica server. You can use the http or https protocol, depending the settings of your website.
When you enter your credentials, if your application contains more than one tenant, you type the tenant name with the username (Item 2 in the screenshot below) in the following format: <username>@<tenant name>. The tenant name matches the name you use when you sign in to MYOB Acumatica. If your application contains only one tenant, you specify only the username.
- The name of the report (Item 3 in the screenshot below)—which is an identifier
with the <AANNNNNN> format, where A is a letter and N is a
digit. For information on the identifier conventions of MYOB Acumatica reports, see Form and Report Numbering.
Tip:To avoid conflicts with new reports that the MYOB Acumatica engineering team could produce in the future, we recommend that you use different report identifiers than those described in Form and Report Numbering.
Figure 1. The Save Report on Server dialog box 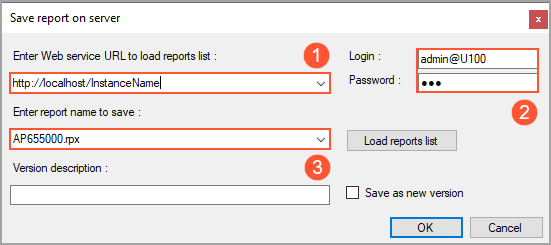
- The connection settings to the server—that is, the connection string and the
sign-in credentials.
- : You use this command if you want to save your report locally.Tip:You can also save the report locally by clicking the Save Report As button on the Report Designer window toolbar.
After you have used any of these commands, the next time you want to save the report (to the same location), you can use the command. For example, if you have saved a report to the server by using the command and then modified this report, you can use to save this report to the server again.
After you have saved your report locally or to the server of an instance, you can use this report for any tenant of this instance.
Report Versions
You can save your report to an MYOB Acumatica server as a new version by selecting the Save as New Version check box in the Save Report on Server dialog box; the version you are saving is activated automatically. When a user runs this report, the active version of the report is executed.
You can manage the active version of a report only in the MYOB Acumatica interface. When a report form is opened, you activate the necessary version on the Report Versions tab by selecting the Active check box in the row with this version. Alternatively, you can activate the selected version by clicking Activate on the table toolbar.
If you want to modify a specific report version, you need to open the report form in MYOB Acumatica and select the row with the necessary version on the Report Versions tab. Then you start the Report Designer by clicking the Edit Report button on the report form toolbar.