
Record Entry: To Create a New Record by Using a Lookup Table
The following activity will walk you through the process of creating a new contact by using a lookup table.
Story
Suppose that you are David Chubb, a sales manager at the SweetLife Fruits & Jams company. You’ve received a phone call from your customer, Blue Cafe. Chris Rea, the manager at Blue Cafe, said that two out of six juicers they purchased some time ago have broken. Instead of repairing the juicers, they plan to buy two new ones. You’ve agreed to offer a 10% discount on new juicers. Chris also mentioned that Blue Cafe’s new technology manager, Alex Carter, will be the primary contact for this process.
Acting as David Chubb, you need to create a case, add a contact record for Alex Carter, and create a new sales order for two juicers with the discount.
Configuration Overview
In the U100 dataset, for the purposes of this activity, the following tasks have been performed:
- On the Enable/Disable Features (CS100000) form, the following features
have been enabled:
- Customer Management: This feature provides the customer relationship management (CRM) functionality.
- Case Management in the Customer Management group of features: This feature gives customer support personnel the ability to create support cases, assign cases to owners, and process cases.
- On the Case Classes (CR206000) form, the SUPPORT case class, which defines cases related to issues with juicers, has been created.
- On the Business Accounts (CR303000) form, the BLUECAFE business account has been created in the system and extended to be a customer.
Process Overview
In this activity, you’ll create a case on the Cases (CR306000) form and create a new contact by using the Contact lookup table in the Summary area of the Cases form. Then you’ll create a new sales order on the Sales Orders (SO301000) form. You will mistakenly apply a discount of 110% and review the warning message about it.
System Preparation
Before you begin performing the steps of this activity, do the following:
- Launch the MYOB Acumatica website with the U100 dataset preloaded and the Modern UI turned on.
- Sign in to the system as David Chubb by using the following credentials:
- Username: chubb
- Password: 123
- Make sure that on the Company and Branch Selection menu, in the top pane of the MYOB Acumatica screen, the SweetLife Head Office and Wholesale Center branch is selected.
Step 1: Creating a Case
To create a case for the request submitted by Chris Rea from Blue Cafe, do the following:
- On the Cases (CR306000) form, add a new record.
- In the Summary area, do the following:
- In the Case Class box, select SUPPORT.
- In the Business Account box, select BLUECAFE.
- In the Contact box, notice that Chris Rea
is automatically selected. Chris is defined as the primary contact of
Blue Cafe.
You will create a new contact for this customer on the next step.
- In the Subject box, type Return of two juicers.
- In the Severity box, select Medium.
- In the Priority box, select Medium.
- On the Details tab, in the text area, type Need to pick up two juicers from Blue Cafe.
- On the form toolbar, click Save.
Step 2: Creating a Contact from the Case
To create a new contact from the case, do the following:
- While you are still on the Cases (CR306000) form viewing the case created in Step 1, click the magnifier button in the Contact box.
- In the Select Contact lookup table, which opens, click
the
Plus
button on the table toolbar to create a new contact.
The system opens the Contacts (CR302000) form in a pop-up window.
- On the General tab, do the following:
- In the First Name box, type Alex
- In the Last Name box, type Carter
- Notice that in the Account Name box, the system selects Blue Cafe; this value is read-only.
- In the Job Title box, type Technical manager.
- In the Email box, type a.carter@bluecafe.com
- On the form toolbar, click Save.
- Close the pop-up window.
- In the Contact box of the Cases form, click the magnifier button.
- In the Select Contact dialog box, select Alex Carter.
- On the form toolbar, click Save.
You have created a new contact for the customer on the fly while working on the case. You can add more information to the new contact by clicking the Alex Carter link in the Contact box. The system will open the Contacts form in a pop-up window.
Step 3: Creating a Sales Order with a Discount Exceeding the Purchase Cost
To create a sales order and apply a discount that exceeds the total cost of the purchase (to review the warning), do the following:
- On the Sales Orders (SO301000) form, add a new record.
- In the Summary area, do the following:
- In the Customer box, select BLUECAFE
- In the Contact box, select Alex Carter
- In the Description box, type Two juicers with a 10% discount
- On the Details tab, add a row and specify the following
settings:
- In the Inventory ID column, select JUICER20C
- In the Warehouse column, select EQUIPHOUSE
- In the Quantity column, type 2
- In the Discount Amount column, enter
10000
Suppose that you did this by mistake instead of entering 10 in the Discount Percent column.
- On the form toolbar, click Save.
The system indicates a row with an issue by displaying a vertical yellow bar at the beginning of the row. Also, warning icons are shown next to the Discount Amount column and the name of the Details tab. The color of the tab has also changed to yellow. If you hover over any of the warning icons, a warning message will appear (see below).
Figure 1. The warning message on the row 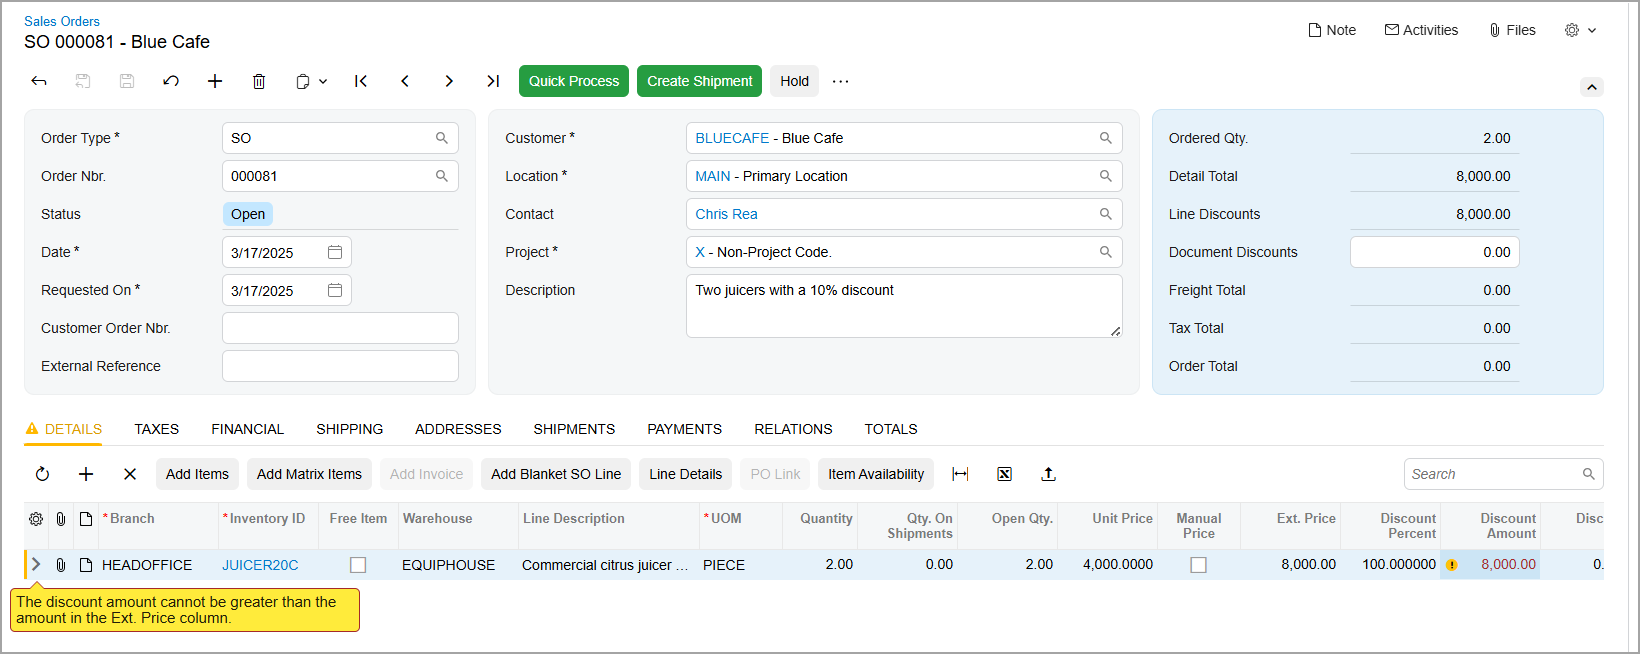
Tip:If an error occurs, the error icons and the vertical bar at the beginning of the row will be red. - In the Discount Amount column, delete the mistaken value.
- In the Discount Percent column, type 10.
- On the form toolbar, click Save.
The warning icons disappear.